Of course there were lessons to be learnt along the way, such as manhandling a 1.2m x .8m x 25mm sheet of MDF by one’s self and running it through a relatively small table saw is not without challenges.
Below is a picture of my very messy temporary workshop!
Hi, your project looks great.

The next time you should pre-cut the pieces with a hand held circular saw, leaving them slightly over sized then do the final accurate cuts on the tablesaw. This allows you to fully support the big sheet and makes the part that will go through the tablesaw more manageable (and safer).
Even those of us with large, fully equipped shops follow this method.
Thanks for the tip John, though my only concern with doing that is ensuring that the pieces are square. Perhaps I need to invest in a better circular saw!
Love the avitar by the way! Its a bit like, why would you want to go to heaven when all the cool people will be in hell? 🙂
Love the avitar by the way! Its a bit like, why would you want to go to heaven when all the cool people will be in hell? 🙂
Some accurate layout and a sawboard:

Go a long way.
To greatly improve even the cheapest circular saws, use a good sharp blade. I use mainly Freud blades and they are excellent and not too costly.
Go a long way.
To greatly improve even the cheapest circular saws, use a good sharp blade. I use mainly Freud blades and they are excellent and not too costly.
The only other issue I have with my circular saw, which is why I relied on the table saw more was because it has a thin pressed steel base, which doesn't ever want to be flat. Thus getting the blade perpendicular to the base is a pain in the a$$, still at least if the board are square then both sides could be run through the table saw to tidy up the edges.
I have been enjoying listening to lots of cds whilst waiting for the gubbins to finish off the insides of the speakers arrived, which has been very encouraging. Unfortunately when all the stuff arrived, what I realised is that in my tiredness I only ordered one port! 😱 Oops! So I am now waiting for the second one to arrive.
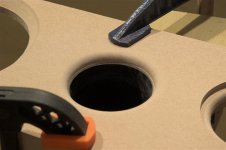
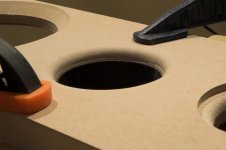
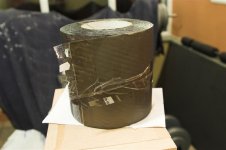
Thankfully in the meantime I have had a chance to have a practice at fitting the port. My plan is to sink it about 15mm into the back panel and then use the router to flare the wood on the outside, such that it blends nicely into the back panel. My attempts are shown below, not too bad, but need to tighten up the tollerance on the actual hole size to match the port.
Thankfully in the meantime I have had a chance to have a practice at fitting the port. My plan is to sink it about 15mm into the back panel and then use the router to flare the wood on the outside, such that it blends nicely into the back panel. My attempts are shown below, not too bad, but need to tighten up the tollerance on the actual hole size to match the port.
Attachments
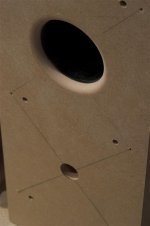
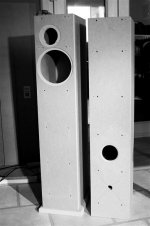
The other thing that I have been looking at is the plinth that they will sit on, I was having trouble deciding whether to go with just a 25mm plith or thinken it up with an extra 18mm board. However, having now tried a mock up the 25mm I think looks about spot on.
The other photos are of the fillings and damping materials.
The other photos are of the fillings and damping materials.
Attachments
Lastly I need to decide what to wire these up with. I am looking into a couple of options, one is cheapish, the other... not so cheap! The first is to buy some Van Damme 4x4.0mm Touring Grade speaker cable (approx £4/m), the second is Chord Rumor 4 (approx £20/m). I think I may go with the former and leave myself the opportunity to upgrade at a later date. Internally (in the speakers), the only challenge i foresee is making all the connections neatly with such large cable.
Your cabs are looking great!
That plinth is a good proportion, looks right to me.
Cable, you probably don`t want to hear my opinion on that so I`ll say no more...🙂
Excellent work
That plinth is a good proportion, looks right to me.
Cable, you probably don`t want to hear my opinion on that so I`ll say no more...🙂
Excellent work
Ahh, I take it you'll not be convinced that cables make much of a difference? 🙄
Thanks for the comments, I'm glad you think the plinth looks about right. I think with rolledover edges on the top the spread should be about right too, but again I'll knock up a quick mock up to see (seeing is believing afterall 😛)
Thanks for the comments, I'm glad you think the plinth looks about right. I think with rolledover edges on the top the spread should be about right too, but again I'll knock up a quick mock up to see (seeing is believing afterall 😛)
...but again I'll knock up a quick mock up to see (seeing is believing afterall 😛)
I recommend getting to know Sketch-up - a great, easy to use visualization tool.
I did this up in less than 5 minutes:

Everything can easily be drawn to the dimensions of the actual box. Very handy.
I like it, will try and get hold of a copy and see what I can do... this could open a whole new can of worms!
Quick update, got the port holes finished tonight and had a quick run around the mock plinth with the router to round the edges off and I think it looks pretty darn good, so that will be how the finished product will be. 🙂
Attachments


In B&W?
Dramatic! 😉
Your workmanship is first rate - you'll have a very appealing pair of speakers. What finish are you thinking of? Veneer or paint?
The port round over looks good. I did a similar thing here:

but used pieces of 2" ABS pipe as the ports. Drilled a hole the exact size, glued them in and after the glue dried, rounded them off.
Thank you again for your kind words, there has been a lot of practice gone on before I make any cuts on the "final" pieces. I had some inspiration ealier today as to how to get the hole to match exactly to the tube, which was to cut the rebate for the port on the inside, then cut a hole from the outside using a hole saw. Then use a trimmer bit in the router to get the exact match. Finally drop the round edge bit in to give the finish.
I like the finish of the ports on yours, they blend in really well. How did you get the front baffle to curve?
My plan for the finish is to paint the plinth and rear in satin black and the front, sides and top will be oak veneer, most probably waxed.
Right must go to bed, this hobby is eating into my beauty sleep!
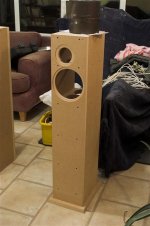
Today has been another good day working away at these speakers, I can't believe how quickly the day passes though! The ports have now been cut to size and fitted, which worked very well.
I have cut, routed and sanded the plinths for the main cabinets, i think the plan will be that these get three spikes each to give them a good footing. They now need to be drilled and painted.
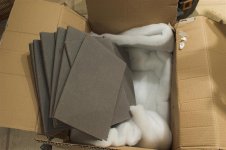
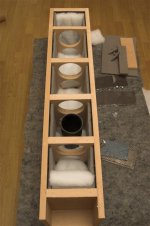
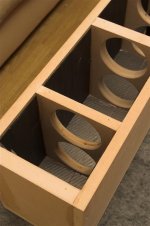
The main cabinets have now been glued, bar the front baffle as I am just getting all the damping and stuffing in, as well as the wiring. Some pictures below illustrate the damping, then the foam, then the stuffing (MDM).
I also recieved today the Van Damme 4x2.5mm^2 touring cable which is going to be used all round, amp to crossover, crossover to cabinets and finally internally in the cabinets. Initially it will be wired with spades so that the drivers and speakon connector are easily removable ready for when I choose and fit the veneer. Also I have a back plate to make up, I have a print that is going to be sandwiched between two pieces of perspex to give it a nice finish with the speakon connector in the middle.
So that's it for now, I am looking forward to getting these up and running again! 😀
I have cut, routed and sanded the plinths for the main cabinets, i think the plan will be that these get three spikes each to give them a good footing. They now need to be drilled and painted.
The main cabinets have now been glued, bar the front baffle as I am just getting all the damping and stuffing in, as well as the wiring. Some pictures below illustrate the damping, then the foam, then the stuffing (MDM).
I also recieved today the Van Damme 4x2.5mm^2 touring cable which is going to be used all round, amp to crossover, crossover to cabinets and finally internally in the cabinets. Initially it will be wired with spades so that the drivers and speakon connector are easily removable ready for when I choose and fit the veneer. Also I have a back plate to make up, I have a print that is going to be sandwiched between two pieces of perspex to give it a nice finish with the speakon connector in the middle.
So that's it for now, I am looking forward to getting these up and running again! 😀
Attachments

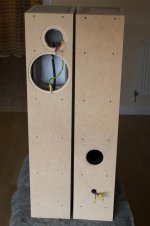
After last night's late finish I thought about having a lie in, but woke up early anyway and decide to fishish off what I had started last night. The last of the bitumin damping and foam sheets went in along with the MDM-3 into both cabinets along with the wiring. The fronts were finally glued and screwed (no going back now). They were then sealed up so that the cabinets could be sanded and whilst the glue was curing I took the time to knock up the various cables that I needed.
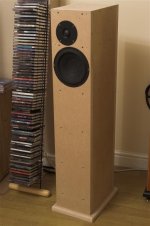
It was then some seriously hard graft getting all the edges nicely matched so that I have a good surface to work from. The plinths were then fitted, followed by the drivers and the who lot was moved back into the living room so that I could try then out.
It was then some seriously hard graft getting all the edges nicely matched so that I have a good surface to work from. The plinths were then fitted, followed by the drivers and the who lot was moved back into the living room so that I could try then out.
Attachments

And with the first cd came a shock... suddenly there was bass! After the first round of listening to an unstuffed and unported cabinet this was much more like my monitor audios in terms of extension and wieght. This put a massive grin on my face and made me a happy boy. 
So now I await the next credit card month to pick up the finishing touches and in the meantime I'll be doing lots of listening and lots of hole filling! 😛
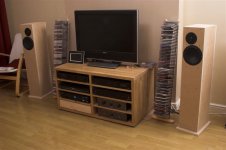
FYI, the crossover is the box in the bottom right hand shelf of the TV unit.
So now I await the next credit card month to pick up the finishing touches and in the meantime I'll be doing lots of listening and lots of hole filling! 😛
FYI, the crossover is the box in the bottom right hand shelf of the TV unit.
Attachments
Excellent progress!
Don't get too comfy with them or (if you are anything like me) you'll never get them finished. It the hardest thing, after you have them hooked up and sounding sweet to lose them to the final finishing for a few days. Be strong! 😉
Don't get too comfy with them or (if you are anything like me) you'll never get them finished. It the hardest thing, after you have them hooked up and sounding sweet to lose them to the final finishing for a few days. Be strong! 😉
Hi John!
Yes, that is the danger! Currently my pre-amp is waiting for me to get around to wiring up the LED on the front, hardly a taxing job but one that seems to be elluding me. I think I may just have a little break to enjoy these since this project seems to have taken over my life for the last couple of weeks to the detriment of the tidiness of my house!
Yes, that is the danger! Currently my pre-amp is waiting for me to get around to wiring up the LED on the front, hardly a taxing job but one that seems to be elluding me. I think I may just have a little break to enjoy these since this project seems to have taken over my life for the last couple of weeks to the detriment of the tidiness of my house!
- Status
- Not open for further replies.
- Home
- Loudspeakers
- Multi-Way
- Amish 45/97 Construction Diary