Does anyone know where I can get aluminum ribbon assemblies for Decca Kelly/London tweeters, as shown in the attached image?
The aluminum ribbon in one of the tweeters has rips on the edges
I've tried to email few people from England and Germany who sell these assemblies on their website, but have not heard from them
Alternatively, please let me know if you have the tools to make these ribbons
Thanks!
The aluminum ribbon in one of the tweeters has rips on the edges
I've tried to email few people from England and Germany who sell these assemblies on their website, but have not heard from them
Alternatively, please let me know if you have the tools to make these ribbons
Thanks!
Attachments

I have had the same problem. Robert Dawson doesn't answer emails, I have tried many times. Shackmann in Germany did answer emails but at that time they where asking about 150 euro's with shipping for two ribbons which imho is totally ridiculous for a plastic frame with a small piece of aluminium foil.
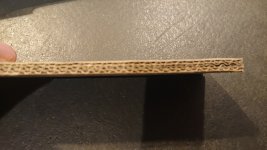
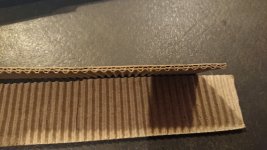
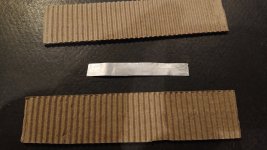
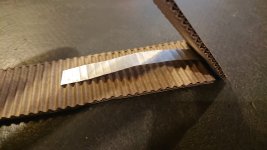
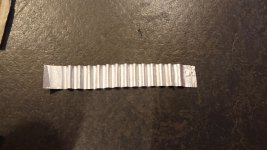
So I started to roll my own. It's quite easy, see pictures.
The final step is to cut the frame into two by drilling the nails that keep them together. All you have to do is align the new ribbon in the frame. First mark where the old ribbon was, remove it and insert the new one. some small pieces of tape will help. I have clamped the frame together with again with tape, it's going to be pressed together by assembling the driver anyway so no need to use nails.
Don't be afraid to try, you have got nothing to lose. I have done this a couple of times with ordinary household alu-foil of the thin kind. It took me 5 to 6 tries and a bit of frustration to get it right, but nowadays I can repair one in five minutes.
I have a pair of Decca London's, one has the original ribbon, one my with own repair. Apart from a 1,5dB difference in efficiency they do sound the same.
The pictures are just for example offcoarse. You can make much prettier ribbons this way by starting with a clean, flat piece of aluminium and some more care than I did in this 30sec example. It took more time to take the pictures then to cut the foil and roll the ribbon.
Attachments

Last edited:
I have had the same problem. Robert Dawson doesn't answer emails, I have tried many times. Shackmann in Germany did answer emails but at that time they where asking about 150 euro's with shipping for two ribbons which imho is totally ridiculous for a plastic frame with a small piece of aluminium foil.
So I started to roll my own. It's quite easy, see pictures.
The final step is to cut the frame into two by drilling the nails that keep them together. All you have to do is align the new ribbon in the frame. First mark where the old ribbon was, remove it and insert the new one. some small pieces of tape will help. I have clamped the frame together with again with tape, it's going to be pressed together by assembling the driver anyway so no need to use nails.
Don't be afraid to try, you have got nothing to lose. I have done this a couple of times with ordinary household alu-foil of the thin kind. It took me 5 to 6 tries and a bit of frustration to get it right, but nowadays I can repair one in five minutes.
I have a pair of Decca London's, one has the original ribbon, one my with own repair. Apart from a 1,5dB difference in efficiency they do sound the same.
Hi Sjef, thank you for the details and the photos.
I will attempt to do my own ribbons
I was mainly worried about attaching the ribbons properly to the terminals.
I will attempt to do my own ribbons
I was mainly worried about attaching the ribbons properly to the terminals.
That's the most delicate part indeed, but you'll figure it out. It's like baking pancakes, the first two always fail. One evening of a little frustration but then you have learned it for the next time(s). Alignment goes best with one half of the frame in the magnet assembly and some wooden or plastic tools.