thompsontechs,
Nice work with the PCBs - looks like you will be finishing the project soon (hopefully)!
What chassis are you going for?
Also, you mentioned that you got a desoldering pump with heat and suction - can you please share the make/model?
I used diystore, up until this one, but I wanted a change for several reasons... I found one I liked the look of..., but it was a bit tight. The goal was always to do a mono version of the build I liked the best. If this isn't it. I shall move my fav to these.
The de-soldering tool works, but it's like a Harbor Freight special, keep and eye on it and for God sake don't leave it plugged in. LINK
I don't see these getting done real soon... 2-3 weeks anyway. The journey is a large part of the experience. I build at a frenetic rate, but I enjoy the process.

JT
Last edited:
I thought the “standard AN 39 watt” design specially called for +/-27 Vdc, and your practical +/-28.5 Vdc was a compromise. No?
Correct. 27v is nominal condition so you don’t have to readjust anything.
.....so I will aim for the design optimal +/- 27 Vdc supply and look into adjusting, if necessary, the LTP bias current. Which resistors would that involve?
Francois,
You can use R112 or R111 to check LTP bias current.
The journey is a large part of the experience.
JT
True for me also.
I'm needing some help with the Mouser Shopping Basket which you linked to in post #1, X.
I "saved it as my own basket" - as instructed - and then Mouser sent me an email giving me a link to access my copy.
I have been going through it, line by line:
* updating the units required to build 4x AN boards
* deleting those parts which are options to the one I have chosen
* deleting parts where I have to substitute different values for the 4R version (so I can add the new parts just before committing the final order),
* and deleting Wima caps as I found another supplier (TAWElectronics.com) who could supply all the required caps.
As you might expect ... this is a long process (I've taken several days, so far! 🙁 ). But I seem to be 'driving' the Mouser software wrongly - hence would appreciate advice from people who are familiar with the Mouser software.
After I've changed some line items, I hit the "Update Basket" button. When I then continue ... I see that, yes, the basket has changed.
But when I come back the next morning to do more work on the basket ... I find that some of the changes I made are not there??? (In spite of having hit "Update Basket" when I finished work the previous evening.)
Do I need to also hit the "save as my own basket" button, at the end of a session?
Thanks,
Andy
Last edited:
I'm needing some help with the Mouser Shopping Basket which you linked to in post #1, X.
I "saved it as my own basket" - as instructed - and then Mouser sent me an email giving me a link to access my copy.
I have been going through it, line by line:
* updating the units required to build 4x AN boards
* deleting those parts which are options to the one I have chosen
* deleting parts where I have to substitute different values for the 4R version (so I can add the new parts just before committing the final order),
* and deleting Wima caps as I found another supplier (TAWElectronics.com) who could supply all the required caps.
As you might expect ... this is a long process (I've taken several days, so far! 🙁 ). But I seem to be 'driving' the Mouser software wrongly - hence would appreciate advice from people who are familiar with the Mouser software.
After I've changed some line items, I hit the "Update Basket" button. When I then continue ... I see that, yes, the basket has changed.
But when I come back the next morning to do more work on the basket ... I find that some of the changes I made are not there??? (In spite of having hit "Update Basket" when I finished work the previous evening.)
Do I need to also hit the "save as my own basket" button, at the end of a session?
Thanks,
Andy
Andy,
Probably safer to save as a new Shopping Cart.
Say for instance, the shopping cart that you are working on is named "ALPHA Nirvana Amp parts 23-01-20 version 1". You make your changes and save a new shopping cart with the name "ALPHA Nirvana Amp parts 23-01-20 version 2". You can keep the old shopping cart or delete it if not needed.
Hope this helps.
Thanks, z. Yes, I did this (save to a new Shopping Cart) - and this seemed to work. So I have worked through more line items - but now no longer have the "Save as my Own Basket" button!! 😕
Also @X - it appears V115 is missing from the original shopping cart list?
EDIT: or is this an alternative to V113 - specified as a KSC3503DS?
Andy
Last edited:
Andy,
Yes, V115 (TTC004B) is an alternative for V113 (KSC350DS) - that is my understanding..
Thanks, z.
Andy
Sorry - a question of PCB component identification, guys. 😱
On the underside of the AN PCB, there are C133 & C134. They are both aligned 'north-south'.
My Qu is: does C134 refer to the SMD cap outline on the left of 'C134' ... or is C134 the cap which is underneath 'C134'?
Thanks,
Andy
On the underside of the AN PCB, there are C133 & C134. They are both aligned 'north-south'.
My Qu is: does C134 refer to the SMD cap outline on the left of 'C134' ... or is C134 the cap which is underneath 'C134'?
Thanks,
Andy
That’s what stuffing guides are for;
https://www.diyaudio.com/forums/att...ss-amplifier-gb-alpha-nirvana_pba-bot_001-pdf
These can be found at bottom of post #1 in GB thread.
https://www.diyaudio.com/forums/att...ss-amplifier-gb-alpha-nirvana_pba-bot_001-pdf
These can be found at bottom of post #1 in GB thread.
Columbo
One more thing... 😛
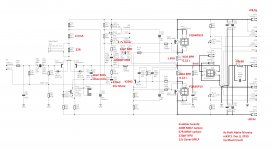
On the snubber boards, you have notes at the bottom of the print of what you used, but the print also has R133 on the gate and then the snubber has R101 which would be another 100R on the gate? We have to populate R101 or there will be no connection to the gate, so do we need both, or do we short the board one. I guess, I'm asking if all the parts on the print for the main are installed and all the parts on the snubber too.
Snubber
R101 = 100R
R102 =47R
C102 = 220pF
V101= 12v Zener
Then I want to confirm the flying lead connections. Thanks for labeling the snubber GDS, that is helpful for us new guys. The connections to the main board are a little harder to figure out. THe stuffing guide and they print have pin 1 located in different positions. That only matter with respect to talking about lead numbers as if I say pin 1 on stuffer or Pin 1 on schematic.
So I will attach a picture in and schematic in a few minutes to make sure we are on the same page.
So ignoring the stuffing guide and looking at the schematic, for N channel we have.
Pin 1 or 2 going to the source
Pin 3 going to the gate
Pin 4 going to the drain
Is that correct?
One more thing... 😛
On the snubber boards, you have notes at the bottom of the print of what you used, but the print also has R133 on the gate and then the snubber has R101 which would be another 100R on the gate? We have to populate R101 or there will be no connection to the gate, so do we need both, or do we short the board one. I guess, I'm asking if all the parts on the print for the main are installed and all the parts on the snubber too.
Snubber
R101 = 100R
R102 =47R
C102 = 220pF
V101= 12v Zener
Then I want to confirm the flying lead connections. Thanks for labeling the snubber GDS, that is helpful for us new guys. The connections to the main board are a little harder to figure out. THe stuffing guide and they print have pin 1 located in different positions. That only matter with respect to talking about lead numbers as if I say pin 1 on stuffer or Pin 1 on schematic.
So I will attach a picture in and schematic in a few minutes to make sure we are on the same page.
So ignoring the stuffing guide and looking at the schematic, for N channel we have.
Pin 1 or 2 going to the source
Pin 3 going to the gate
Pin 4 going to the drain
Is that correct?
Attachments
Last edited:
Pin 4 goes to Source according to the schematic. Source is the pin connected to the arrow on the MOSFET pin diagram. The one without the arrow is the Drain. In general, on an N channel (arrow points into the flat) the Drain goes to +ve rail, on a P channel (arrow points away from the flat) the pin connected to the arrow is the Drain. Despite the schematic, I always check the wiring and traces in the PCB to make sure it’s correct.
If you have the functionality on the snubber it can be bypassed on the main board with a wire jumper.
If you have the functionality on the snubber it can be bypassed on the main board with a wire jumper.
Thanks X that explains it perfectly, my problem was looking at the source as VE. I still have a lot of work to do understanding schematics and parts. I'll get there, I'm a persistent mofo... in the mean time thanks to all that help. I would rather ask than smoke something. Hell, I still may smoke something, but it isn't going to be because I didn't ask the question when in doubt.
I'll be, "one more thing," ya later . 😛
I'll be, "one more thing," ya later . 😛
Last edited:
Okay then if we are looking at the P channel on the schematic. The arrow that connects to pin 4 and is the drain. It looks like Pin 3 goes back and connects to the gate, so that means the source goes to the - rail?
Pins on P channel still the same GDS. Negative rail goes to Drain pins 1 and 2 on connector. Note that connector pins are consistent between N and P channel, just like the GDS pins.
I think my confusion was reading this: "on a P channel (arrow points away from the flat) the pin connected to the arrow is the Drain"
Sorry, my mistake. The pin connected to the arrow is always the Source. On P channel, arrow points towards pin and away from flat line.
Sorry, my mistake. The pin connected to the arrow is always the Source. On P channel, arrow points towards pin and away from flat line.
It's cool brother you are all over the place helping and working too, so not a thing, other than me cussing at my inability to understand lmao. It was like it's this way accept on the first Sunday of the month unless it's leap year and then it's the other way. 😱
Last edited:
- Home
- Amplifiers
- Solid State
- Alpha Nirvana 39w 8ohm Class A Amp