Using DACT Type SMD Stepped Attenuators I am repairing a NAD 3500 volume control. The control has dual concentric stereo stages, the front one is a 20K audio taper with a loudness tap at 5200. The balance is a 50K MN control. The following is what I have done.
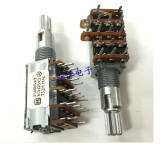
1) I had to make a MN control, so I took a 21 step SMD attenuator and removed the SMD resistors, and soldered in 4.7K SMDs up to the mid points and shorted the remaining contacts. Make sure to do the right sides (these are NOT mirror images for stereo).
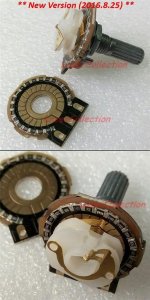
2) The 20K audio taper stepped attenuator is easy to get. I took it apart, and filed the side of the case so the center tap can come out. I used twisted wire-wrap wire to make the tap at the 5.2K step. Strain relief with some super glue.
========
To get the concentric control to work, I need to file the front wiper to accept the outer control shaft. Tolerances are a bit close, but not to hard to do.
The only issue is I don't have detents on the unit, since the concentric shaft is too large for the detent part of the control..
To solder the surface mount parts I used low temp solder paste. I placed the part in a cast iron pan and heated it on an induction stove until the solder reflowed. A little solder paste goes a long way, and the parts will self align if you get them close to being in position.
Fun!!
Let me know if you need more details.
1) I had to make a MN control, so I took a 21 step SMD attenuator and removed the SMD resistors, and soldered in 4.7K SMDs up to the mid points and shorted the remaining contacts. Make sure to do the right sides (these are NOT mirror images for stereo).
2) The 20K audio taper stepped attenuator is easy to get. I took it apart, and filed the side of the case so the center tap can come out. I used twisted wire-wrap wire to make the tap at the 5.2K step. Strain relief with some super glue.
========
To get the concentric control to work, I need to file the front wiper to accept the outer control shaft. Tolerances are a bit close, but not to hard to do.
The only issue is I don't have detents on the unit, since the concentric shaft is too large for the detent part of the control..
To solder the surface mount parts I used low temp solder paste. I placed the part in a cast iron pan and heated it on an induction stove until the solder reflowed. A little solder paste goes a long way, and the parts will self align if you get them close to being in position.
Fun!!
Let me know if you need more details.
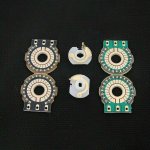
These are great raw material if you can work with smaller pcbs.
They come with thick film resistors, and should improve when replaced with thin films.
They come with thick film resistors, and should improve when replaced with thin films.
I hope you took some pictures!The only issue is I don't have detents on the unit, since the concentric shaft is too large for the detent part of the control..
We're looking at one of these, right?
Attachments

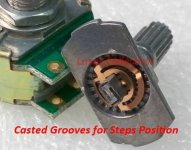

Yes, these are the units. The detents I refer to are in the face plate, attached to the shaft with a copper spring shown in the third photo above. Since the unit I have is a concentric shaft( dual control ) I had to change the shaft and thus the face plate ( loosing the detents), but the control still works fine. I will post photos tomorrow.
Finally got the modified smd stepped attenuators installed. I didn't want to post updates before testing. Sounds like new (I did a recap before breaking and having to rebuild the volume control).
I think this is the solution for rebuilding broken multistage loudness tapped units. I post details based on measurements of the original resistive units.
I will also post some resources for the mechanicals for dual concentric controls if you need to harvest them. I reused the mechanicals from the original NAD controls and modified the stepped attenuators to make it fit.
The detents I refer to are in the face plate, attached to the shaft with a copper spring shown in the third photo above.
On a non-switched control, having "cosmetic" detents will tend to place excessive wear on the element
at the points where the wiper sets at each step. I always removed the spring part when I used Alps pots
with fake detents. And the action felt much better that way, too.
First, I reused the mechanicals from the original unit, but this unit (AliExpress) has mechanicals which will work. Removing the rear switch and moving the tapped section to the front works in the NAD 3155, but it is not to spec. So used the approach documented here in.
Attachments
This is the audio taper with the loudness tap. Looking at the front of the unit, the center tap is on the left.
The stepped attenuators are mirrored, so no worries. Need to measure from the low side to the desired resistance for the center tap. Used wire wrap wire, two wires twisted and soldered and the desired step.

The concentric shaft needs to pass through the front contacts. Need to widen the slot in the front contacts to accept the outer mechanism.
- Home
- Design & Build
- Construction Tips
- Adding Taps to DACT