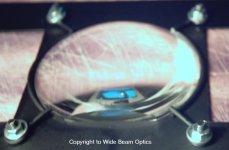
ok time for some more pics, trust me guys these pics dont do it justice, the paint on this thing is good although not in the pics and the mirror through the condenser is very blinding, i will definatley be not looking through this condenser with the light on lol, unless i want to go blind of course but other then that the unit in real life looks realy pro and hot, sorry again for crappy pics as i think the camera is having its time of the month once again, ok lets get to it, this is pics of the part B of the light engine although its not finnished its a start lol the reason i cant do anymore on it is cos im waiting for my new frensel to get here and i cant go out and try a page mag as all shops are closed here for 4 days otherwise this unit would have been finnished yesterday, in the first shot it shows u how its lined up to the light box, the light box as u know can be placed in and out of the projector for a bulb change via undoing a clamp angle and being lifted out verticaly, this part B will stay in the projector and it will have the pyramid atached to it, the big holes are for the air flow to go through the system of the light box, so that is an air intake, the condenser is mounted via 2 small customised brackets chopped out of a computer fan grille, they are strong and clamp the condenser in very firmly, even if i threw this thing on the floor the condenser wouldnt come out, although that is not realy the whole purpose of this but it gives u an idea of how firm it is in place, also saying how firm it is, the condenser isnt under any surface presure to cause any harm to the lens, if lenses are under too much presure they will break from the exspansion of heat from the light source, so a careful design in this feild is in order, u can also see the honey combe, the reflector and the lamp holder, this is just to show how things go.
Trev
Trev
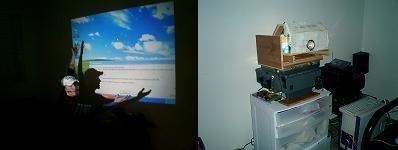
ok here is another pic of how it will sit in the lcd unit, things are just sitting there for now as its not worth to fix it to the lcd unit yet as i have to make the pyramid but u can see the back of the lcd in the background, also it doesnt look centerd in the shot, thats just the angle i took the pic on. The angles for the light mount isnt on yet either, they will come soon after i do the pyramid and after i place the seal in place.
Attachments

ok in this shot i tried to show how the condenser clamp worked lol its a crap shot but with the previous couple of pics it makes it fairly understanable, u can see the clamp has a round part thats flush to the actual bracket, that is what holds it to stop moving up and down while on the ends of the clamp bar there is a small amount of bar thats clamping the condenser down to stop it from falling out forward, with both combinations this realy is a super strong mount, its also fully ajustible and also can take heat no worries at all, the condenser cant move in any direction once the clamps have been set, i hope u enjoyed the new pics more will come soon.
Trev
Trev
Attachments
Hi Everyone, 🙂
I’m new to all this. I was looking for a site with info on how to put together a LCD projector and stumbled across this. This is the first thread I have read (read it all the way through)
I must say Trev is the main man!! Your projector and info are absolutely brilliant. Can’t wait for the unveiling.
Definitely interested in the blue prints, please name a price soon, never mind the name.
Keep up the good work bro!
Respect!
TinTin
Tin Tin
Heya there Tin Tin thanks for the nice coments and welcome to the forum, there is heaps of info in this forum and heaps of great reads, ill be sure to keep you in mind on the plans, have you got any particular project in mind at the moment? or just searching around to find the best options vs price ratio?
Trev
Hiya Trev, Have just been looking around. First stumbled upon the idea on Ebay and decided to do some more research. There is so much info flying about the place and for a new comer like me it all seemed too much. Then came across this site and then this thread, which seems to have just what I'm looking for.
When I saw your design I thought yeh man this is the one, compact and stylish and funky. I’m not going to start any thing yet but just follow the progress of your project (no pressure mate) 🙂
Just a quick one, with all those fans how noisy is it?
Keep us posted.
Respect!
TinTin
When I saw your design I thought yeh man this is the one, compact and stylish and funky. I’m not going to start any thing yet but just follow the progress of your project (no pressure mate) 🙂
Just a quick one, with all those fans how noisy is it?
Keep us posted.
Respect!
TinTin
Tin Tin
Heya buddy the fans im using are 2000rpm fans, they are super quiet and when mounted upto somthing solid u cant hear them, i think they put out 24cf/m abit less then the 2500rpm and the 3000rpm ones, ive got a infocus projector here and this projector is silent compared to the infocus, about the 15db range would be the noise factor or maybe less, the infocus would be 32db+, even with the smaller airflow u can use them no problem, it depends on how u design the airflow, in this projector im making it has 2 fans air in while just the one fan being air out, now if u design it right and make the enclosure sealed and direct the air to the right direction over your components u can make a presure in side of your inclosure, this is the case with mine where i have the 2 fans blowing air in so say 48cf/m while the single fan of 24cf/m sucking the air out, i have the preasure of the 2 air in fans pushing against the air out fan, even though not directly it helps air flow through the enclosure and components and also for the air out fan to have abit more then it can chew and to help it suck the air through the light engine, the air thats going in has nowhere else to go but out through the air out fan, ill have to draw up a pic soon on the airflow of the new projector.
Trev
Is there cracks between the tunnel where the lcd is and the plexiglass outside for cooling? I mean I see that fan laying down and I don't see how that can cool anything but the outside of the tunnel? just wondering
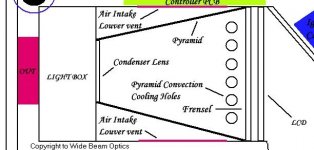
nope no cracks, just a louver, im deciding weather to use just the 1 or 2 of them at the moment, in the pic below u can see the louvers that i havnt placed in place yet, the louvers will suck air in from the outer of the lcd unit and with the presure i was talking about in my previous post there is no where for the air to go but through the louvers and out of the light box fan, im also thinking in placing a vent inbetween the lcd and the frensel, but heat build up in this area is of no great concern as the lcd runs reasonably cool enough as it is.
Trev
Trev
Attachments
How do you form your metal?
well i bend it, drill it, sand it and paint it, all u see in this that is made out of alloy is hand crafted from sheet aluminium, no machines other then a drill, trimming knife and vice are used, although ill have acess to machines when u get back to aust.
Trev
With the louvers do you lose any light and what is this pyramid your always talking about building what does it do
ok what a louver does is block light and let airflow through, because im using a clear plexi casing if i have 1 light leak ill see it not only in the room but the projector would be like it had a light bulb going in it lol so inorder to have an airflow and to stop the light from coming out ive opted to use louvers, the pyramid does a couple of things in my design, it helps guide the light to the frensel, it also helps to take the heat out of the area that the light travels acting as a big heat sink and also im using the pyramid to isolate light from escaping to places i dont want it too so its self contained although it would be fine without it.
Trev
Trev
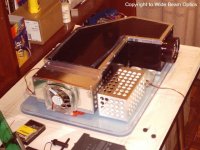
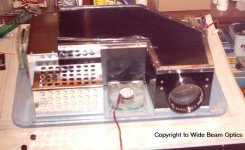
ok ive been fooling with my ballast box latley, well making it actually lol its not finnished but ill just post up a couple of pics of it for all to see, ill be making up another box for all of the power supplies and ignigtor to fit into, to tidy up those components and make them a single unit, i dont have too much left to do actually its just time consuming stuff like i have to yet make a new side peice and top cover, after that the rest of the part B of the light engine then some polishing on the plexi then mounting, im getting some main peices machined right now, they wont be here for a couple of weeks but u will see what they do and how they go at the end of it all, all of this stuff wont take long so keep tuned.
Trev
Trev
Attachments
az
lol the thing in the front with all of the holes? thats a rotisery, i plan on putting some chicken in there later to cook while i watch the movie that way i can have some roasted chicken after the movie lol na just joking with ya, thats the ballast box, full of holes so the ballast dont cook while its enclosed, these things get hot, typically 110deg F so u need to have a good cooling area for them, i didnt have to enclose mine but because its a clear plexi case it would look alot better in a nice enclosure rather then its ugly colour.
Trev
- Status
- Not open for further replies.
- Home
- General Interest
- Everything Else
- The Moving Image
- DIY Projectors
- Ace_3000....pictures of Projector?