The combination of full range drivers and convolution based correction can potentially make for a system which is simple and well behaved from both a frequency and time domain perspective. The provided guide however, will help anyone improve the sound of their system, regardless of their chosen loudspeaker type, using free software and a minimum of hardware. This guide assumes the use of a PC as the source, however, it is possible to hear the potential improvements afforded by this method by preprocessing music tracks with correction filters and burning to a CD.
Dropbox - Room Correction.zip
After downloading and unzipping the attached file, you will find a text guide to get you on your way. This guide is not meant to be a substitute for the instruction manuals of the software programs that will be used, but I have tried to articulate the steps in a manner that might be understandable to someone for whom these processes are unfamiliar.
A good starting point with the standard configurations might be "minimal.drc" with the following edits: PTType = N, and PSPointsFile = BK-2-44.1.txt (this file must be copied from drc-3.2.2/source/target/44.1 kHz to drc-3.2.2/sample). This will give modest correction strength and a traditional "tilted" target frequency response.
Dropbox - Psycho Filter.zip
From the PsychoFilter "readme" file:
This correction method uses two passes through DRC per channel (necessitating the use of two configuration files). During the first pass (prefiltering), the excess phase portion of the impulse response is removed, the remaining (minimum phase) portion is windowed with a frequency dependent length of approximately 3.6 cycles (1/5th octave resolution), and mic calibration is applied. During the second pass, the spectral envelope of the prefiltered impulse response is calculated with Bark scale resolution, inverted, and a target frequency response is applied.
Last edited:
example result
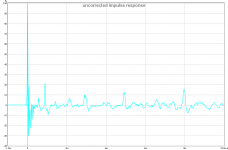
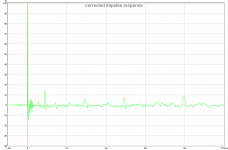
Attached are some graphs showing the response of my left speaker (a small single driver hypercube speaker) from the listening position both before and after correction with the 4cycles filter (using the supplied highpass target file). The phase plot was done with a 6.5ms window to highlight the direct sound. There is no electrical network used for the speaker; the amplifier is connected directly to the speaker terminals.
Attached are some graphs showing the response of my left speaker (a small single driver hypercube speaker) from the listening position both before and after correction with the 4cycles filter (using the supplied highpass target file). The phase plot was done with a 6.5ms window to highlight the direct sound. There is no electrical network used for the speaker; the amplifier is connected directly to the speaker terminals.
Attachments
-
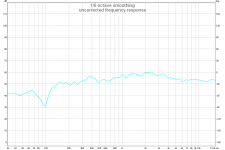 uncorrected frequency response.png31.3 KB · Views: 5,622
 -
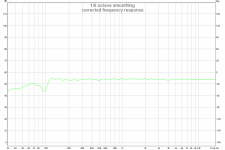 corrected frequency response.png30.2 KB · Views: 5,579
 -
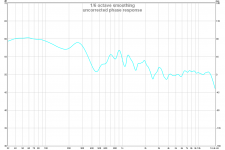 uncorrected phase response.png32.7 KB · Views: 5,553
 -
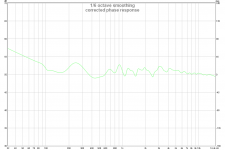 corrected phase response.png31.7 KB · Views: 5,450
 -
 uncorrected impulse response.png30.5 KB · Views: 5,441
 -
 corrected impulse response.png28.6 KB · Views: 1,673
Last edited:
Great! I hope this will start more people to look into this great tool set!
Scripting is included to check out the predicted response of the impulse correction.
So all you need to get started is to follow the steps outlined in the text guide.
You can actually see what it is going to do right after you've measured the impulses of both left and right speaker at the listening position.
If you can measure your speakers you can play with this, it's as simple as that!
I was encouraged to start this thread by xrk971 and wesayso. Wesayso, as a user of DRC Designer (a GUI version of DRC) has been kind enough to test the scripts for me. I would also like to thank him in advance for all the help I know he'll be providing in this thread.
Hi guys. Thanks for this thread.
I've been using Farina's convolution and inverse transfer function (Kirkeby) plugins for Cool Edit and getting great results for near field alignment of smaller speakers. Prior to getting plugins I had mulled through DRC guide and all the terms and descriptions just seemed like psycho-babble. The posted plots of improvement didn't seem like much either.
I've had great success, but not after a number of experiences that make pre/post echo terms clear to me.
Frequency dependent windowing is what I am looking to explore more. I've manually done some band windowing and splicing that increase distance to which microphone may be placed from speaker without the correction becoming a modal mess. A more proper, and automated process with sliding window is a nice prospect.
I've read your primer, and indeed gone back through the DRC guide, looked at your various settings files and will be digging in.
Good to have you looking into this! I'm still using DRC Designer, purely for ease of use.
Not with standard templates but with templates based primarily on gmad's settings. Of coarse I still play around with the variables, but nowadays mainly with the predicted response to see what does what. If I find something interesting it's easy enough to try and listen to it.
Pre-ringing is a reality with fir correction and it is key to keep an eye on that. But that all depends on how far you want to take things.
The basics (up to 4 cycle correction) gmad put in his templates are subtle enough to use for most users to get their feet wet. That probably won't lead to any big pre-ringing problems.
I think this thread would benefit from a step by step walk trough with some pictures added for guidance? As the thread from Perceval's setup showed, the initial results can differ a lot depending on room and speaker. So to have something up showing a visual aid to aim for would probably help make things more clear.
Hi,
Very nice work here - thanks for putting this together. It might be helpful for readers who are just getting into this to be able to see the basic outline of the process involved in text and embedded figures in Post #1 rather than downloading a 13MB zip file. The zip file would be utilized by those wanting to delve deeper and actually try the method with the config files as you have provided. I know it helps to get over the hump of reader's ease of access if it's readily apparent what the general process is without having to extract a zip file.
Also, if figures are embedded in line with text with captions that makes it easier too as figures in the common attachment area are confusing as to what they represent.
Thanks.
X
Hi, Barleywater:
I hope this proves to be useful to you. I will be interested to hear how things work out.
X,
Thanks for the perspective. You have made good points. I guess I was unconsciously gearing this thread towards people who are already somewhat familiar with the idea of convolution based impulse response correction, but either weren't sure about where to start, or didn't want to invest in expensive software. As time goes on, I'll try to think of links to add to post #1 that give more of an overview of the process.
Time to give back from all the help I got in using DRC.
Here's an intro guide, with pictures, showing how to get the sweeps ready for DRC use.
This is version 1. I believe it is complete, but I am not perfect, so please tell me if there's anything I should add or change.
https://www.dropbox.com/s/8ciayxx21qy4syy/DRC Sweep Guide.pdf?dl=0
Here's an intro guide, with pictures, showing how to get the sweeps ready for DRC use.
This is version 1. I believe it is complete, but I am not perfect, so please tell me if there's anything I should add or change.
https://www.dropbox.com/s/8ciayxx21qy4syy/DRC Sweep Guide.pdf?dl=0
Last edited:
Without knowing enough about RePhase it's a bit hard to say.
From what I get about rephrase you import a measurement into it and can use it to flatten the phase behavior. It also can generate FIR crossovers based on that measurement. Further more you can manually apply EQ with minimum phase or linear phase behavior.
The imported measurement is key here for RePhase to do a proper job. A very nifty tool giving a lot of freedom to it's user.
DRC works with the measured impulse at the listening position. You have nearly infinite possibilities to gate/window that measurement, frequency dependent to apply your correction.
The correction itself can also be changed from minimum phase to linear phase and even combinations in between. The EQ applied here is a result of variables inside DRC and a chosen target. This is an automated process with DRC using the windowed FR to calculate the correction. It has some anti-pre-ringing algorithm's and dip limiting functions inside to get optimum results according to the visions of it's maker. Most of those choices can be changed with variables and different windowing.
The templates used can be seen as a starting point.
I think they are too different to compare. DRC is largely an automated process based on clever algorithms with several psychoacoustic considerations built in those algorithms.
RePhase is a more manual process leaving more up to the user to make the choices.
I think both can be very powerful tools. Both will have a learning curve to get the best out of it. Like I said, I lack the experience of using RePhase so I can't fully judge it.
How does DRC differ from rePhase? Advantages, disadvantages?
DRC corrects the signal in both the time and frequency domain using a frequency dependent window. This allows you to measure from the listening position and then decide how big of a spatial area you want to correct the sound over. I correct over a time period of 4 cycles for any given frequency which gives me a big improvement in the sound with no noticeable artifacts when listening from anywhere in the room.
Last edited:
Here's an intro guide, with pictures, showing how to get the sweeps ready for DRC use.
Thanks for the contribution, perceval. This may help first timers who need more specific guidance than I offered. When you feel like you're ready to step things up a little bit, take a look at the package I put together.
No problem. I saw X's post about adding pictures and I had already started something like that, so I finished it and posted the "Get started" guide.
I did have a look at your package. Tried to figure out how to use your scripts with DRCDesigner, and this is what I came up with:
I used the preset "strong-44.1.drc", opened it, deleted everything (but kept a duplicate) and copied over the content of the script "4cycles-44.1.drc" into it, then saved.
Now, opening DRCDesigner, I made my target curve and selected Strong in the presets, then generated the filter. That should give me a filter based on your 4cycles script, right?
It's too late tonight to test out the filter. Will have a listen tomorrow.
I guess it will work when you select that preset on the "Generate Standard Filters" tab. You'd have to rename it to: strong44100.drc though, that's the one that is used.
See batch file drcWrapperRunDRCLeftstrong_44100.bat:
Code:
cd C:\DRCDesigner\drc-3.2.0\sample
drc.exe --MCFilterType=M --MCPointsFile="C:\DRCDesigner\drc-3.2.0\source\mic\151113-ECM8000-D1302067118-corrected.cal" --PSPointsFile="C:\DRCDesigner\drc-3.2.0\sample\DRCDesignerCustomizedPoints.txt" --BCInFile=LeftSpeakerImpulseResponse44100.pcm --PSOutFile=LeftSpeaker44100STRONG.pcm strong44100.drc
move /y LeftSpeaker44100STRONG.pcm "C:\DRCDesigner\ConvolverFilters"If you try selecting it on the Custom tab, that one always uses the Soft44100.drc template no matter which one you choose.
Last edited:
DRC corrects the signal in both the time and frequency domain using a frequency dependent window. This allows you to measure from the listening position and then decide how big of a spatial area you want to correct the sound over. I correct over a time period of 4 cycles for any given frequency which gives me a big improvement in the sound with no noticeable artifacts when listening from anywhere in the room.
And herein lies the key. I'm familiar with rePhase too, but what is attracting me to DRC is the frequency dependent windowing. From your post, it seems like you can even control how large the window is for any given frequency. How do you do this and where can I see the calculated frequency response by DRC, before applying correction?
The windowing looks like this:
That's the windowing from a normal template using 10 cycles. Do you want to output the result of that windowing (obviously with different parameters) to a wave file? I took the normal template as an example because that one uses 10 cycles of correction.
That allows you to see the input in DRC is in samples.
10 cycles at 20 Hz = 500 ms = 22050 samples.
Code:
Minimum phase component single side sliding lowpass prefiltering.
Input signal prewindowing.
R - Initial lowpass convolution...
R - Band:   0,    20.0 Hz, width:  22050, FIR, convolution...
R - Band:   1,    25.2 Hz, width:  17501, FIR, convolution...
R - Band:   2,    31.7 Hz, width:  13890, FIR, convolution...
R - Band:   3,    40.0 Hz, width:  11024, FIR, convolution...
R - Band:   4,    50.4 Hz, width:   8750, FIR, convolution...
R - Band:   5,    63.5 Hz, width:   6945, FIR, convolution...
R - Band:   6,    80.0 Hz, width:   5512, FIR, convolution...
R - Band:   7,   100.8 Hz, width:   4375, FIR, convolution...
R - Band:   8,   127.0 Hz, width:   3472, FIR, convolution...
R - Band:   9,   160.0 Hz, width:   2756, FIR, convolution...
R - Band:  10,   201.6 Hz, width:   2187, FIR, convolution...
R - Band:  11,   254.0 Hz, width:   1736, FIR, convolution...
R - Band:  12,   320.0 Hz, width:   1378, FIR, convolution...
R - Band:  13,   403.5 Hz, width:   1093, FIR, convolution...
R - Band:  14,   508.0 Hz, width:    868, FIR, convolution...
R - Band:  15,   640.0 Hz, width:    689, FIR, convolution...
R - Band:  16,   807.6 Hz, width:    546, FIR, convolution...
R - Band:  17,  1016.0 Hz, width:    434, FIR, convolution...
R - Band:  18,  1281.8 Hz, width:    344, FIR, convolution...
R - Band:  19,  1615.1 Hz, width:    273, FIR, convolution...
R - Band:  20,  2041.2 Hz, width:    216, FIR, convolution...
R - Band:  21,  2563.2 Hz, width:    172, FIR, convolution...
R - Band:  22,  3241.4 Hz, width:    136, FIR, convolution...
R - Band:  23,  4081.4 Hz, width:    108, FIR, convolution...
R - Band:  24,  5124.9 Hz, width:     86, FIR, convolution...
R - Band:  25,  6480.5 Hz, width:     68, FIR, convolution...
R - Band:  26,  8159.0 Hz, width:     54, FIR, convolution...
R - Band:  27, 10243.9 Hz, width:     43, FIR, convolution...
R - Band:  28, 12951.2 Hz, width:     34, FIR, convolution...
R - Band:  29, 16303.4 Hz, width:     27, FIR, convolution...
F - Band:  30, 20000.0 Hz, width:     22, FIR, completed.
That's the windowing from a normal template using 10 cycles. Do you want to output the result of that windowing (obviously with different parameters) to a wave file? I took the normal template as an example because that one uses 10 cycles of correction.
That allows you to see the input in DRC is in samples.
10 cycles at 20 Hz = 500 ms = 22050 samples.
Last edited:
No problem. I saw X's post about adding pictures and I had already started something like that, so I finished it and posted the "Get started" guide.
I did have a look at your package. Tried to figure out how to use your scripts with DRCDesigner, and this is what I came up with:
I used the preset "strong-44.1.drc", opened it, deleted everything (but kept a duplicate) and copied over the content of the script "4cycles-44.1.drc" into it, then saved.
Now, opening DRCDesigner, I made my target curve and selected Strong in the presets, then generated the filter. That should give me a filter based on your 4cycles script, right?
It's too late tonight to test out the filter. Will have a listen tomorrow.
Just to clarify (not nitpick) - files with the extension .bat are scripts, and files with the extension .drc are configuration files.
All you have to when using my package is drop your left and right impulse responses into the "sample" folder and then click on the script of your choice. It couldn't be easier. You do have the added step of having to convert the filters to .wav however...
And herein lies the key. I'm familiar with rePhase too, but what is attracting me to DRC is the frequency dependent windowing. From your post, it seems like you can even control how large the window is for any given frequency. How do you do this and where can I see the calculated frequency response by DRC, before applying correction?
Yes, freq dependent windowing is where it's at. You can set the window length for the extremes of the freq range and then optionally curve it (deviate from log scale). I don't bother with any curving personally. This is all done by editing the config files, but this is for more advanced users. In the beginning, just listen to what 3, 4, and 5 cycles of correction sound like. That should keep you happy for a while. If you've read my guide, you'll note that there are 2 scripts for each configuration file; one generates the correction filter and the other generates the predicted response of your system after correction.
Can I see the frequency response resulting from the frequency dependent time windowing? REW and Holm apply their own time windows. Holm has a simple frequency dependent time window with three separate windows. I want to see the response that DRC is trying to correct.
- Home
- Loudspeakers
- Full Range
- A convolution based alternative to electrical loudspeaker correction networks