I bought 4 JBL2380 clones for some 40 bucks in total and now I am enjoying sanding them to make the throat smooth and they begin to look really nice. A pair is fitted with JBL2445, the second pair will be fitted with Beyma CP385/Nd. For that, I tried to get a 1" to 2" adapter, but I kind of failed so far. I need the acoustic centers of these to be time aligned. From the measurements I did, the drivers are quite well aligned when the bug meshes are aligned which is very similar to the position when the backs are aligned (I actually need to remeasure, which was more correct). When I find the correct distance, I would need a (conical?) adaptor with the correct length and I remembered about 3D printing - it should not be too difficult or costly.
Therefore I am asking - did anyone create a STL file for this? I think it should be relatively easy to scale for lenght without resizing the flanges. How difficult would it be to create a model from scratch? I can do 2D CAD, but never really got to 3D (only some basics long time ago - I created a simple NCC Enterprise model in TrueSpace) - is there any free one that I could use just for this project? Any help would be appreciated😉
Therefore I am asking - did anyone create a STL file for this? I think it should be relatively easy to scale for lenght without resizing the flanges. How difficult would it be to create a model from scratch? I can do 2D CAD, but never really got to 3D (only some basics long time ago - I created a simple NCC Enterprise model in TrueSpace) - is there any free one that I could use just for this project? Any help would be appreciated😉
I just bought metal adapters from Eminence. They work. 😀 Of course there was no choice in angle or length, but I didn't care.
Hope you find the files for this.
Hope you find the files for this.
I would buy these or from P.Audio, but nothing in stock around here. I will try to make a 3D model myself - once I find some 3D CAD that could be used for free.
It took me ca 2 hours including downloading and installing the FreeCAD - I cannot say I know what I was doing, but I created the shape. The STL in the attachment is just a proof of concept. Now I need to measure all the dimensions properly - and consult the wall thicknesses with my 3D printer guy🙂
Attachments
Not all 3D free programs are created equal. A lot of them are bad actually.
If you want a good one, here's my suggestion: Fusion 360 | Free Software for Hobbyists, Startups & Makers | Autodesk
It will be pretty easy to model anything you want, lots of tutorials around on Youtube and the AutoDesk site. I think it will be worth it to (re)do it with a real 3D app like Fusion.
If you want a good one, here's my suggestion: Fusion 360 | Free Software for Hobbyists, Startups & Makers | Autodesk
It will be pretty easy to model anything you want, lots of tutorials around on Youtube and the AutoDesk site. I think it will be worth it to (re)do it with a real 3D app like Fusion.
The web says it is free for hobbyists, but I could not find the proper category for licensing (only a 30 day trial). I used AutoCAD since many years on and off, at one point of time as a part time job.
The only problem could be that I actually need to use it on my current work computer (that I am allowed to use for private purposes). Some programs actually denied non-commercial license on this one.
Edit: So I started the Trial on the Fusion 360. Rotating the shape imported from 2D took exactly 5 seconds. I hope the trial will continue further as non commercial. If not, by 30 days I should have my adaptor finished🙂
Last edited:
Just sign up for an account and you'll be fine. Actually the easiest way to get an account is to sign up for Tinkercad first, and use that account with Fusion.
I can't say the AutoDesk site is that clear or transparent in use 🙂.
I can't say the AutoDesk site is that clear or transparent in use 🙂.
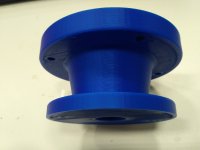
Fusion 360 is great, very intuitive. This is the prototype that will go to print. Then, it will be measured so that it is aligned including the crossover phase delays and the final version will be the correct length. Also, I will try to make the conical part to fit exactly both the horn and the driver.
Attachments
I made an adapter for a horn I bought off eBay, from 2" down to 1". It worked really well!
It's way better to 3D print an adapter, because you can design the adapter to fit the horn. In particular, because it's not just the *diameter* of the adapter that's important, but the *length.* Because those two parameters dictate the coverage angle.
I wish I could find pics of it. This was two years ago. I'm 95% sure I posted the pics on here but I can't find them.
Yes, the length will be determined after acoustic measurements.
Trying to measure the dimension from outside may be a few mm off. Also, there is some shift from the passive crossover I can compensate.
Here is the first print.
Trying to measure the dimension from outside may be a few mm off. Also, there is some shift from the passive crossover I can compensate.
Here is the first print.
Attachments
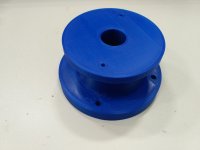
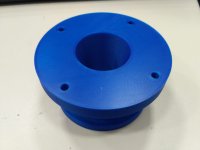
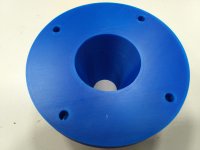
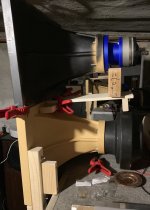
It works! However, as expected, it is about 18 mm shorter than needed. Also, I made the 2" interface to the horn 50 mm and it needs 1-2 mm more. All in all, I am very happy with the result. The two drivers will be perfectly time aligned. The step/impulse response looks almost perfect.
Edit: Added picture🙂
Edit: Added picture🙂
Attachments
Last edited:

- Home
- Loudspeakers
- Multi-Way
- 3D printed 1" to 2" driver adapter - anyone tried before?