Yes, according to the actual maths, the circuit should work just fine.
According to Miller Effect (Slew rate current) | VT52.com :
The Ultimate 300B has 2.5mA or so sourced from the paralleled-12AX7 SRPP driver stage.
That's almost 2.5X the minimum required plate current to drive the input capacitance of the 300B at 30kHz to 70V peak swing.
I don't understand the insanity of that thread.
Now, whether or not that's the 'best' way to drive a 300B, I really don't know and cannot say. But there is a good theoretical basis for why that circuit should work fine.
So there.
--
PS - "Ultimate" literally means "final" or "the last one". It does not necessarily mean "best".
Ultimate | Definition of Ultimate by Merriam-Webster
--
According to Miller Effect (Slew rate current) | VT52.com :
300B:
A = µ = 3.8
Cga = 15pF
Cgc = 9pF
U = 40V
f = 30kHz
Ig = 2 x π x 40V x 30kHz x (9pF + 15pF(3.8 + 1)) / 1.000.000.000 = 0.61mA
yet at 70V swing the 300B requires 1.07mA
The Ultimate 300B has 2.5mA or so sourced from the paralleled-12AX7 SRPP driver stage.
That's almost 2.5X the minimum required plate current to drive the input capacitance of the 300B at 30kHz to 70V peak swing.
I don't understand the insanity of that thread.
Now, whether or not that's the 'best' way to drive a 300B, I really don't know and cannot say. But there is a good theoretical basis for why that circuit should work fine.
So there.
--
PS - "Ultimate" literally means "final" or "the last one". It does not necessarily mean "best".
Ultimate | Definition of Ultimate by Merriam-Webster
--
Last edited:
Back in the day, I found this article to be inspirational: http://www.audiodesignguide.com/se/fleshblood.html
Since then, - and many solder-joints later - I have come to trust that for every choice, there is a gain and a price to pay. That is in fact what makes this hobby so much fun.
Therefore: just get started. Pick a simple schematic you can build, and then start tinkering...
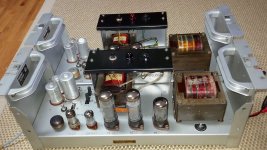
About how best to build a set of mono-blocks: find a thick piece of aluminum (3mm or so) and get hole saws for the tube sockets. Size depends on how many components and how big your caps are etc. But let's say you have a plate of 15cm X 40cm - or something like that. Then lay the parts on top and move them about till it looks nice. Tubes on a center line: 6sn7 first, then the 300B, then the rectifier tube and so on...
Now, mark your holes with a black marker and score the center of the black dots with a center punch. Then the rest is work at the drill press.
Now you have a plate with holes. And it will look ugly. But don't despair. Take a wooden block and wrap it in sandpaper. Now apply oil to the freshly drilled mounting plate and drag the sandpaper block across the surface. Put some heft into it. And try to stay as parallel to the lengthwise edge of the plate.
After a bit, you should have a gray mess of oil and aluminum sanding dust. But the mounting plate will now look beautiful when you wash the mess off with dishwashing soap.
Now you are ready to mount sockets, clamps etc.
Here is the payoff: you can build a your amp point-2-point easily around this mounting plate. It is easy to work with for soldering and measuring. And when finished, build a wooden frame/plinth to finish the job.
Easiest way to build a tube amp I know of. - And it will look good too.
Good luck.
Since then, - and many solder-joints later - I have come to trust that for every choice, there is a gain and a price to pay. That is in fact what makes this hobby so much fun.
Therefore: just get started. Pick a simple schematic you can build, and then start tinkering...
About how best to build a set of mono-blocks: find a thick piece of aluminum (3mm or so) and get hole saws for the tube sockets. Size depends on how many components and how big your caps are etc. But let's say you have a plate of 15cm X 40cm - or something like that. Then lay the parts on top and move them about till it looks nice. Tubes on a center line: 6sn7 first, then the 300B, then the rectifier tube and so on...
Now, mark your holes with a black marker and score the center of the black dots with a center punch. Then the rest is work at the drill press.
Now you have a plate with holes. And it will look ugly. But don't despair. Take a wooden block and wrap it in sandpaper. Now apply oil to the freshly drilled mounting plate and drag the sandpaper block across the surface. Put some heft into it. And try to stay as parallel to the lengthwise edge of the plate.
After a bit, you should have a gray mess of oil and aluminum sanding dust. But the mounting plate will now look beautiful when you wash the mess off with dishwashing soap.
Now you are ready to mount sockets, clamps etc.
Here is the payoff: you can build a your amp point-2-point easily around this mounting plate. It is easy to work with for soldering and measuring. And when finished, build a wooden frame/plinth to finish the job.
Easiest way to build a tube amp I know of. - And it will look good too.
Good luck.
I don't think aluminum is the way to go. It doesn't capsule the circuit to electromagnet stray fields. Despite the fact that it seems to be a US- american fashion to build a nice wooden frame (same style like my dining room cabinet) and put a simple top plate above it (without an underside plate, because this doesn't see anybody; typical american, too) I prefer the same old steel chassis that Western Electric and many (nearly all) of the famous manufacturer of the golden era of tube audio used. With a good reason. The only reason I see that points toward aluminum is the special loved practice to use punch hole sets for the tube socket holes to be made.
Last edited:
Yes, according to the actual maths, the circuit should work just fine.
According to Miller Effect (Slew rate current) | VT52.com :
The Ultimate 300B has 2.5mA or so sourced from the paralleled-12AX7 SRPP driver stage.
That's almost 2.5X the minimum required plate current to drive the input capacitance of the 300B at 30kHz to 70V peak swing.
I don't understand the insanity of that thread.
Now, whether or not that's the 'best' way to drive a 300B, I really don't know and cannot say. But there is a good theoretical basis for why that circuit should work fine.
So there.
--
PS - "Ultimate" literally means "final" or "the last one". It does not necessarily mean "best".
Ultimate | Definition of Ultimate by Merriam-Webster
--
Thanks @rongon ! 🙂
Yes, no offense to certain imbeciles experts 🙄 tels Arrias who know everything without ever having experimented anything... 😀
No pictures ? It never existed. Period.
A+!
Gray, dear friend, is all theory and green of life's golden tree.
Faust 1, Studierzimmer. (Mephistopheles)
12AX7 is a wimpy driver tube for a 300B.
Much too complicated and sophisticated concept. Use a real beefy driver tube and your done. No SRPP double parallel nonsense.
Faust 1, Studierzimmer. (Mephistopheles)
12AX7 is a wimpy driver tube for a 300B.
Much too complicated and sophisticated concept. Use a real beefy driver tube and your done. No SRPP double parallel nonsense.
Last edited:
Back in the day, I found this article to be inspirational: http://www.audiodesignguide.com/se/fleshblood.html
Since then, - and many solder-joints later - I have come to trust that for every choice, there is a gain and a price to pay. That is in fact what makes this hobby so much fun.
Therefore: just get started. Pick a simple schematic you can build, and then start tinkering...
About how best to build a set of mono-blocks: find a thick piece of aluminum (3mm or so) and get hole saws for the tube sockets. Size depends on how many components and how big your caps are etc. But let's say you have a plate of 15cm X 40cm - or something like that. Then lay the parts on top and move them about till it looks nice. Tubes on a center line: 6sn7 first, then the 300B, then the rectifier tube and so on...
Now, mark your holes with a black marker and score the center of the black dots with a center punch. Then the rest is work at the drill press.
Now you have a plate with holes. And it will look ugly. But don't despair. Take a wooden block and wrap it in sandpaper. Now apply oil to the freshly drilled mounting plate and drag the sandpaper block across the surface. Put some heft into it. And try to stay as parallel to the lengthwise edge of the plate.
After a bit, you should have a gray mess of oil and aluminum sanding dust. But the mounting plate will now look beautiful when you wash the mess off with dishwashing soap.
Now you are ready to mount sockets, clamps etc.
Here is the payoff: you can build a your amp point-2-point easily around this mounting plate. It is easy to work with for soldering and measuring. And when finished, build a wooden frame/plinth to finish the job.
Easiest way to build a tube amp I know of. - And it will look good too.
Good luck.
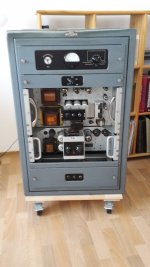
Hey! That's a lot of good information! I've been tinkering with my box for now and soon I'm going to buy top and bottom plates for the amp, here's a picture what I've done for now.
Always wondering wether people try to build electronic gear or furniture when this is the starting point.
No one, expect DIYers, wrap wooden frames around electronic gear since the 1970s. Its so outfashioned...
No one, expect DIYers, wrap wooden frames around electronic gear since the 1970s. Its so outfashioned...
Last edited:
Always wondering wether people try to build electronic gear or furniture when this is the starting point.
No one, expect DIYers, wrap wooden frames around electronic gear since the 1970s.
It's electronic gear 🙂
I fear it will never become gothic🙂
Well as we would say, every man has his taste 🙂
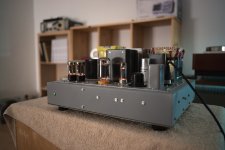
@Deva009: Nice wooden frame! Well done!!!
You are right, a nice brushed aluminum top and bottom plate, and it will look fantastic!
I like the "antique furniture" look - especially for amplifier designs that hark back to the 1930's.
Have fun! - I am sure with this kind of care, your 300B amp will sound fantastic! - Please post pics as you progress. 🙂
D.
I'm a big fan of gothic......
Wow I like the door handle Andy lol. Great for old fart like me with back issues.
Thanks now you've given me a idea on how to build my chassis.
Cheers
Was aluminum sheet really even available in the 30s?
I always thought the stamped, bent, and spot welded steel was mostly for rapid and inexpensive production more than anything.
I always thought the stamped, bent, and spot welded steel was mostly for rapid and inexpensive production more than anything.
I'm a big fan of gothic......
Me also..
Btw, aluminium was invented in the late 19th century but it took years to made its way into the mass market and its manufacturing was quite expensive because it needs lot of energy.
Maybe it was more expensive those days and in the beginning of the commercial electronic amp manufacturing but I see no real sense in using it for electronics other than to save weight. For my amps I only use stell sheets because they deliver the stability and rigidity what is needed for a heavy amplifier.
Btw, this little 40 pounder has blown away my KLV 502. Simply more music, less hifi.
Attachments
Last edited:

> aluminium was invented in the late 19th century but it took years to made its way into the mass market and its manufacturing was quite expensive
"Napoleon is reputed to have held a banquet where the most honored guests were given aluminium utensils while others made do with gold."
However, after up/down in WWI, the price fell in 1919.
History of aluminium - Wikipedia
"Napoleon is reputed to have held a banquet where the most honored guests were given aluminium utensils while others made do with gold."
However, after up/down in WWI, the price fell in 1919.
History of aluminium - Wikipedia
In 1919 WW I was over and there was more electrical energy available to produce aluminium.
"Give us aluminum in the right quantity, and we will be able to fight for another four years."
— Soviet leader Joseph Stalin to Harry Hopkins, personal representative of the U.S. President Franklin D. Roosevelt, in August 1941
Duraluminium was used to build airplanes. Without it, the russians could have build tanks in the tens of thousands but wouldn't have an airforce. The russians were, despite their massive tank army and their massive troops, short of such materials for winning the war.
It was the US that delivered them the needed resources and military gear to win the war.
Without those deliveries, they would have gone bancrupt.
Last edited:
- Home
- Amplifiers
- Tubes / Valves
- 300B SET