I'm pretty partial to the knobs from Kilo over at Digikey. I like their soft-touch series, as well as some of their other ones.
I still think the spiffiest knob are those ones Peter Daniel pulled in from India. I think they were Classe styled knobs. I picked up a pair, and have been saving them for very special projects.
I do love illuminated knobs, too, though.
I still think the spiffiest knob are those ones Peter Daniel pulled in from India. I think they were Classe styled knobs. I picked up a pair, and have been saving them for very special projects.
I do love illuminated knobs, too, though.
I am on call this week so I haven't had a chance to check the wiring. I am pretty sure that the speakers are wired separately as they should have been. I did tie the grounds together for the input and the potentiometer. I'll have a look around at it later today.
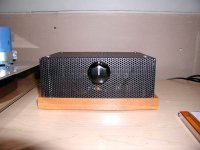
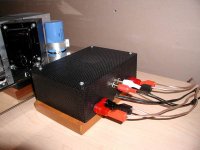
shelt said:Well, here's my finished first iteration of the SLA powered "Sonic Humidor"
Looking good, Rich! And you have plenty room left for cigars. 😀
Isn't it silly that such a tiny IC can give such great sound?
Nice neat wiring job. See how hard it is to drill in a straight line? Drives you crazy, yeah? For my chassis I made a drilling template, printed it on adhesive paper and stuck it in place. Still hard to keep the drill bit from wandering. Grrrr...
You've done a great job there. Very classy. Should be just the ticket with your Omega speakers. Let us know how it sounds.
Thanks, Michael!
It is a pain getting everything drilled square. My major unforced error concerns the volume knob. Originally, the power switch was to be on the right. i drilled the hole, and when the pots came, I tested them in that hole. However, I set the knob too close to the wood and gouged it a little when I turned it. So.... that became the knob hole, at the expense of longer internal wiring. Oh well...
My real fear was that the veneer was going to splinter while drilling the last hole 🙂
My T-AMP
Here's my attempt at modding the T-Amp. Its a mesh box screen that I found at work and I attched it to a nice wood base. Sorta looks like a tube setup??
Anyway, didn't do much, no real mods per se, other than RCA plugs and Biding posts. I run it with an old Laptop Power Supply - 12 Volts and 1.8 Amp (Amps are key here!) I will continue modding this later (upgraded Caps, Resistors, etc).
Currenently undergoing a serious Burn In...8 hours and counting...
Attachments
And one more
Here's the amp again next to my Other Project - a 45 wpc tube amp I aquired from a friend that I'm still fartin' with...The T-Amp was a good repreive - I don't think I can get myself killed with the 12v T-Amp, compared to the 450+ volts on the DIY Tube Amp...
Burn-In Music is Fourplay - great Burn-In CD...real dynamic, and lotsa percussion...
Attachments
Amp project
Hey John,
Had to say that old instrument knob was a nice touch, gave it that just right old Timmy look. Probably should have used one of those old red jeweled lenses for the on light too.
Roger
Hey John,
Had to say that old instrument knob was a nice touch, gave it that just right old Timmy look. Probably should have used one of those old red jeweled lenses for the on light too.
Roger
The knob is a $2.29 Rat Shack jobbie (comes in packs of two). The red dot is the one on the T-amp board. Just poke a bit bigger hole for it.
I got lots of Kudos for it. Looks neat. If I get my hands on a few more expanded metal grid boxes, I'll try a 20 wpc amp board from 41hz.com. Maybe the 100 wpc. The SMD soldering bothers me and the power supply on the 100 wpc looks a bit out of my skill set.
I got lots of Kudos for it. Looks neat. If I get my hands on a few more expanded metal grid boxes, I'll try a 20 wpc amp board from 41hz.com. Maybe the 100 wpc. The SMD soldering bothers me and the power supply on the 100 wpc looks a bit out of my skill set.
That is a really cool thing about this amp. You can run it off of batteries, which gives you very clean power, but it also makes the setu portable! Take hifi everywhere you go.
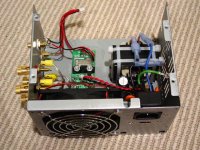
My brother has a birthday coming up and I figured it would be nice to give him a good present for a change, so I made him a one off T-amp consisting of parts I already had or acquired for free from other sources! I think you guys will like the case I used - it even has a built-in cooling fan 😀
Attachments

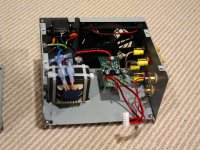
It's a gutted power supply case from an old compaq computer that bit the dust and donated it's body to science. That's a 9VAC ??VA transformer on the left wired directly to the IEC power jack with the 120/230 mains switch rewired as the amp's on/off switch. The transformer was sourced from an orphaned wall wart and it has a board with 3A rectifier diodes and a 3900uF nichicon HE cap for filtering. The DC output is wired directly to the leads of the onboard cap which is a brand new 680uF nichicon HE.
Attachments
Since I took these pictures I've changed the wiring a bit. I soldered the input wires directly to the stock SI pot board. The original idea was to keep the input connector so you could just unplug it when you wanted to open the case. Now you have to remove the knob and unscrew the pot from the panel but the connections are better. The RCA inputs and binding posts are from partsexpress. I could hook the fan up to the power supply but the amp hardly gets warm during operation and I didn't want to decrease the supply voltage with the extra 0.2A draw from the fan or take a chance at increasing the supply noise that could possibly come from the fan. These PSU supply cases work great for the tripath amps and you can usually find spare ones from computer junkie friends. I did sand and steel wool the case to get a nicer looking brushed aluminum look finish even though it's steel. I just need to clean all my fingerprints off of it before I wrap it up.
Attachments
Havent been around recently so I thought Id take a look.
John, very nice retro-looking chassis. Would fit in perfectly between a ST70 and a Scott.
And Brian, thats about the best use of an old PSU that Ive seen. They throw them away by the box loads at the PC recyclers and can be had for $2 at the local St. Vinnies.
amt
John, very nice retro-looking chassis. Would fit in perfectly between a ST70 and a Scott.
And Brian, thats about the best use of an old PSU that Ive seen. They throw them away by the box loads at the PC recyclers and can be had for $2 at the local St. Vinnies.
amt
For a decent case it's hard to beat at that price! You can also salvage some parts out of the PSU if it still has the internals. I collected some TO220/TO3P insulator pads, a couple aluminum heatsinks, a toroid core, a bridge rectifier, and some other misc parts while gutting the PSU. Interestingly enough I used the SI that I originally had in the aluminum case I ordered from you! The case will soon become the new home for an AMP3 from jan. I figured a great case deserves a great amp 😉
- Status
- Not open for further replies.
- Home
- Amplifiers
- Class D
- $30 amp upgraded