My speaker quest started off with grand ambitions of finding a fancy 3 or 4-way active setup. Luckily, @vineethkumar01 , the voice of reason, drilled some sense into me, urging us to go for something simple enough with better chances of success (or lesser chances of screwing up). The goal was to create a high-efficiency horn-based design, complete with active crossovers and DSP.
Enter @vineethkumar01 , the bringer of audio enlightenment, who mentioned this brand spanking new redesign with improved directivity of Yuichi Arai's 290 called the mk3b2 Radial Fin Horn, a collaborative effort from the minds of @DonVK , @docali , and @fluid (The thread can be found here). We didn't waste any time, we quickly decided that this was the one we were going to attempt. And so, we begin this project with a dash of enthusiasm and a sprinkle of uncertainty!
Particulars:
Action sequence:
Enter @vineethkumar01 , the bringer of audio enlightenment, who mentioned this brand spanking new redesign with improved directivity of Yuichi Arai's 290 called the mk3b2 Radial Fin Horn, a collaborative effort from the minds of @DonVK , @docali , and @fluid (The thread can be found here). We didn't waste any time, we quickly decided that this was the one we were going to attempt. And so, we begin this project with a dash of enthusiasm and a sprinkle of uncertainty!
Particulars:
- Drivers: HF: FaitalPRO HF146 LF: FaitalPRO 15PR400
- Bass Reflex cab with 120 Nett volume with F3 at 38Hz.
Action sequence:
- Build the horn first. Which will include 3d printing and CNC.
- Design and execute the adaptor for the CD.
- Design and build the BR cab to suit the horn dimensions.
- Extensively measure the horn and create a full spinorama.
- Set the crossover and tune with DSP.

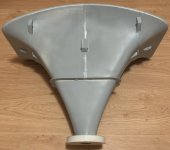
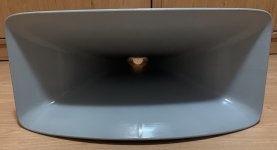
1. HORN
We embraced the mantra of cost-cutting for this purely experimental endeavour. So we came up with a plan of printing only the inner wall of the horn and decking out the outer wall with good ol' plywood. Once that's complete we would probably go wild with a filling of POP (plaster of Paris) or expanding foam sandwiched in between. Because who doesn't love a speaker that's part 3D-printed, part carpentry?
We embraced the mantra of cost-cutting for this purely experimental endeavour. So we came up with a plan of printing only the inner wall of the horn and decking out the outer wall with good ol' plywood. Once that's complete we would probably go wild with a filling of POP (plaster of Paris) or expanding foam sandwiched in between. Because who doesn't love a speaker that's part 3D-printed, part carpentry?
3d printing is indeed a fascinating new method to realize such projects. Here is an example of a 625Hz William Neile horn printed in one step with wood filament:

Pleas keep us posted about your endeavour.
Pleas keep us posted about your endeavour.
Just ask if you need anything to help with the uncertainty 🙂And so, we begin this project with a dash of enthusiasm and a sprinkle of uncertainty!
I think a Polyurethane casting resin is a good idea as it will provide some damping.Once that's complete we would probably go wild with a filling of POP (plaster of Paris) or expanding foam sandwiched in between.
😛 😛 😛Enter @vineethkumar01 , the bringer of audio enlightenment
I am hoping to be of some help and will watch and learn from this project
I have outsourced the printing job. IIRC the material he mentioned was PLA. This material does ring for sure.I like that plan. What material do you plan to use for printing? I printed a horn of similar size in pieces, but it definitely needs the walls damped.
The wood filament looks nice!3d printing is indeed a fascinating new method to realize such projects. Here is an example of a 625Hz William Neile horn printed in one step with wood filament:
View attachment 1186194
Pleas keep us posted about your endeavour.
Thanks! I intend to finish one horn first and if required further tweak the building process for the second one. I have outsourced the printing job, and my printer is super enthusiastic about this project! fingers crossed!Just ask if you need anything to help with the uncertainty 🙂
Yes! This is an option. I want to see the amount of cavity that needs to be filled once the outer wall is complete.I think a Polyurethane casting resin is a good idea as it will provide some damping.
Your own 2-way horn project based on ATH was an inspiration for me!😛 😛 😛
I am hoping to be of some help and will watch and learn from this project
Would you like to show us some pictures or the cad file of the PLA inlay you are currently printing? I would likte to see how thick the PLA block is. Do you also have the fins included in the print?
I have some mixed experiences with PLA as it is prone to resonances especially for thin parts. Your approach is very interesting to overcome these issues. What is also quite nice to print is carbon fibre PLA which gives a better internal damping. My current attempts are also metal filled filaments.
I have some mixed experiences with PLA as it is prone to resonances especially for thin parts. Your approach is very interesting to overcome these issues. What is also quite nice to print is carbon fibre PLA which gives a better internal damping. My current attempts are also metal filled filaments.
I have shared your cad file with just the profile with the printer. He's making the necessary slices to suit his printer. The thickness will be 2mm, and the fins will be printed separately and then glued. This also gives enough space to sand down to a smoother finish before the fins go on.
You're right, carbon fibre will have a "natural" dampening quality.
These are printed on multiple machines simultaneously. Helps speed things up.

You're right, carbon fibre will have a "natural" dampening quality.
These are printed on multiple machines simultaneously. Helps speed things up.
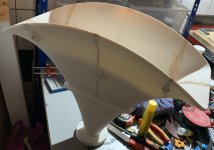
To study the effects, I will inject and fill the fins on the second horn with resin to make it solid. If the measurements show anomalies, I can always drill small holes in the fins of the first horn and fill them. The fins in the first horn are currently bound by structural webbing on the inside, but a quick flick with my fingers makes them ring.
Here's a top view. (rejected piece)

Here's a top view. (rejected piece)
I have two questions:
- Regarding the upcoming testing of the horn over the weekend, I'm looking for guidance as a novice in preparing for it. Can someone direct me to a guide or assist me in understanding the setup process?
- An Audio Interface: Amazon Link
- An XLR microphone kindly lent by @vineethkumar01
- A turntable to place the speakers on.
2. I'm reconsidering my approach to dampening the horn. My initial plan was to fill the cavities with POP, but I'm concerned that the added weight would cause the PLA surface to sag. I'm now considering the option of attaching felt or thick fabric around the horn. Are there any other ideas or suggestions for dampening the horn effectively?
Edit: I'm intrigued by @DonVK's post on his horn construction and would like to gain a better understanding of the effectiveness of his damping solution.
Edit: I'm intrigued by @DonVK's post on his horn construction and would like to gain a better understanding of the effectiveness of his damping solution.
Last edited:
- Home
- Loudspeakers
- Multi-Way
- 2-way horn system based on the MK3B2