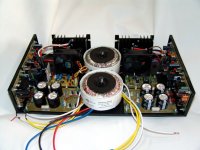
Thank you very much Alex for your kind cooperation!...... Bottom view in black and white , top side ,and all
Alex.
HAVE A VERY HAPPY NEW YEAR!!! 😀
Cheers,
Max.
Hey Alex,
Thanks!!🙂
I am confused as well.
So will I need 2 boards for 2 fans ?
Or can I just parallel 2 fans and connect them together ?
I am thinking of using this controller for a 100W amp, in which both channels are mounted on a single heatsink.
Hi, chlorofille!
You can parallel both fans, no trouble. I've done this in my DX Blame ST, and the mosfet does not get any hot. So, I did not use a particular heatsink for this part.
You can even parallel the heat sensors, if using dual heatsinks for OPs.
Good luck! HAVE A NICE 2011!
Cheers,
Max.
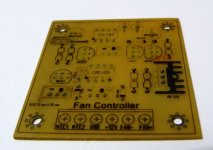
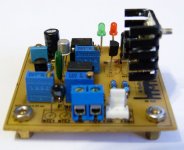
Only one board for fan controller
Hello again.
Only one board is needed.
As you can see in attached photograph, on the left side is located the fan controller (two paralleled sensors, two paralleled fans).
The small board on the right side is the soft start controller.
Regards,
Max.
(more pics here: http://www.diyaudio.com/forums/soli...ur-solid-state-pics-here-166.html#post2397421)
Attachments
Last edited:
Ty for your kindness...... Bottom view in black and white , top side ,and all
Alex.
paralleling two (or more) fans off one resistive loaded supply is likely to make starting in the slow mode even more troublesome.You can parallel both fans, no trouble.
It is necessary to match the fans (same brand, same model), to minimize differences during startup and equalizing cooling results (air flow).
I needed to use two different models, and one always starts first!!!
Yes, a unique control makes matching difficult...
As it is so simple, two boards won't drive anybody broke!
I needed to use two different models, and one always starts first!!!
Yes, a unique control makes matching difficult...
As it is so simple, two boards won't drive anybody broke!
Jotha has done it right!
Jotha, from São Paulo, has built this unit, from Alex mm's design.
A very nice job, indeed! Congrats, Jotha.
Here are some adjusting instructions, from Mr. Giogros Lazaridis original site:
Jotha, from São Paulo, has built this unit, from Alex mm's design.
A very nice job, indeed! Congrats, Jotha.
Here are some adjusting instructions, from Mr. Giogros Lazaridis original site:
Adjusting the circuit
Before start adjusting the circuit, we need to make sure two things:
1. The 'full speed' temperature set point is above the 'low speed' temperature set point
2. The PWM pulses have a duty cycle able to rotate the fan
You can adjust the circuit under real conditions or using another heat source like a thermo-gun for heat shrinks.
I have the regulator of the thermo-gun set to 1, the lowest scale possible.
First, we need to make sure that the 'full speed' temperature set point is above the 'low speed' temperature set point. To do so, we will set the 'full speed' at a very high temperature, the highest possible. Put all potentiometers near the center. Then power on the circuit. Turn the R6 potentiometer completely to one side. If the fan start to rotate, then turn it on the other side. The side that the fan does not rotate is the one that we want.
Then, we need to make sure that the PWM duty cycle is able to rotate the fan. To do so, turn the R2 completely to one side. Then, start rotating the R5 from side to side until the fan start rotating. If the fan does not rotate in either sides, then go back to R2 and turn it completely to the other side. The R5 potentiometer can be used to set the low speed of the fan. Set the speed that you desire and proceed to next step.
Now you need to set the temperature level for the 'low speed' operation. I use my electronic-controlled thermo gun for my heat shrinks and a thermometer. I turn on the gun and i put the thermistor and the thermometer side to side across the gun. The gun is set to it's lowest temperature possible and i keep it about 20cm away from the thermometer. At this point, i get about 40 °C. When the temperature is steady for about one minute, start turning the R2 until the fan is turned off. Then turn it the other way. you must find the exact point where the fan is turned on. When you do so, you are done with the 'low speed' set-point.
The next and last step is to set the 'full speed' temperature. In continue to the above procedure, put the thermo-gun closer to the NTC-thermometer pair. The temperature will rise. Using my gub, at about 15 cm i get around 46 °C. When the temperature is stable for about a minute or so, start turning the R6 potentiometer. Do it slowly and find the exact point where you hear the fan rotating at full speed. If you have done this correctly, the circuit is ready to operate. The fan will turn on at about 40 °C and revolve at 'low speed'. If the temperature goes above 46 °C, the fan will revolve at full speed. That's it!'
Attachments
Last edited:
whether that is in use on ntc1 n 2?
forgive me because I am not an expert electronics ....
whether such measure heat?
forgive me because I am not an expert electronics ....
whether such measure heat?
whether that is in use on ntc1 n 2?
forgive me because I am not an expert electronics ....
whether such measure heat?
Sorry for being late to answer!
Forgive me, but I didn't understand your question.
What about writing in your native language, through private message?
Regards.
An NTC (a thermally variable resistor with negative temperatura coefficient) must be installed attached to the main heatsink, and connected to points NTC1 and NTC2 on the board. This will provide temperature sense to the system, so the fans can slow or accelerate as needed.
- Status
- Not open for further replies.
- Home
- Amplifiers
- Solid State
- 2 Speed Fan Controller