I think i will just carry on using the condenser if it dosent affect the image, as long as it dont crack again 
Update:
Bracket for the celing mount.
Up on the celing
My problem with keystone correction is that i cant fix the top and right side...you can see why in this picture cant be fixed as the psu board gets in the way
My plan is to move the lcd controller bit forward so its closer to the actual lcd and move the psu back so its totaly under the wood I just have to extend the wires between the two boards
Update:
An externally hosted image should be here but it was not working when we last tested it.
Bracket for the celing mount.
An externally hosted image should be here but it was not working when we last tested it.
Up on the celing
An externally hosted image should be here but it was not working when we last tested it.
My problem with keystone correction is that i cant fix the top and right side...you can see why in this picture cant be fixed as the psu board gets in the way
My plan is to move the lcd controller bit forward so its closer to the actual lcd and move the psu back so its totaly under the wood I just have to extend the wires between the two boards
Wow, thats almost my exact setup except i used skinnier pine wood, 15.4" screen, and no long *** bolts 🙂. I hope to finish by the end of this week (or at least get a working model).
Dont rush it, take your time and wait for results. As soon as it works you will just want it finished 😛
Its kind of scary having it hanging in mid air at the moment. As i havent angled it to the exact position yet.
Its kind of scary having it hanging in mid air at the moment. As i havent angled it to the exact position yet.
New to optics lenses
When making a DIY projector Do I understand that the basic setup is:
1 Bulb with relector beaming light through a condensor
2 The light then beaming onto a LCD panel
3 Then onto one fresnel lense
4 And then onto a the final lense which is adjustable
(You would only use a mirror if the light was not projected in a straight line?)
Re: New to optics lenses
No its
1 Bulb with reflector (condenser/reflectors are optional on a 15")
2 Rear Fresnel
If doing a split fresnel design then 3 = LCD and 4 = field fresnel if not doing a split design then 3 = front fresnel and 4 = LCD
5 depending upon the orientation of your LCD 5 can be either a mirror or the projection lens. In my design 5 is the projection lens
eilz said:When making a DIY projector Do I understand that the basic setup is:
1 Bulb with relector beaming light through a condensor
2 The light then beaming onto a LCD panel
3 Then onto one fresnel lense
4 And then onto a the final lense which is adjustable
(You would only use a mirror if the light was not projected in a straight line?)
No its
1 Bulb with reflector (condenser/reflectors are optional on a 15")
2 Rear Fresnel
If doing a split fresnel design then 3 = LCD and 4 = field fresnel if not doing a split design then 3 = front fresnel and 4 = LCD
5 depending upon the orientation of your LCD 5 can be either a mirror or the projection lens. In my design 5 is the projection lens
[My plan is to move the lcd controller bit forward so its closer to the actual lcd and move the psu back so its totaly under the wood I just have to extend the wires between the two boards
In my PJ (Im using the same LCD you are) I put a slit in the bottom so I could mount the controller board underneath so there is nothing in the way of the front fresnel. I didnt have to extend the cables at all. works great.
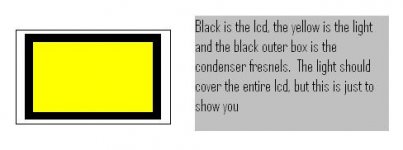
Unless your projecting in near complete darkness, a reflector and condensor fresnel is a must, unless of course you have a 1000W setup 🙂. A pre-condenser is optional, but i recommend it because it does add additional light (probably 2-4%) to the projected image.
Unless your projecting in near complete darkness, a reflector and condensor fresnel is a must, unless of course you have a 1000W setup . A pre-condenser is optional, but i recommend it because it does add additional light (probably 2-4%) to the projected image.
What the difference between a condensor lense and a condensor fresnel, are we talking about the same thing. This is the thing that is attached to the reflector and bulb RIGHT?
LUCA mentioned in point 5 SPLIT FRESNEL design, do you really need to use this, does it give better light/resolution?
If I have an OHP does it have two Fresenels and can I split them and use the SPLIT FRESNEL method.
I have a 250w MH Light kit and a OHP, but nothing else. Was going to use the lense and fresnel from the OHP, so all I need is a CONDENSOR and a decent REFLECTOR, is that right?
What is a pre-condensor? PICS?
I am a little confused between using the OHP lense or getting a triplet Lense, why do I need a triplet lense and if I get one do I still need to lense on the OHP.
Does anyone have a very basic line drawing of putting a basic setup together, ideally with a 250W setup. Please
Sorry for all the question, but have checked all the FAQ pages, can't find these answers.
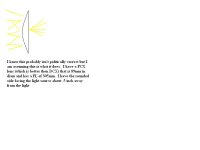
I am going to assume that you have an HQI bulb (uses FC2 holders on both ends of the bulb rather then the mogul base with the old fashioned screw in). I don't think I've seen an overhead with split fresnels, but they probably do exist. If your overhead has only one fresnel, then I do not believe you could split it. The difference between a condenser (aka 'pre-conenser') and a condenser fresnel is that the pre-condenser is almost touching the outer envelope of the bulb (usually a couple mm from the bulb). It is used to direct more light onto the condenser fresnel. The condenser fresnel then directs the light onto the lcd evenly so you do not get bright spots on the projected image.
This is a basic drawing of a pre-condenser which looks a lot like a single objective projection lens, except that the pre-condenser has a flat side to it not a convex. I got my pre-condenser for around 20 dollars shipped from these fellas http://www.anchoroptics.com/ Look under lenses then it should be on PCX lenses. There is a good method here for deermining all the stuff you need for you pre-condenser. http://www.diyaudio.com/forums/showthread.php?s=&threadid=51658&highlight=
Attachments
Update:
I typed loads and because of the design on VB it lost it all 😡 and the hell with retypin it all
I typed loads and because of the design on VB it lost it all 😡 and the hell with retypin it all
An externally hosted image should be here but it was not working when we last tested it.
An externally hosted image should be here but it was not working when we last tested it.
An externally hosted image should be here but it was not working when we last tested it.
- Status
- Not open for further replies.
- Home
- General Interest
- Everything Else
- The Moving Image
- DIY Projectors
- 15" Projector (Projector #3 by Nick)