Dear all,
I’m a newbie and have been lurking around the DIY Audio fora for some time now. This is my first post. Finally I’ve dipped my toe in the water and am now the happy owner of a pair of DIY speakers.
What I (and my brother Warren did) –
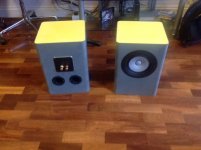
Design – Given my lack of practical experience, I quickly realised that I had to apply the KISS principle (i.e. keep it simple stupid!). Initially I thought of making a closed cabinet design, but quickly realised that I would lose too much low end response with an F3 of about 105dB. TL’s (and variants) together with horns were too daunting for me to design construct – and that’s leaving aside the low WAF. So I settled on a bass reflex design – this gave me a reasonably acceptable cabinet size together with decent response – 60Hz – 22000Hz. I used some of the freeware available on the net to model response. My personal preference is for minimalist design, so no logos – but I realise that others may not share this. I’m happy that I’ve rendered this in the final construction.
Construction –
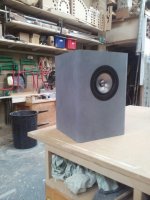
The cabinet has an internal volume of 16.35 litres (subtracting all the components and lining). It is constructed from triple rebated (to give greater gluing surface) 24mm (31/32”) Baltic birch ply. I’m in the very fortunate position that my brother Warren is a master cabinet maker and he cut and assembled the cabs and then did the necessary routing for the driver and binding post plates. The vertical corners were routed to give a 25mm (1”) radius – this to make veneering easier (see below). The driver was flush mounted – with a 10mm chamfer on the inside of the cabinets.
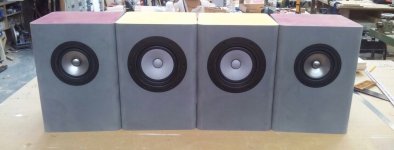
Two ports were used – each 51mm (2”) – rearward facing at the bottom of the cabinet – mounted as far from the driver as was possible. Why two? – well because I can use the identical cabinet for a pair of 10.2’s (my next project for may study speakers) with a single 51mm port – so there is no requirement to make an additional routing temple for the port (this pleased my Warren no end!) Internal volume of the 10.2’s will be 16.75 litres with a predicted F3 of 40Hz.
Binding posts and mounting plates are the ludicrously expensive WBT 0763’s (but I managed to get this on Ebay for less than a 1/3 retail – so I’m not too upset). Internal cabling is 2.5mm single crystal copper – I know probably snake oil in claims but again from Ebay and as cheap as buying standard cable retail – so why not! Cables have been silver soldered to the binding posts but I’ve used Mark’s connectors for the drivers as I didn’t want to risk damaging them.
Lining – I used a visco-elastic self adhesive membrane – 2.5 mm thick – using standard acoustic foam or similar would have increased the overall dimensions of the cabinets – this apparently is equivalent to 25mm (1”) acoustic foam (if the manufacturer’s blurb is to be believed). This was placed on the inside top and half way down the back of the cabinets.
Ports – these are 51mm (31/32”) internal bore. They have plain – not flared – ends. I liked these because they have a sliding outer sleeve which has allowed me to adjust the tuning from outside the cabinet without the need to remove the driver or ports repeatedly to get it right.
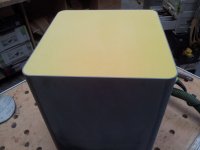
Veneer – the cabinets were then veneered with 2.5mm thick natural rubber on all sides. This was sanded and has yet to have a UV resistant polish applied. Shore hardness of the rubber is 75 so they will not mark or dent unless abused. I’ve used a proprietary wood – rubber contact adhesive designed for the application, it has work very well with no bubbling or lifting.
Stuffing – I’ve use lightly stuffed long haired wool in the upper part of the cabinets – ports have been kept well clear of it. I’m not sure this is necessary – opinions seem to differ in the DIY fora and elsewhere – I’d like some feedback on this if you wish to express a view.
The cabinets were tuned to 60Hz (the 10.2’s will be to 40Hz). They’re mounted on stands at listening height (about 1.1m from the floor) they are 30cm from the wall. No toe in seems necessary as off axis response appears to be very good at all mid – high frequencies.
I’m astonished and very please by the result – these are by far and away the best speakers I’ve ever heard. My thanks to Mark for producing such wonderful drivers and to all of you for the invaluably information you’ve posted on the DIY Audio fora. Needles to say, I’ve now caught the bug!
Kind regards,
Shane & Warren
I’m a newbie and have been lurking around the DIY Audio fora for some time now. This is my first post. Finally I’ve dipped my toe in the water and am now the happy owner of a pair of DIY speakers.
What I (and my brother Warren did) –
Design – Given my lack of practical experience, I quickly realised that I had to apply the KISS principle (i.e. keep it simple stupid!). Initially I thought of making a closed cabinet design, but quickly realised that I would lose too much low end response with an F3 of about 105dB. TL’s (and variants) together with horns were too daunting for me to design construct – and that’s leaving aside the low WAF. So I settled on a bass reflex design – this gave me a reasonably acceptable cabinet size together with decent response – 60Hz – 22000Hz. I used some of the freeware available on the net to model response. My personal preference is for minimalist design, so no logos – but I realise that others may not share this. I’m happy that I’ve rendered this in the final construction.
Construction –
The cabinet has an internal volume of 16.35 litres (subtracting all the components and lining). It is constructed from triple rebated (to give greater gluing surface) 24mm (31/32”) Baltic birch ply. I’m in the very fortunate position that my brother Warren is a master cabinet maker and he cut and assembled the cabs and then did the necessary routing for the driver and binding post plates. The vertical corners were routed to give a 25mm (1”) radius – this to make veneering easier (see below). The driver was flush mounted – with a 10mm chamfer on the inside of the cabinets.
Two ports were used – each 51mm (2”) – rearward facing at the bottom of the cabinet – mounted as far from the driver as was possible. Why two? – well because I can use the identical cabinet for a pair of 10.2’s (my next project for may study speakers) with a single 51mm port – so there is no requirement to make an additional routing temple for the port (this pleased my Warren no end!) Internal volume of the 10.2’s will be 16.75 litres with a predicted F3 of 40Hz.
Binding posts and mounting plates are the ludicrously expensive WBT 0763’s (but I managed to get this on Ebay for less than a 1/3 retail – so I’m not too upset). Internal cabling is 2.5mm single crystal copper – I know probably snake oil in claims but again from Ebay and as cheap as buying standard cable retail – so why not! Cables have been silver soldered to the binding posts but I’ve used Mark’s connectors for the drivers as I didn’t want to risk damaging them.
Lining – I used a visco-elastic self adhesive membrane – 2.5 mm thick – using standard acoustic foam or similar would have increased the overall dimensions of the cabinets – this apparently is equivalent to 25mm (1”) acoustic foam (if the manufacturer’s blurb is to be believed). This was placed on the inside top and half way down the back of the cabinets.
Ports – these are 51mm (31/32”) internal bore. They have plain – not flared – ends. I liked these because they have a sliding outer sleeve which has allowed me to adjust the tuning from outside the cabinet without the need to remove the driver or ports repeatedly to get it right.
Veneer – the cabinets were then veneered with 2.5mm thick natural rubber on all sides. This was sanded and has yet to have a UV resistant polish applied. Shore hardness of the rubber is 75 so they will not mark or dent unless abused. I’ve used a proprietary wood – rubber contact adhesive designed for the application, it has work very well with no bubbling or lifting.
Stuffing – I’ve use lightly stuffed long haired wool in the upper part of the cabinets – ports have been kept well clear of it. I’m not sure this is necessary – opinions seem to differ in the DIY fora and elsewhere – I’d like some feedback on this if you wish to express a view.
The cabinets were tuned to 60Hz (the 10.2’s will be to 40Hz). They’re mounted on stands at listening height (about 1.1m from the floor) they are 30cm from the wall. No toe in seems necessary as off axis response appears to be very good at all mid – high frequencies.
I’m astonished and very please by the result – these are by far and away the best speakers I’ve ever heard. My thanks to Mark for producing such wonderful drivers and to all of you for the invaluably information you’ve posted on the DIY Audio fora. Needles to say, I’ve now caught the bug!
Kind regards,
Shane & Warren
Attachments
![image[1].jpeg](/community/data/attachments/392/392445-cf57aab6b43d9ae6931caa52fe6799c3.jpg?hash=z1eqtrQ9mu)
![image[3].jpeg](/community/data/attachments/392/392451-a64fcab003dcf221e15c697c61e1e927.jpg?hash=pk_KsAPc8i)
![image[2].jpeg](/community/data/attachments/392/392447-57a719ced630d696d07e57ec28b442e0.jpg?hash=V6cZztYw1p)
Shane and Warren,
Congrats on your build. As doorman has already mentioned, DIY can be "highly" addictive! 🙂
Do you already have a pair of Alpair 10.2? Otherwise please note that the Alpair 10.3 has replaced the Alpair 10.2 in the Mark Audio line up.
How many hours do you have on the drivers?
Congrats on your build. As doorman has already mentioned, DIY can be "highly" addictive! 🙂
Do you already have a pair of Alpair 10.2? Otherwise please note that the Alpair 10.3 has replaced the Alpair 10.2 in the Mark Audio line up.
How many hours do you have on the drivers?
Drivers were broken in for approximately 200 hours using the method described by Mark Fenlon. I already have the 10.2's - bought them just before Mark announced the 10.3'sand 10P's. Does anyone have a view on the use of stuffing for BR enclosures? Thanks for the feedback. Kind regards, Shane & Warren.
Shane,
Nice boxes.
1 note: the damping should notbe subtracted from the volume.In fact it will add to the effective volume, althou a lining is usually of such little effect wrt that that it is usually ignored.
Do you have a link to the lining material you used? Sounds to good to be true.
dave
Nice boxes.
1 note: the damping should notbe subtracted from the volume.In fact it will add to the effective volume, althou a lining is usually of such little effect wrt that that it is usually ignored.
Do you have a link to the lining material you used? Sounds to good to be true.
dave
Thanks Dave, I didn't know that. The link to the vico-elastic material is Tecsound 50 T50 Acoustic Membrane Visco elastic High Performance Sound Insulation - it's the sy50. I too am of the school of thought that if it sounds too good to be true then it probably is - but what's the harm? After all I'm not advocating the material - merely relating the approach that we took. What we've tried to achieve is the most inert cabinets that we reasonably could with the skills and materials we had - hence the use of 1" void free Baltic birch ply, visco elastic sheet, natural rubber veneer and contact adhesive: these are strong and heavy boxes. Hovever, I absolutely reserve the right to be wrong in this approach! A little knowledge is a bad thing. That all being said, I'm delighted with them - even with my age related hearing loss! Can you let me know your view on the stuffing BR cabinets - there appears to be conflicting advice on this in the literature and fora? Thank you for your comments and kind words. I look forward to gaining a greater understanding of speaker design and construction. Hope this finds you well. Kind regards, Shane & Warren
Bloody nice job for a first time build, mate - my only comment would be: next time (count on it😀), you could save almost the cost of a driver by using something far less exotic that the WBT plates and binding posts.
I've yet to hear a demonstration that justifies their cost, or the Eichmann speaker pods for that matter ( which I have used) . I think there are far better ways to spend the money -although some are transitory, such as that nice bottle of Cabernet Sauvignon well probably be having at dinner tonight.
I've yet to hear a demonstration that justifies their cost, or the Eichmann speaker pods for that matter ( which I have used) . I think there are far better ways to spend the money -although some are transitory, such as that nice bottle of Cabernet Sauvignon well probably be having at dinner tonight.
Thanks Chris, I agree but I got the WBT's on Ebay - second hand at about 1/3 retail price. Wouldn't pay full price for them. Thanks for the kind words. Shane & Warren. BTW, I take no credit for the cabinet construction - that was all Warren - he's a master cabinet maker - my effort would look like an orange box!
Tecsound 50 T50 Acoustic Membrane Visco elastic High Performance Sound Insulation
Looks to be more towards a panel damping material than an airspace damping material likecotton or wool felt, polysester batting, etc...
One has to be careful with adding mass without adding stiffness.
1" BB is probably overkill, we typically would use 15 or 18mm BB (18mm baffles), well braced to push panel resonant frequencies high enuff in frequency that they never get excited.
dave
Thank you for this Dave, clearly I've confused the two. It would be difficult for me to retrofit bracing at this stage given that the cabinets have now been fully assembled. However, I should be able to insert some batting. For my next build (with the 10.2's) I'll make the suggested modifications with bracing and batting. Would stuffing the 12P cabinets improve airspace damping? Grateful for your advice. I accept that novices make errors through inexperience and lack of knowledge and I am such. But it's great fun learning something challenging and new. Many thanks and kind regards, Shane & Warren.
Dear all, following previous exchanges in this thread, myself and Warren have completed the 10.2 build. We've now included polyester batting to the back and top panels and have braced the panels - our thanks to Dave (Planet10) for his advice on this. The cabs are the same external dimensions as the 12p's but only have one 2" port - internal volume is 16.6 litres. We have yet to tune the port by measurement (rather than calculation). Kind regards, Warren & Shane
Last edited:

10.2 and 12p Cabinets
Thanks Chris,
It is simply impossible to own enough clamps!
We are experimenting with various finishes to give them a more solid appearance, clearer colour definition and better UV tolerance. The rubber itself turns out to be really practical for everyday use, it's easy to clean and it feels very smooth.
Shane and Warren
(Warren)
- Status
- Not open for further replies.
- Home
- Loudspeakers
- Full Range
- 12P reflex - my first build!