Sure, they are meant for the Manzanita 😀 just wanted to try it in the TL.try with TC9 in openbaffle.....
Yes you can position it outside and on top. Several people have done this. If you want to use the same XO, make the baffle width the same and keep the 7in CTC spacing. Offset the full range baffle back by 3in if top mounted. I cannot guarantee the passive XO will be perfect because this is really a different speaker. But if you have DSP and go active it is easy.
I have indeed tried it but not extensive measurements or XO developed yet. From what I hear, they can work well.Hi X. I've been waiting to see if you executed this speaker with the 8" GRS planar. Have you?
Thank you, great! I will try with the passive xo, but I'm building the 6-24 active xo now, so I can use it that way too.Yes you can position it outside and on top. Several people have done this. If you want to use the same XO, make the baffle width the same and keep the 7in CTC spacing. Offset the full range baffle back by 3in if top mounted. I cannot guarantee the passive XO will be perfect because this is really a different speaker. But if you have DSP and go active it is easy.
Sure, they are meant for the Manzanita 😀 just wanted to try it in the TL.
yep but try on TL an hybrid OB 🙂Sure, they are meant for the Manzanita 😀 just wanted to try it in the TL.
Thanks x. This is a project I would love to try. But the trynergy is still so great to listen to, I'm in no rush. 😊 Thanks for your wonderful designs and contribution to musical enjoyment.I have indeed tried it but not extensive measurements or XO developed yet. From what I hear, they can work well.
X, the CTC should be 7.5in, according to your plans - or are there any changes? Anyway, with an on-top mid cabinet it is not really possible, the distance between the center of the RS225 and the top of the baffle is 6in, so I would have 1.5in for an FR with R=2in. Or am I completely wrong? 😀
If the CTC distance is different it just means the XO is not optimal but may still sound quite nice.
Oh, understand, thanks. It will be a funny experiment🙂If the CTC distance is different it just means the XO is not optimal but may still sound quite nice.
Oh, make it just wide enough so that the 8inch woofer outer circumference seats within the front baffle ply piece. No need to increase any wider that's needed. It is to make your circle routing process easier.Hi meanie,
Thanks for the tip. I plan to have the front baffle cover the enclosure edges (ie: 10" wide baffle), not the 8.5" baffle inside the enclosure edges. Are you implying to maybe make the enclosure width larger than 10"?. If so, by how much?
MM
For my case, i have to boxed up the whole speaker assembly, then perform the woofer outer diameter circle routing, it will route into both the side panels. Wish i had looked into it in more detail before, would have built it like member " Plott" in #3394.
Anyway, its just a different approach in the building process.
Last edited:
Hi X, could you please explaine the function of the cone for the FR? Definitely not just a cabinet with that funny shape - does it have an acoustic amplifying function for the mids? I tried to search but without success
The idea is to absorb the back wave so as to not have parallel resonant surfaces. I originally made a multi sided pyramid rear chamber called the “Dagger” but found that a premade sports cone/pylon worked just as well and easy to source. It is similar in idea to a “Wood’s horn” used radio and optics. Basically an acoustic black hole.
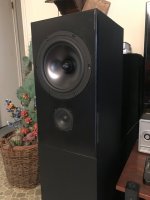
Finished my sealed RS225/TC9FD. Because I'm cheap I used 3/4" subfloor material from all the construction in my neighborhood. Heavy and dense, maybe even heavier than MDF. So far sounding good. Kept standard tweeter attenuation even though TC9FD less efficient than 10F/8424 because brightness bothers me. Used a cheaper Dayton iron core 4 mh inductor and wondering if I should upgrade. Used it because I had it. What difference would I hear? Thanks to X for such a well documented project!!
Attachments

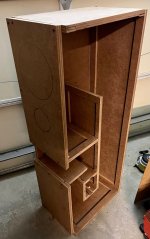
I started with a mixed cut list (never a good thing, as one had the sides tucked under the top and the other did not) and the prototype has a bunch of wrong sized panels, which is why I try to prototype before cutting expensive lumber... But now I can verify all my cuts and notice little things to fix and adjust. It also allowed my wife to look at the basic shape and size and give it the green light.Hi KKing,
Awesome news. We look forward to hearing about your build. Please post us on the progress as you go.
Quick question - I've seen radii listed for the routing and the holes for the front, but not for how deep the routing (at the edge) should be. Do we want the speakers flush with the wood? Or is there some other measurement to use for the depth of the routing for the outer ring?
Attachments
Super work, TubaV! They look great and your tweeter padding is a personal preference. The use of 4mH iron core is perfectly fine. In fact, I have been wanting to try it as it will give about 0.5dB more bass sensitivity vs air core. I don’t think there is a drawback as I use iron core on many other speakers. The DCR is lower hence more bass sensitivity.Finished my sealed RS225/TC9FD. Because I'm cheap I used 3/4" subfloor material from all the construction in my neighborhood. Heavy and dense, maybe even heavier than MDF. So far sounding good. Kept standard tweeter attenuation even though TC9FD less efficient than 10F/8424 because brightness bothers me. Used a cheaper Dayton iron core 4 mh inductor and wondering if I should upgrade. Used it because I had it. What difference would I hear? Thanks to X for such a well documented project!!
The drivers need to be flush mounted for best results. If not, can still work well. Do a round over on back of cutouts for full range and woofer.I started with a mixed cut list (never a good thing, as one had the sides tucked under the top and the other did not) and the prototype has a bunch of wrong sized panels, which is why I try to prototype before cutting expensive lumber... But now I can verify all my cuts and notice little things to fix and adjust. It also allowed my wife to look at the basic shape and size and give it the green light.
Quick question - I've seen radii listed for the routing and the holes for the front, but not for how deep the routing (at the edge) should be. Do we want the speakers flush with the wood? Or is there some other measurement to use for the depth of the routing for the outer ring?
- Home
- Loudspeakers
- Full Range
- 10F/8424 & RS225-8 FAST / WAW Ref Monitor