A lot of the other forums have a permanent photo gallery for projects, so why not the Chip Amp forum?
I will kick this off with my newly finished Chip Amp and let the moderators decide if this should be a permanent thread or not.
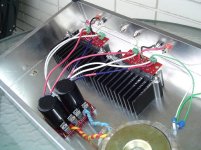
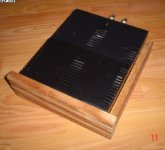
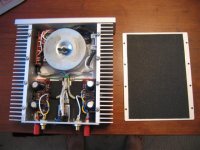
This is an LM3886 based Chip Amp using PCBs from www.chipamp.com.
The tranny is a Piltron 160VA 22V transformer with 15000uF caps and snubbers.
For a more laid back sound, I went with Carbon Film resistors.
The results really surprised me. The Chip Amp sounds better than I expected and better than it should considering the cost.
I will kick this off with my newly finished Chip Amp and let the moderators decide if this should be a permanent thread or not.
This is an LM3886 based Chip Amp using PCBs from www.chipamp.com.
The tranny is a Piltron 160VA 22V transformer with 15000uF caps and snubbers.
For a more laid back sound, I went with Carbon Film resistors.
The results really surprised me. The Chip Amp sounds better than I expected and better than it should considering the cost.
Attachments

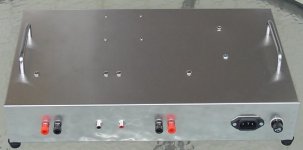
This is a picture of the back side.
For more information and pictures, visit my website.
Thank you to the diyAudio community for providing me information to build this project, and to Carlosfm for the PSU design, and BrianGT for the PCB design.
Cheers,
Gio.
For more information and pictures, visit my website.
Thank you to the diyAudio community for providing me information to build this project, and to Carlosfm for the PSU design, and BrianGT for the PCB design.
Cheers,
Gio.
Attachments
Member
Joined 2003
Hi,
Some pictures of my amp and preamp are available here.
The preamp is the Kookaburra from Twisted Pair Audio. Uses a 10VA transformer, and has 2 outputs wired in parallel. One for the main amp, and one for the subwoofer.
The amplifier is Mauro's RevC design and is the kit from Twisted Pair Audio. It uses a Plitron 400VA transformer, and uses all the parts that come in the kit from TPA, except the input coupling caps. Here I've used Solen 2.2uF 250V MKP caps. The AC outlet on the back is so I can plug my preamp directly into the power amp and only use one ac outlet on the wall.
Member
Joined 2003
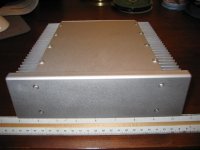
I should add that that's a mighty fine looking amp you have there yourself, GG. Very industrial looking. Looks like it could use some ventilation holes though 😉.
Is "industrial" the polite way of saying rough? 🙂 I always struggle with the chassis.
I had thought about ventilation holes, but the heat sinks are much larger than required and they do not even get warm.
Your amp and preamp look much more "refined"! 😉
Where did you get the chassis?
Cheers,
Gio.
I had thought about ventilation holes, but the heat sinks are much larger than required and they do not even get warm.
Your amp and preamp look much more "refined"! 😉
Where did you get the chassis?
Cheers,
Gio.
Member
Joined 2003
I bought the chassis from the trading post on this very forum. I couldn't tell you where it's from originally, as it has no manufacturer's markings on it.
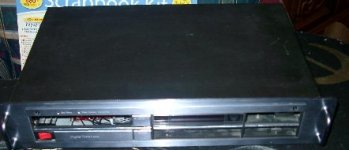
I built this one from chipamp.com PCBs but bought my own components from Mouser. For the chassis I used an old Carver CD player that died. The quite large heatsinks came from eBay and I will probably pare them down to just one and use the other one in another amp. The tranny is a 22v + 22v 160VA from avel-lindberg. The LM3886 chips I bought direct from National.
It Rocks!
RDV
It Rocks!
RDV
Attachments
Here goes:
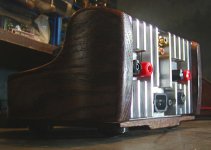
The front case holds the 250 VA toroid, diode pcb and caps on an aluminium subchassis.
The case in the back has the chip board and heatsink, also on an alloy subchassis.
BrianGT pcb set, connections between the 2 cases by Hirschmann Stas/Stak.
Monaural amp, WBT style terminals from the jrsun GB.
The wooden sidestrips hold the 2 cases together.
The cases are NOS from former porsche highway cop amplifier production(got about 20 of those cases and subchassis)
The wood is a leftover from the swimmingpool.
Stll need to buy a sh..load of rubber feet from ApexJr.
It sucks.
Attachments
Peter Daniels premium kit, with 2.200uF Pana FCs per rail (bypassed with Siemens MKTs), and 220pF Silver Micas between signal + and -; Zobels consist of 0.1uF Wima MKP4 caps and 2.6R MF resistors. 350VA toroid, all solid core cables by Belden. Stepped attenuator from diyfidelity.com.au.
Velleman kit seen in the pic is not used, the Silver Mica caps take care of the clicks'n'pops nicely.
I've been using it for half a year now without any 'fiddle attacks'. 🙂
Velleman kit seen in the pic is not used, the Silver Mica caps take care of the clicks'n'pops nicely.
I've been using it for half a year now without any 'fiddle attacks'. 🙂
An externally hosted image should be here but it was not working when we last tested it.
An externally hosted image should be here but it was not working when we last tested it.
An externally hosted image should be here but it was not working when we last tested it.
Wow, that is superb both on quality of construction and beauty. Nicely done. What case is that?coredump said:Peter Daniels premium kit, with 2.200uF Pana FCs per rail (bypassed with Siemens MKTs), and 220pF Silver Micas between signal + and -; Zobels consist of 0.1uF Wima MKP4 caps and 2.6R MF resistors. 350VA toroid, all solid core cables by Belden. Stepped attenuator from diyfidelity.com.au.
Hi orthoefer,
thanks for your comment. The case was built by a member of another forum who tried to mimic the classic Naim cases to provide better visual integration of DIY efforts. ;-) At one point he sold them on eBay.
The inner chassis is made of alloy, the outer case is made of perspex. I added the separators for the toroid and the passive pre, heat sink, plugs, etc.
Actually, this is my 3rd GC, and I wanted to build something more ... erm... definitive, if you catch my drift.
Best,
Oliver
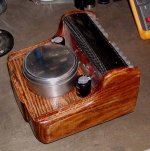
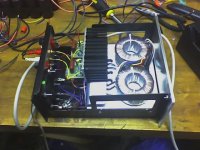
Just a quickie before I take some more shots of the innards, but here is my latest "finished" amp built inside of an old SCSI external enclosure. Those babys are GOLDEN for compact chipamps, and you can usually find them surplus for dirt cheap or free. Get busy with the cutting wheel and dremel, slap on a new coat of paint, and you have a great, roomy enclosure.
I still have to add power lights on the front (which is 3/16" aluminum plate) and get some better feet, but the guts are done. I am planning on using this as an office amp for my iPod and computer, so there is no need for volume control since all of the devices I will be using with it will have volume controls built in.
I still have to add power lights on the front (which is 3/16" aluminum plate) and get some better feet, but the guts are done. I am planning on using this as an office amp for my iPod and computer, so there is no need for volume control since all of the devices I will be using with it will have volume controls built in.
Attachments

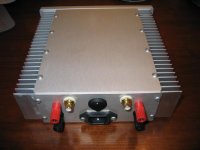
BrianGT LM3875 kit. Two alternative power supplies:
- Dual mono 1500 Panasonic FC + 100 uF Black Gate per rail.
- 10000 uF Panasonic FC (snubberized) + 100 uF Black Gate per rail
Transformers 120 VA each. Enclosure is still unfinished.
HD pics here:
http://www.dvdplaza.fi/galleria/showgallery.php?cat=500&ppuser=3104
- Dual mono 1500 Panasonic FC + 100 uF Black Gate per rail.
- 10000 uF Panasonic FC (snubberized) + 100 uF Black Gate per rail
Transformers 120 VA each. Enclosure is still unfinished.
HD pics here:
http://www.dvdplaza.fi/galleria/showgallery.php?cat=500&ppuser=3104
An externally hosted image should be here but it was not working when we last tested it.
An externally hosted image should be here but it was not working when we last tested it.
An externally hosted image should be here but it was not working when we last tested it.

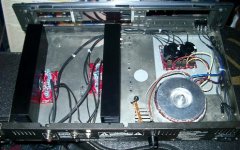
More pictures of the guts of my amp. This thing isn't what I would call "good" with regard to wiring or layout, but hum is non-existant and the sound quality is excellent. It's a dual mono due to a great deal on 80VA transformers at ApexJr that I couldn't pass up (who are great to deal with, btw). Hidden under the torroids are 2X2200uf/rail (250V!!!) caps that were salvaged that I had laying around (4400uf X 4 rails total). They take up a ton of space, but work great with this configuration.
Attachments
- Home
- Amplifiers
- Chip Amps
- Chip Amp Photo Gallery