It would appear that some controls for pre-amps are not meant for use in thick front panels like those supplied with some Modushop chassis. For example, the Alps volume controls only have a shaft length of 20mm, including the threaded part, which would not allow sufficient shaft to mount anything but a very thin knob on the outer side.
Is there a smarter alternative than having to resort to CNC drilling and rebating that one can do at home?
Thanks
Is there a smarter alternative than having to resort to CNC drilling and rebating that one can do at home?
Thanks
Hi , in such cases a extenders are used , but i have not seen where to purchase them. Probably you can try some alu or cu tube of similar diameter .
Thanks, but yes, the extenders seem a little difficult to find. Wonder if anyone has a source?Hi , in such cases a extenders are used , but i have not seen where to purchase them. Probably you can try some alu or cu tube of similar diameter .
Perhaps I could use Al tubing but I'd be concerned about finding a suitable bushing for the front panel holes.
With a bit of practice, a lot of patience and lubricant (I use polishing compound) you could try a Forstner bit in a drill press to do rebating in aluminum. E
finding a suitable bushing for the front panel holes.
Get a $2 pot, bust the back off.
When I see such bushings bare they ask $7, so half a pot is cheaper.
Thanks I'll give it some thought!With a bit of practice, a lot of patience and lubricant (I use polishing compound) you could try a Forstner bit in a drill press to do rebating in aluminum. E
Excellent Idea. ThanksGet a $2 pot, bust the back off.
When I see such bushings bare they ask $7, so half a pot is cheaper.
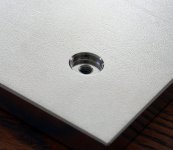
Counterboring the back side of the front panel is the best way with a thick panel.
You could also counterbore the front side, and have the back of the knob a little recessed.
But Alps seems to have longer than usual shaft length on their pots that I've used.
For example, the RK27 has options of 15, 20, 25, and 30mm from the base of the bushing
to the end of the shaft. In my experience the limitation is the 7mm bushing length, not the shaft.
The panel has to be less than 3-4mm thick for the bushing to be usable with a nut.
Attachments
Last edited:
You can normally counterbore pot holes from the front, since the knob will cover it anyway. Here's how I used to do it by hand:
1) Drill 8mm through hole for the threaded part of the pot.
2) Cover front panel with masking tape to protect it against scratches (at least the area around the borehole, but 1 strip of 50mm tape per height unit covers a Modushop front panel nicely 😀 ).
3) Clamp the front panel securely to a solid work surface with a piece of scrap wood between.
4) Use a 15-18mm metal drill in a handdrill to make a counterbore that is as deep as you need it and as straight as you can make it. I used a 16mm drill and that was just large enough to be able to get a pair of pliers onto the Alps nut to tighten it afterwards, but there's obviously a little wiggle-room here.
Tips: A hand drill with a support handle is easier to keep straight(ish) with a two-handed grip. Go slow, check your depth regularly and don't drill all the way through. Some alcohol for lubrication/cooling often helps.
Yes, you end up with a hole that is basically just countersunk but if you are a bit careful it will have clean edges and you can easily tighten the nut and washer of the pot even if the hole doesn't have a flat bottom.
Counterbore from the back if the shaft is shorter, but you then need a large enough dia bore for the entire pot body.
Counterbore from the front if the shaft is longer, and then you only need a bore size large enough for clearance
for the mounting nut. The counterbore doesn't have to be the dia of the knob if the shaft is long enough.
Counterbore from the front if the shaft is longer, and then you only need a bore size large enough for clearance
for the mounting nut. The counterbore doesn't have to be the dia of the knob if the shaft is long enough.
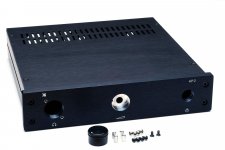
On the HP-2 chassis I had ModuShop make a counterbore from the front of the panel. The bore is slightly larger than the volume knob so the knob slides into the bore nicely. I think it looks very nice, though it obviously adds cost.
If you're going to DIY it, I'd swing by a maker space or machine shop and mill it.
Tom
If you're going to DIY it, I'd swing by a maker space or machine shop and mill it.
Tom
Attachments
If you ever have to shorten a too-long shaft, clamp it by the free end of the shaft, and let the body of the pot
hang free (in a sealed plastic bag), while you cut the shaft to length with a hacksaw.
This will prevent damaging the pot, which would be likely to happen if the body of the pot is clamped instead.
hang free (in a sealed plastic bag), while you cut the shaft to length with a hacksaw.
This will prevent damaging the pot, which would be likely to happen if the body of the pot is clamped instead.

Countersink from the back using a Forstner bit large enough to fit the pots body and connections without shorting against the aluminum. Try it on wood first to get the hang of it. If you do it from the front you might have trouble reaching the set screw on the knob! Trust me, it sucks!
Thank you everyone for your contributions. Very good of you to help.
A couple of questions:
Any specific suggestions for the bit make that works well with Al?
Thanks once again
A couple of questions:
- I thought Forstner bits were only good for wood and not metal like Aluminium?
- With Counterbores they all seem to be relatively small diameters and require a 'locating' hole for the bottom of the bore (which might be too large for the larger bores), I assume for stability/centering purposes.
Any specific suggestions for the bit make that works well with Al?
Thanks once again
With a carbide tipped first er bit and cutting oil you can do aluminum. Use your drill press and drill the center hole after the large hole is done. Go slow and lift up often to clear the chips.
It´s not the same cutting angle but "wood tools" in general can be used on Aluminum.
- I thought Forstner bits were only good for wood and not metal like Aluminium?
4 caveats:
1) go slow
2) go slow
3) use solid lubricant such as soap
4) go slow 😉
For extra economy, for one offs, you can even use spade drills.
Drill a small pilot hole for the point.

hey are easy to resharpen after use.
Drill a small pilot hole for the point.
hey are easy to resharpen after use.
Spades suck, even in wood. Go with a Forstner.For extra economy, for one offs, you can even use spade drills.
Drill a small pilot hole for the point. View attachment 1127314
hey are easy to resharpen after use.
Thanks,It´s not the same cutting angle but "wood tools" in general can be used on Aluminum.
4 caveats:
1) go slow
2) go slow
3) use solid lubricant such as soap
4) go slow 😉
It's slowly dawned on me I should give it a try then 😉
When you say 'slow' I take it that you mean 'feed rate' (downward pressure) but would this also apply to the drill speed too - i.e. low RPM?
- Home
- Design & Build
- Construction Tips
- Attaching controls to 10mm front panels