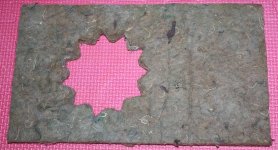
I would experiment with a multi-point star shaped cut on the inside circle cut of the donut to ease the transition and avoid any semblance of cavity resonances.
If your driver's problem is confined to the dome only, a dot of PVA in the center will aid to disperse the beaming without materially affecting the off axis FR to any noticeable degree. If the beaming is caused by an interaction between that noticeable first change in tone, as you tap the cone in a radial direction from VC to surround, and the dome center things become more complex.
Try taping again but this time attempt to hear through the tap to the trailing "echo" or decay of the energy. As you move the tap up to the change point does this decay seem to alter in an odd directional manner? It is easy to discount this subtle activity as "making no sense".
A change in decay direction is far more important than a change in tone or timbre. You should also tap farther up the cone looking for these change points. You are likely to find one out near the surround and possibly a few more back down the cone, with very little change in tone or timbre, other than a rather gradual one. The change points farthest from the voice coil typically have far more effect upon beaming than those found near the voice coil.
I realize this is counter intuitive, but that really doesn't alter what occurs when you seek to control the wave shaping caused by these circumferential points of decay direction change,
A correctly performing driver starts with a seeming straight out decay right at the voice coil, one without any direction, and this slowly changes to a decay pointing at the surround, by the time your taping reaches that point.
For the dome, there are usually two points where this directional decay can be found, with the outer one being the most noticeable. Neither of them will completely correct beaming but their benefit will audible once they have been corrected. In this area a change in tone or timbre is more noticeable than any change in decay direction, once inside the outer point, Since applying the patterns in an unneeded place appears to have no audible effect (again unintuitive) I just go ahead and treat the inner points, if treating the outer one doesn't disperse all of them.
A central set of patterns, around the dot of PVA can also be beneficial. A pattern that looks like two triangles offset from each other by equal rotation, with the vertexes marked by a pair of dots, will "turn off" the high frequencies reaching the center of the dome. Whether this is actually a cessation of activity or the dispersion of a loop back, emitting wave distortion mechanism, is unknown to me, though I favor the latter idea.
Using toothpaste for this central dot and central pattern will be useful in experimentation but not perhaps how you want to handle a permanent solution.
Bud
I would experiment with a multi-point star shaped cut on the inside circle cut of the donut to ease the transition and avoid any semblance of cavity resonances.
Like this?
dave
Attachments
I appreciate the replies...
Thanks for your time, Bud! I was interested looking at the online photos of your work on the Fostex A200, which AFAIK, was modeled after JBL's LE8T.
Let me be sure that I understand about tapping - What I want to hear are inflection points in the amount of echo from the cone as I move along the radial axis? Listening for echo, I just now took my unsharpened pencil and tapped all around one of the JBL cones. The echo (unlike the timbre) seems fairly homogeneous all around the edge of the aluminum dust cap and out almost to the midpoint of the cone's radius. There the echo clearly begins to increase and that increase seems fairly steady clear out to the very edge of the cone. It's like striking a bigger and bigger drum, irrespective of the tension on the drum head. Neither the glue lines enclosing the coil leads nor the joint to the foam surround change the *echo* as much as I expected. For comparison, I just tapped on a (never-used) FE126e. That seemed to have the most echo approximately a centimeter from the edge of the cone (or about 2/3 of the radial distance between the dome glue and the surround). Am I on the right track? If so, then I'm focusing on the dome.
Tapping the dome, I hear the timbre gradients near the very edge of the aluminum but not much difference in echo. However, particularly near the center of the dome it seems that the pencil's impact may be absorbed somewhat rather than transmitted to the cone. In the center of the dome, the tap sound looses resonance and seems less crisp - more dull, more of a thud tan a tap. Clearly less echo around the center of the dome. So whaddaya think??? I think I'm going to try the toothpaste on the dome! A dozen dots in the often-photographed pattern, surrounding a larger central dot. Other suggestions? If not, I'll report back.
Thanks also for your replies Russell and Dave. What are your experiences with absorptive strategies? Just guessing, "better to remove it from the source than try to subtract it after it exists"...
TIA,
Frank / Mpls.
Last edited:
Like this?
dave
Pretty much, except I pictured more extreme points. What you pictured would be much better than a round hole in the centre, though, I would think.
I have also had very good results from damping the centre spot on a metal domed tweeter, too, but haven't tried it on the metal centre dust cap/dome of the likes of a JBL LE8T though, even though I had one for years.
Last edited:
The echo (unlike the timbre) seems fairly homogeneous all around the edge of the aluminum dust cap and out almost to the midpoint of the cone's radius. There the echo clearly begins to increase and that increase seems fairly steady clear out to the very edge of the cone. It's like striking a bigger and bigger drum, irrespective of the tension on the drum head. Neither the glue lines enclosing the coil leads nor the joint to the foam surround change the *echo* as much as I expected.
Exactly.
I rather strongly suspect that the growing resonance towards the outer 1/3 or so is actually from a Raleigh wave. You must treat this on the back side of the cone using an acrylic ever sticky glue. If you tap the back side as you did the front, you should find a very clear demarcation where the decay seems to suddenly spread out from the point of impact and emit almost as loudly from the opposite circumference of the back side of the cone as it does from the tap point.
Find the inner radial distance and apply the glue from there to the edge of the cone or cone / surround. Just one coat. Allow to set overnight and tap again. If there is still an obvious change apply another coating. Continue to do this until the decay product sounds very similar across the entire radial length from VC to edge. Two coats will likely be correct, but listen carefully after the first one. Every 8 inch nominal cone I have treated has had this Raleigh wave, so look at the Fostex F 200 A cone where they taught me how to snuff it.
Then attack the dome.
Bud
Wonderful help! Thanks Bud.
I'm optimistic, as just tonight I played with the domes using three different-shaped bits of electrician's tape (in lieu of the 'correct' toothpaste 😛). A small central triangle of tape has made a surprising improvement. [If we're not careful, we'll make these drivers too good for their current enclosures!]. Before I begin to tweak the drivers in earnest, I feel it best to get 100% happy with the I/V converter for my Buffalo DAC and collect the various circuit boards scattered around my amps into the chassis that arrived today. Then I'll follow your recommendation and report back.
Many thanks for your interest and spirit of sharing.
Frank
If someone would like my EnAbl kit I got from Ed, let me know. Only 1 application so ~99% still left.
Hi all!
I want to try EnABL a pair of Monacor SPM-200X/4 N.
MONACOR INTERNATIONAL😛roduct detail page
Are their any pattern already done in this thread that fits?
The diameter on the cone is 160 mm -the flat part, whole cone 180 mm.
The whizzer cone is 65 mm.
Thanks.
I want to try EnABL a pair of Monacor SPM-200X/4 N.
MONACOR INTERNATIONAL😛roduct detail page
Are their any pattern already done in this thread that fits?
The diameter on the cone is 160 mm -the flat part, whole cone 180 mm.
The whizzer cone is 65 mm.
Thanks.
Progress report - JBL LE8T
Greetings Bud,
All electronics are now in order and I'm able to work on cone treatment. There is not sufficient space around the rear of the cone to reproducibly tap along a radius or up near the voice coil, so I used the demarcation point that I found from the front of the cone. In that regard, I have an little oddity to run by you. One of the cones is ~6 years older than the other. (DC accidentally entered one of the drivers 1.5 years ago, requiring a re-build) I found that the older cone had a more obvious echo gradient than the newer cone. The two surrounds feel equally soft... I assume that I should be aiming for equal results rather than worried about performing exactly equal treatments, no?
Today I applied one coat of Zig 2-way glue and feathered it a bit near the inner edge. The back side of the LE8T cones are uncoated black paper and surprisingly absorbent. I applied the glue using a #6 flat natural bristle artist's brush and I suspect the coat was rather generous. 8 hours later, the resonance of the newer cone didn't seem to vary at all. The older cone may produce slightly more echo at the edge - but only slightly more. Since the winter air is bone-dry and the cones seemed to dry quickly, I hooked the drivers up after 8 hours and listened first at low output. Oboes and certain grand piano notes and female vocals had always been prone to beaming by these drivers. Now, the piano and vocals seem cured. The oboe - almost. I'm using a nice 88kHz/24 bit recording of Bach's concerto for violin and oboe (Hilary Hahn). Sound before and after the glue treatment seemed subtly different at first but with added listening it became more and more obvious that the Oboe was much more under control. Only a couple of oboe notes seemed to strain, and only very slightly. [BTW, the oboe in this recording mostly plays through the driver with the older cone.] Overall, the apparent space around all of the instruments and voices has expanded. At higher volumes the improvements are more than subtle - *everything* is cleaner. [I used to blame the square room dimensions for some of that dissonance!] So this is a very positive result and I'll listen (and tap) quite a bit more before deciding whether to apply any more glue to the cones. ...maybe just the older cone so it taps the same as the newer one?
Meanwhile, I need to find the correct PVA paint to 'attack' the aluminum dust caps, and now I'm seriously considering surface patterns on the cones.
Have you ever evaluated or treated anything like a JBL 2235? They might be next in line! 😛
Best regards,
Frank / Mpls.
Greetings Bud,
If you tap the back side as you did the front, you should find a very clear demarcation where the decay seems to suddenly spread out from the point of impact and emit almost as loudly from the opposite circumference of the back side of the cone as it does from the tap point.
All electronics are now in order and I'm able to work on cone treatment. There is not sufficient space around the rear of the cone to reproducibly tap along a radius or up near the voice coil, so I used the demarcation point that I found from the front of the cone. In that regard, I have an little oddity to run by you. One of the cones is ~6 years older than the other. (DC accidentally entered one of the drivers 1.5 years ago, requiring a re-build) I found that the older cone had a more obvious echo gradient than the newer cone. The two surrounds feel equally soft... I assume that I should be aiming for equal results rather than worried about performing exactly equal treatments, no?
Find the inner radial distance and apply the glue from there to the edge of the cone or cone / surround. Just one coat. Allow to set overnight and tap again. If there is still an obvious change apply another coating. Continue to do this until the decay product sounds very similar across the entire radial length from VC to edge. Two coats will likely be correct, but listen carefully after the first one.
Today I applied one coat of Zig 2-way glue and feathered it a bit near the inner edge. The back side of the LE8T cones are uncoated black paper and surprisingly absorbent. I applied the glue using a #6 flat natural bristle artist's brush and I suspect the coat was rather generous. 8 hours later, the resonance of the newer cone didn't seem to vary at all. The older cone may produce slightly more echo at the edge - but only slightly more. Since the winter air is bone-dry and the cones seemed to dry quickly, I hooked the drivers up after 8 hours and listened first at low output. Oboes and certain grand piano notes and female vocals had always been prone to beaming by these drivers. Now, the piano and vocals seem cured. The oboe - almost. I'm using a nice 88kHz/24 bit recording of Bach's concerto for violin and oboe (Hilary Hahn). Sound before and after the glue treatment seemed subtly different at first but with added listening it became more and more obvious that the Oboe was much more under control. Only a couple of oboe notes seemed to strain, and only very slightly. [BTW, the oboe in this recording mostly plays through the driver with the older cone.] Overall, the apparent space around all of the instruments and voices has expanded. At higher volumes the improvements are more than subtle - *everything* is cleaner. [I used to blame the square room dimensions for some of that dissonance!] So this is a very positive result and I'll listen (and tap) quite a bit more before deciding whether to apply any more glue to the cones. ...maybe just the older cone so it taps the same as the newer one?
Meanwhile, I need to find the correct PVA paint to 'attack' the aluminum dust caps, and now I'm seriously considering surface patterns on the cones.
Have you ever evaluated or treated anything like a JBL 2235? They might be next in line! 😛
Best regards,
Frank / Mpls.
I assume that I should be aiming for equal results rather than worried about performing exactly equal treatments, no?
Yes, get that resonance under control on both cones. Everything else will be both more subtle and easier to find.
Gary Pimm was up here a few weeks ago and one of the things we did was to teach him how to do a tap test. As always, when teaching you learn far more than when thinking on your own. What I learned was how important it is to have the driver in front of you, on a flat surface and tap up the far side of the cone, in a radial direction.
It took a few tap sets before Gary realized that there was an actual sensation of a beam of emitted sound, from the tap, sweeping across his face as he crossed a change point. After finding this beam sweep he was then able to locate the decay direction too. However, the sweep of the beaming was the most important indicator for him and he eventually had to tilt the driver to get the far cone surface more tangent to his face, to more closely target the center of the resonance / loop back change point.
This point needs to be bracketed by the two rings of patterns. You can trust that it will remain constant in distance from the voice coil, all the way around the cone.
Meanwhile, I need to find the correct PVA paint to 'attack' the aluminum dust caps, and now I'm seriously considering surface patterns on the cones.
The correct PVA is the surround glue sold by Parts Express. You can also use white wood glue, though it has a modified chemistry. The correct point for the PVA dot is right in the middle of the dome. The acrylic paint pattern blocks will need to be applied first, along with a center dot of acrylic paint, in the middle of the simplified 6 block pair twin triangle pattern of block pairs that surrounds the dot. This pattern and PVA dot will kill the beam of high frequencies, loop back, steering mechanism and they will disperse properly and widely.
The cone pattern treatment will cure all of the rest of the beaming events from the cone. You have undone the worst one, but the rest provide ever greater reproduction of the spatial character of the musical event and ever deeper levels of coherence to the tiny signals that help to reconstruct the true nature of the instruments involved.. So, once complete you will have perfect dispersion, complete lack of the "hall of mirrors" echo resonances and about 50 db further down of coherent musical information, as sounds that are now incoherent and currently mask this low level information, are placed back in their correct context and cease being "noise" you cannot hear through.
Your drivers will finally sound as their designer intended.
Bud
Yes, get that resonance under control on both cones. Everything else will be both more subtle and easier to find.
With a bit more time to cure, I am sure that a second coat is not needed. The worst of the oboe frequencies are now tamed. One of the cones remains 100% even in resonance (to my ear) and the other has a central ring where resonance is *slightly* greater than either margin. I probably didn't give that area quite as much material. So a tiny bit more will go in that region. Interestingly, the property of timbre is also different between cones - the newer one producing higher tones. All the parts are OE from the factory and installed by the same technician but 6 years apart.
Thanks for your continued interest and I'll check back when more is done.
Frank
Greetings Bud,
I think the Fostex F200A has many physical similarities to the LE8T, and I have downloaded the F200A pdfs. They fit the LE8T reasonably well, except the JBL cone is a bit deeper and the voice coil a bit larger. However, adjusting the scale of the individual pdf patterns by a few percent is all that seems necessary for good positioning. My question has to do with the rear rings. Are there any criteria that might indicate to me that rear patterns may NOT be beneficial? Again, a radial tap test is very difficult on the rear of this driver. How do I decide whether to do the rear?
BTW, I ironed-out the final dissimilarities between my two drivers by adding a bit more Zig glue at one radius, and by removing some glue from the back of one surround where it overlaps the paper. I used cotton gauze wetted with 100% isopropanol and the glue came off gradually with light rubbing. ...tuned it right up! So now the only variations in resonance *I* can sense with front tapping are very near the glue lines. I don't hear any gradients mid-cone. These cones are fairly heavy paper - I wouldn't be surprised if the F200A cones are lighter - and again there is a white outer surface treatment on the LE8T fronts. I've located supplies and am excited to start experimenting with nibs and 'practice cones'. [I'm not sweating the learning curve because I've done detail work all my life - experimental surgery and microsurgery plus all manner of DIY (a family tradition: furniture, cabinetry, racing bike frames, tailoring, houses, etc... 😛)]
Frank
Having read a bit about the driver and looked at an unknown smoothing factor, frequency response plot. I strongly suspect that the two outer cone rings from the Fostex patterns and one ring set out on the periphery of the dome are all you will need, in combination with the center dome dispersion group.
The final ring set has the largest effect upon high frequency dispersion, bringing it to the included angle of the cones and tangent to the cone curve from the dome center.
The only thing you will need to concentrate on, when training, is pen tip angle, shallow, and the difficulty of negotiating a double curved surface with the upside down pen tips. With your hand eye coordination experience, I suspect it will take at least 10 minutes for you to adapt.
I would advise you to tap test some bare cone drivers, looking for that directional wash across your face from them, just to make sure you are properly sensitized. Otherwise, go for it!
Bud
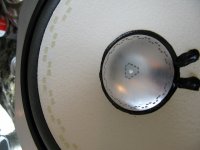
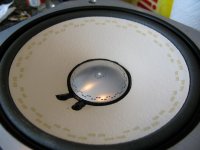
LE8T treatment - first steps
OK, here's how my EnABLed LE8Ts look thus far... I had been playing the drivers with a decent-sized electrical tape triangle on the domes and it helped significantly. Also, the central 'echo zone' of the domes, before any edge treatment, was fairly large. Thus, I went ahead and made the center pattern rather large. I was prepared to put a ring pattern on the cone just outside the dome but after putting the border pattern on the dome it seemed to also eliminate the small increase in cone resonance I had noticed tapping on the other side of the black glue. The particular radius of the outer dome pattern was where the resonance gradient became obvious. I don't know if it would be better closer to the margin of the aluminum, but now there is no resonance gradient so we'll have to audition them - starting later tonight. If highs are too muted I can either remove the acrylic and make the triangluar pattern smaller, or even bring the tweeter crossover point (fill-in, no filter on the 8's) farther down. I'll work through some reference recordings in the next few days and report back on the quality and personality of the sound.
Frank
Attachments

Last edited:
OK, a quick 1st impression: a) we're close to my upper limit on 'attack', and b) I can't locate the speakers - it's a deep wall of sound.
Now you know.
When you turn your attention to the JBL 2235 the results will be a complete lack of noise in low frequencies, bass with an actual leading edge and texture everywhere. Transient attack will exactly match that of the LE8T.
Back to the the LE8T. I strongly suspect that a ring set, placed right after the curve flattens out onto the rest of the cone, will uncover yet another level of detail and liquidity in the sound field. You are fortunate to have a driver that is large enough to provide the weight of upper bass notes, without need for a crossover / woofer blend to help.
With the 4 inch drivers I have and a pair of slant line terminated transmission line bass towers I have from Planet 10, I can get that weight and power. However there are tiny miscues in perceived location within the illusion of a sound field, due to the driver offsets (bass drivers on the sides) that shorten the depth of the sound field to something less than 30 miles or so.....
Welcome to the party Frank, I salute your courage.
Bud
Now you know. ...I strongly suspect that a ring set, placed right after the curve flattens out onto the rest of the cone, will uncover yet another level of detail and liquidity in the sound field.
I will add that mid-cone ring, maybe positioned just outside the coil leads. Also there is now an obvious need to center-treat my 1" silk dome tweeters (Morel). They stand out in the 'sound wall' as foci of HF information.
FWIW, the treated LE8Ts now *seem* to output less upper-bass than before. Attack and fidelity of the 15" woofers has always been very pleasing, each channel originating from a WM8741 DAC chip in mono mode into separate balanced amps. BUT... I found an HD recording that the 2235s don't follow well so later on I will consider this specific flaw and its correction. [It's Ron Carter's acoustic jazz bass in Rosa Passos' - 'Entre Amigos' (96kHz/24 bit).]
Also FWIW, my standards and performance targets are primarily dictated by HD recordings. The midrange+HF channels (to the LE8Ts + tweeters) originate in a TPA Buffalo 2/Legato (one sweet DAC!).
Home-brew Audio Preamp/DAC-ADC | Facebook
My bias toward HD digital is partly why I was surprised by this: among signals from that very high resolution source, it is the transparency of *redbook recordings* that are most obviously improved by the tweaks to the LE8T cone and dome! This is evidence of the fundamental level on which the EnABL 'system' is improving transducers, and suggestive of its broad efficacy in aiding reproduction of common digital audio.
...Welcome to the party Frank, I salute your courage.
A very gracious party, Bud, and your interest and insightful help are making all the difference! I'm really only risking some time and the cost of new OE motors and cones ($160/side). I hope this small extension to your body of descriptive research is encouraging to other readers.
Frank
Silk dome tweeters respond to EnABL like no other form of tweeter. If you place a ring set at the very beginning of the actual dome and the triangular six block pattern, with tiny PVA dome at the tip of the dome,just as you did with the LE8T dome, they will have almost a 180 radiation, unless there is a focusing horn.
For flat plate mounted domes the addition of a 50% or less mix of gloss to pure water will bring that radiation to a true 180 degrees. In amy event they will disappear, high frequencies will be buried in information, with leading edges no longer disassociated from the rest of the musical event.
Treating the woofers will eliminate bass sounds and instead provide you with structures that the rest of the information makes perfect sense within. The compression effect of low frequencies will astonish you, but they will just be another part of the whole illusion, with all of the gauze's removed.
I am sure your journey will provide comfort and courage to more folks and they too will take the plunge.
Bud
- Home
- Loudspeakers
- Multi-Way
- EnABL - Listening impressions & techniques