I had hoped to make a pair using papier-maché, but it never happened. I wanted to cut the sides from card stock or some very thick, very stiff watercolor paper, then add a paper and glue pulp to the outsides of the cells. I made some tractrix horns that way and they were lovely sounding, very smooth and neutral. A 10 or 15 cell horn would be a big project!
Mat board could also me nice, but you’d probably need 2 or 3 layers.
My wife still reminds me - 17 years later - how I killed her nice kitchen blender making the paper pulp.
Mat board could also me nice, but you’d probably need 2 or 3 layers.
My wife still reminds me - 17 years later - how I killed her nice kitchen blender making the paper pulp.
You might also be able to do something like this:You'd need 45° angular cuts along the curves
Post in thread 'Investigating port resonance absorbers and port geometries'
I already have access to a 3d printer and printing a round port is the planned next step!Buy a 3D printer!
here is another possible port construction technique:

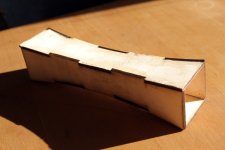
laser cut 4 mm plywood, square cross section, rounded walls.
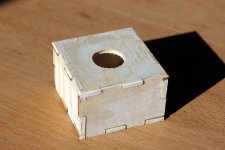
I use a small helmholtz resonator as absorber. in this case it is 3 x 5 x 5 cm and has a small 2 cm "port", about 2,6 cm long.I don't think the resonator needs to be that long.
the resulting resonance frequency can easily be verified by blowing into the hole/the port.


it could be interesting to see whether a...
Thick paper, very thick. Some watercolor papers are very thick and stiff. I used a very heavy Arches 100% cotton paper. Mat board is also thick and stiff enough to hold shape during building, but I suspect too thin for final use. Even the metal horns used extra mass on the outside walls to kill vibrations. Some were tar filled, and they are very heavy. 😱
Ladies and gents! Just got the laser cutter delivered this morning and I'm in love with it! I will be cutting the bits out of 3m plywood and then using a router to get 45° edges. Maybe print the throat adaptor but I like the idea of an all wood project.
@pelanj @Aftonklubben @Petter Persson @Fuling since you guys built them and the thread has both 3d print and wood versions, what is the best way to go about for having sharp joints at the throat? Do I simply sand them down to a razor sharp edge?
Pelanj did you print some wedges to put between the gaps?
Any other advice you have that could simplify the job or avoid mistakes? thanks!!!!
I'll keep you posted as I'll probably get evicted from my flat due to burning wood and loud router noises buy hey, speakers are cool and I don't like my neighbours enough to care haha
Oooh! Sounds fantastic! 😀 Can't wait to see some in progress reports from you.
I would suggest putting the end of each cell wall on a flat surface and sand it down with a flat block.
That way you'll have most of the job done once you assemble the four walls. This is what I'm planning on doing!
Edit: Are you doing your horn according to Pelanj plans or closer to the size of the original 1505?
Last edited:
That's how I did it. A belt sander with a fixture back when I was building plywood horns, for the masonite ones a piece of sand paper glued to a flat surface was sufficient.Do I simply sand them down to a razor sharp edge?
You have quite some journey ahead. But it was fun. I still think I would do as I did in the first few posts in this thread. I would fill with PU- foam rather than polyester though. Good luck!
Also I have a big doubt relative to the dimensions to cut out. Petter's excel coordinates reach a length of 59cm while Pelanj's plans are 39mm long.
How would this impact the frequency response?
Due to laser cutter limitations my max dimensions are 40x41 so ideally I'll go with Pelanj's version.
Then looking at the model I thought about the fact that the curved sides will need to be laid flat, and it won't just be like cutting out the top projection since the bend adds a total 4mm.
Any idea how to flatten a curved solid face in F360 so i can laser cut it?
Smells like strawberries... 😀polyester
How pretty!!!! In Ojas grey hahaha looks great! What are the monoblocs?
Also I was thinking, how would carbon fiber or acrylic horns sound? would they need lots of dampening too?
Also I was thinking, how would carbon fiber or acrylic horns sound? would they need lots of dampening too?
In addition, I guess those 807 plate caps need to be connected and insulated 😎 .What are the monoblocs?
Best regards!
Yes, unfortunately... I tried to mix my own "Battleship grey" to imitate the paintjob on old Altec cabs but it turned out more like the light grey used by Ojas.Ojas grey
What are the monoblocs?
807 PP triode, class A2. They started as a pair of Philips EL6400 PA amps modded beyond recognition.I guess those 807 plate caps need to be connected and insulated
Not my best sounding amps, the OPTs are far from hifi quality.
FWIW, etc., Altec's gray changed over time as they used whatever gov't. surplus they could get cheapest, such as my 1964 A7-500 'pallet' kits were a perfect match to ANSI 49 touch up spray cans as late as 1975 when I was forced to sell them.
Makes sense. Vintage Altec stuff is rare over here but according to what I've seen on the net they seem to exist in "50 shades of grey", often with a tint of blue or green?Altec's gray changed over time
...and beaten up in various ways 🤣they seem to exist in "50 shades of grey"
- Home
- Loudspeakers
- Multi-Way
- The construction of a multicell horn
