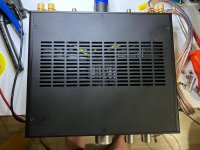
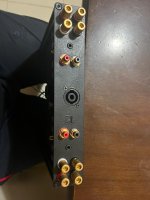
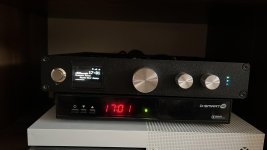
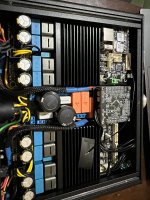
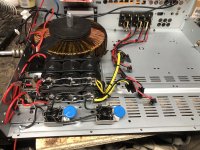
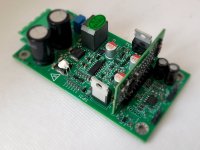
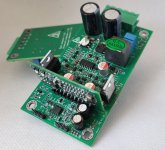
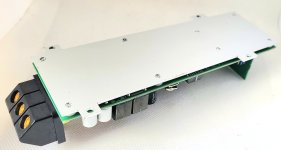
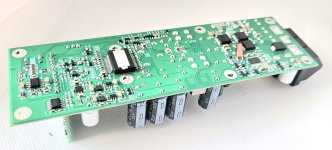
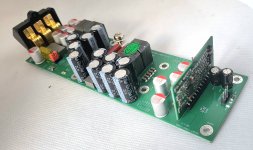
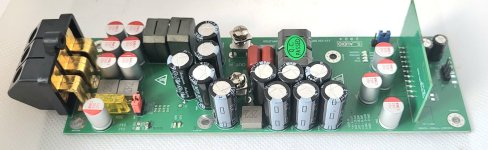
My new fully balanced amp based TAS5342 output stage and UcD type modulation.
TAS5342 working in PBTL mode. Max output power 100W@4Ohm, 150W@2Ohm.
In the 0.1W-P/2 output power range at full audio frequency bandwidth, distortion is less than 0.001%.
![20231230_203832[1].jpg](https://www.diyaudio.com/community/attachments/20231230_203832-1-jpg.1258631/ "20231230_203832[1].jpg")
![20231230_204231[1].jpg](https://www.diyaudio.com/community/data/attachments/1166/1166529-a375a4acf93023c4ec1063e406b4e3b5.jpg?hash=o3WkrPkwI8 "20231230_204231[1].jpg")
![20231230_203849[1].jpg](https://www.diyaudio.com/community/data/attachments/1166/1166530-9fb552dd344b856fd012f49419272d7e.jpg?hash=n7VS3TRLhW "20231230_203849[1].jpg")
![20231230_203747[1].jpg](https://www.diyaudio.com/community/data/attachments/1166/1166531-32c28ebbbc6088b37a63e2bd523762e6.jpg?hash=MsKOu7xgiL "20231230_203747[1].jpg")
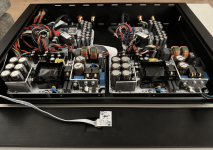
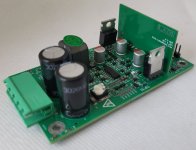
TAS5342 working in PBTL mode. Max output power 100W@4Ohm, 150W@2Ohm.
In the 0.1W-P/2 output power range at full audio frequency bandwidth, distortion is less than 0.001%.
Last edited by a moderator:

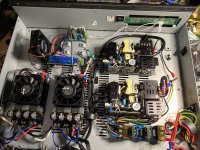
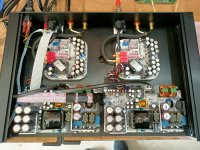
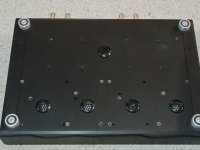
@rhale64 send me these pictures of his creation.
3ch "monoblock" amp1500W of power (3 x 500W). Monoblock because it powers the lows, mids and highs on a single speaker.


3ch "monoblock" amp1500W of power (3 x 500W). Monoblock because it powers the lows, mids and highs on a single speaker.
Hi,
This is my last build. I am going to replace the ADAU1701 board with the ADAU1466 DSP soon.
This is my last build. I am going to replace the ADAU1701 board with the ADAU1466 DSP soon.
Attachments
-
 2024-02-22 saat 00.48.01_caba9f01.jpg275.4 KB · Views: 419
 -
 2024-02-22 saat 00.48.01_6dd3a168.jpg98.3 KB · Views: 365
 -
 2024-02-22 saat 00.48.00_a73031d9.jpg203.6 KB · Views: 368
 -
 2024-02-22 saat 00.47.59_2f208a4a.jpg99.9 KB · Views: 447
 -
 2024-02-22 saat 00.47.57_139138ca.jpg273.3 KB · Views: 488
 -
 2024-02-22 saat 00.47.55_bb4a017a.jpg264 KB · Views: 482
I have installed a second PSU in my Hypex Nilai amplifier, effectively making it a dual mono block.Hypex Nilai500DIY
Had to improvise to make it fit into a wall mounted BESTÅ cabinet from IKEA (WxHxD: 56x32x20 cm):
- 90 degree banana plugs and XLR's.
- External standby switch, the amp is resting on the front plate where it originally was.
- Removed the top cover for those nice LED's, an accidental PSU touch just clears my ears.. /s
- Adjustable voltage regulator in the green box to control the USB-powered exhaust fan.
More info can be found over at ASR: https://www.audiosciencereview.com/...ai-stereo-mono-kits-cases.48769/#post-1820706
Cheers!
Attachments
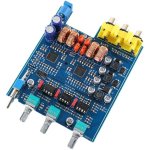
MA12070...😉Class D power audio amplifier with TPA3116
3 way motional feedback amplifier, mid+high ch powered by a 3116, bass ch by a 3116 in pbtl mode. Analog opamp based Sallen Key xovers, miniXLR balanced in, 20dB servo loop. 100*100*30mm.
Hi,
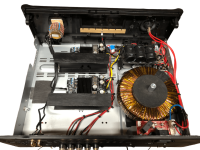
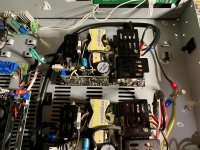
Here is another class D build using TPA3255. I needed a 4 channel amp delivering about 200 w/ch@4 ohms. After some searching found an old Anthem receiver for cheap locally - not working to use it's chasis. All guts were removed, a toroid wound for required voltage. The toroid is 400 VA, so it would not hold all channels on max. power sinus. However, normally music has quite high peak to average ratio and it works fine.
In order to make it easier for solving ground problems two separate windings with split paths for bridge rectifiers & caps are used for each board, containing a stereo amp. Heat sinks were also improved by adding some aluminium sections.
Also in bottom of second picture there are ground loop breakers shown. It's an idea from Rod Elliott sound pages.
The boards used were "Sure Electronics AA-AB32504" which is actually a BDM-8 amp from chinese. However, bluetooth interference/hiss could be heard which is not ideal. So I physically removed bluetooth boards from both amps. It's possible because BDM-8 has a switch on-board that routes signal directly to TPA-3255, bypassing BP1048B2 bluetooth chip. So it looks like it's better to use BDM-8A as it does not have the extra chip included.
On top there is a bluetooth received & DSP, the ESX-QM66SP and all of that is used to drive a semi-active speakers.
Was quite fun to do : )
Regards
Attachments


My easy build 1200AS2 in Quad 405 (china) case. without any buffer input. For me sound great.


I had two 1200as2 based amps from two different builders and both had SMPS buzzing from inside the case. I added some dynamat type stuff to the top of the cases top panel and it didn't work 🙁 dc filter didn't help either, I guess that's more for toroids than smpsHi X,
cool amp! Just a question re hum: many reviewer report an acoustic hum caused by the psu transformer (not through the speaker, the transformer itself makes hum/buzz). What's your experience with that issue and how disturbing is it, if any?
fyi this was when the 1200as2 first came out, perhaps later batches were improved
lol unrelated but I have a three channel purifi iet7040 amp and 2 of the amp modules died, the amp was built when the purifi 7040 first came out too. luckily VTV honored their two year warranty and were very cool about it, thumbs up to VTV
In the meantime I use two 1200AS1 and altough they produce some slight hum, I can't hear it on my listening place, even without a chassis (it's under construction) - so I don't worry anymore.
My MA5332MS power amp. Sounds better than my Pillor MA12070. Not even a slightest pop on turn on or shutdown.
Sound good enough for me. At this price point, i have nothing to complain.


Sound good enough for me. At this price point, i have nothing to complain.
Last edited:
My latest Dual Mono TPA3255 b ased on cheap ALiexpress board the ZK-3002. I went through 4 to find 2 that were silent noise wise. Powering off two Meanwell EPP-300-48 supplies.

Attachments


Hi, I also have one of the Hypex Nilai Stereo amps and was interested in adding a second PSU. While most of the wiring is straight forward, I was wondering how you wired the 12 pin auxiliaries cable? Any help will be greatly appreciated.I have installed a second PSU in my Hypex Nilai amplifier, effectively making it a dual mono block.
More info can be found over at ASR: https://www.audiosciencereview.com/...ai-stereo-mono-kits-cases.48769/#post-1820706
Cheers!
Been meaning to post this for ages. Wanted to get back into building things again now I have time with retirement so thought I'd try a Class D amp first. It's an eBay bought board in an old Linn LK85 case which had a write off board due to the usual chip failure burning a hole in it!
I'm running the module at 36v to be on the safe side (and I had the PSU already) into Linn Keilidh's which are 4 Ohm load and it doesn't even break sweat, only gets slightly warm and has more than enough power for my listening room though I haven't measured it.
I have the protection board in it, though I probably don't need it, but to replace those speakers with equivalents in todays market will set me back about £3.5K! As good practice (and I don't like crimped connectors having had so many problems with them over the years) I just soldered them without crimping.
I am very impressed with the sound quality and I am amazed for the price it was. So far, and in in certain respects, it is far better than the £2.5K Linn AV 5125 it has replaced, especially in the Bass department which I find to be a bit wooly, undefined and lacking punch with the Linn (even though it's been recapped). Will get round to modifying the board by changing the usual suspects eventually and see what improvement we get.
Have ordered another board as I want to Bi Amp first before taking the Keilidh's active again as the next project is a crossover, or I may just put the Linn active cards I have somewhere in a box with PSU to start with.
Project Ptero(С) for car audio
A modern self-oscillating bridge amplifier with an automotive power supply on board. 190W 4 ohms, 1-130W THD < 0.0006% in audio freq.
Based MAX913+OPA1612 purifi type modulator, OPA1612 dif preamp, TAS5162 PBTL output stage, LM5122 boost.
A modern self-oscillating bridge amplifier with an automotive power supply on board. 190W 4 ohms, 1-130W THD < 0.0006% in audio freq.
Based MAX913+OPA1612 purifi type modulator, OPA1612 dif preamp, TAS5162 PBTL output stage, LM5122 boost.
Attachments

Over the past two days, I installed a second PSU into my Hypex Nilai DIY500 Stereo amp. The original amp is supplied as a kit to be assembled with two Nilai amplifier modules, a single PSU, case and associated hardware and cables. It is all screwed together with no soldering required. It's output is 250 watts per channel with the single PSU. Adding a second PSU doubles the power output.
I dissembled the amp, drilled new PSU mounting holes and five large holes to fit some metal Temu air vents. The additional PSU is supplied with two amplifier connection cables (not required), a power input cable and a 12 pin auxiliaries cable (J5).
I soldered the power input cable to daisy chain it with the original power input cable.
I also soldered five wires on the 12 pin auxiliaries cable to the original 12 pin cable. This required carefully removing some of the insulation from the original cable, soldering the ends of the new cable onto the original and then insulating with electrical tape. The five wires I connected were:
Pin 2: Ground
Pin 7: Pushbutton+
Pin 8: Pushbutton-
Pin 9: Trigger+/-
Pin 10: Trigger +/-
The end result sounds slightly better than with a single PSU IMO. The extra headroom seems to have given the bass more weight behind it and added to the overall clarity at louder volume.
Attachments

- Home
- Amplifiers
- Class D
- Class D Amp Photo Gallery