
What speakers ?.Thoroughly tested out the smaller A04 case on the desktop. No fans and no vertical mounting needed for laminar air flow cooling....
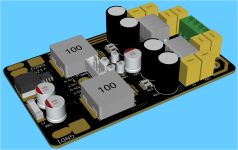
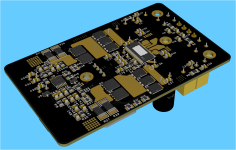
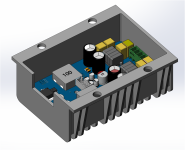
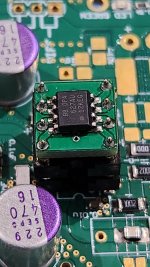
RDC2-0034 KIT TDK Planar Si, Class D Power Amplifier. TPA3255, Assembly. Planar Spiral Inductances!!!!!!


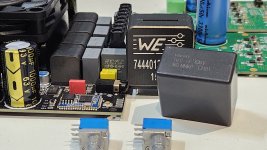
My on-going project, TPA3255 Bluetooth Car Amplifier with Integrated 12-40V DC-DC Power converter.
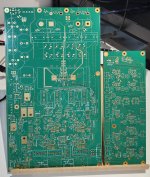
Next prototype assembly & design of Pre-amplifier and Bluetooth audio & Bluetooth Remote Control.
Next prototype assembly & design of Pre-amplifier and Bluetooth audio & Bluetooth Remote Control.
Attachments
Centure 24 based on TAS6584 🙂
https://www.diyaudio.com/community/...nel-dsp-amplifier-with-class-h-option.421487/

https://www.diyaudio.com/community/...nel-dsp-amplifier-with-class-h-option.421487/
A friend wanted to try out Class D.
Dual NC250MP in a BZ3207 case, long version.
With own speaker protection and mains filter.

Patrick
Dual NC250MP in a BZ3207 case, long version.
With own speaker protection and mains filter.
Patrick
I'll tidy up the wiring a bit more when I install alloy XLR connectors...


This is a the 3E audio board. A continuation of the A07 tpa3255 build design sans volume pot... and it bests the A07 sound/dynamics no doubt with PFFB added. The bottom heat spreader interface with the thick billet distributes the heat evenly into the casing. Had a laser temp gauge on it earlier.
I plan on doing the same for your board when the time comes.🙂
What size SMPS (Voltage/Amps) do you suggest for your board? I need to get another one and will want to compare both when done. Thanks much.
I plan on doing the same for your board when the time comes.🙂
What size SMPS (Voltage/Amps) do you suggest for your board? I need to get another one and will want to compare both when done. Thanks much.
The ideal PSU that my TPA3255 amp was designed with in mind is the Micro-Audio SMPS630-SO set for 52v. You want a supply that can maintain the rms current needed based on Ohms law. P=i^2 x R. If you want 150w into 4ohms for example, i = sqrt(P/R)=sqrt(150/8)=4.33A rms. Peaks are usually handled by the large caps unless you have a lot of them. That’s per channel so multiply by 2 for stereo or about 9A. The SMPS630 is capable of 12A continuous and 17A peak.
Ok. Thanks for the suggestion. Perhaps they have one closer to the size of your 3255 board size? I'd like to add a quality SMPS inside the case as well, since they shouldn't introduce any noise, correct?
Not sure if you will find one from Micro Audio that is small enough and with the power levels needed for 10A rating. I think that is a very small case and you probably don’t want to stick a powerful SMPS inside. They do have their own 60kHz noise but that can be controlled in a larger case with correct placement. But in a little cylinder and placed on top of each other it might be very tough.
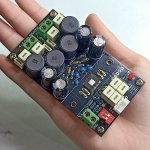
Here is how member @Plott assembled his amp using my amp board and buffer - he gave it a lot space and the result was a wonderful looking and sounding reference quality amp.


Here is how member @Plott assembled his amp using my amp board and buffer - he gave it a lot space and the result was a wonderful looking and sounding reference quality amp.
Last edited:
Is the 60 HZ noise in the circuit or emitted by radio/EM frequency?
I have another case 6" tall that can take the stack with a 1/4" thick alloy isolation plate.
I have another case 6" tall that can take the stack with a 1/4" thick alloy isolation plate.
60kHz (not 60 Hz) switch mode frequency of the SMPS. It would be emitted from the PSU if you placed a sensitive audio high impedance input stage right near it. I have not been affected by it so can’t say how bad it is, but I would keep my opamps and line level signal cables away from the top of the SMPS transformers etc.
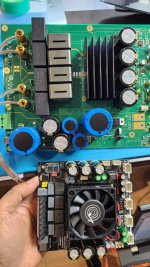
I've completed the TPA3255+PFFB design for personal use at home.
TL783CKCSE/LM337 or LM5010/MAX17578, followed by TPS7A4701RGWR/TPS7A3301RGWR, and finally LT3045 (x6) / LT3094 (x2)
#Multi-channel amplifier project.
TL783CKCSE/LM337 or LM5010/MAX17578, followed by TPS7A4701RGWR/TPS7A3301RGWR, and finally LT3045 (x6) / LT3094 (x2)
#Multi-channel amplifier project.
Attachments
-
 20250126_131919.jpg465.7 KB · Views: 262
 -
 20250128_004149.jpg525.2 KB · Views: 262
 -
 20250128_185101.jpg650.2 KB · Views: 267
 -
 20250127_025058.jpg455.6 KB · Views: 252
 -
 20250128_005431.jpg232.2 KB · Views: 258
 -
 20250128_005644.jpg487.8 KB · Views: 259
 -
 20250128_020249.jpg350.9 KB · Views: 256
 -
 20241229_224947.jpg370.1 KB · Views: 250
 -
 20250107_005713.jpg858.6 KB · Views: 265
Last edited:
My attempt at DIY Class D amplifier using the following core components:

MicroAudio’s early version of the SMPS630 does not include a trigger input but does have a power standby. I used an EL357N optocoupler to act as a switch so when fed a 5v trigger from my DAC the SMPS will energise the output stage and power the amplifier module.
Needless to say with the quality components from Viet at @xrk971 and Sami from MicroAudio the amplifier sounds fantastic. I would like to thank them for their support and contribution to the community.


Optocoupler location:

- XRK Audio RTR TPA3255 reference Class D amp module
- XRK Audio BTSB Audio Buffer Board
- Micro Audio SMPS 630 (old)
- EL357N-C Optocoupler Isolation Module Input Output Signal Level Conversion 5V
MicroAudio’s early version of the SMPS630 does not include a trigger input but does have a power standby. I used an EL357N optocoupler to act as a switch so when fed a 5v trigger from my DAC the SMPS will energise the output stage and power the amplifier module.
Needless to say with the quality components from Viet at @xrk971 and Sami from MicroAudio the amplifier sounds fantastic. I would like to thank them for their support and contribution to the community.
Optocoupler location:
Last edited:
- Home
- Amplifiers
- Class D
- Class D Amp Photo Gallery