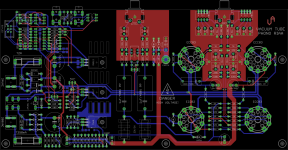
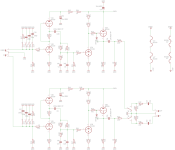
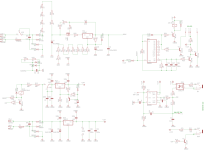
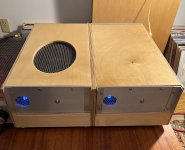
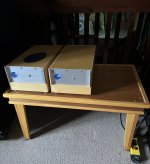
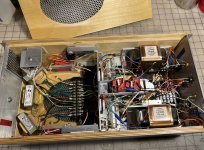
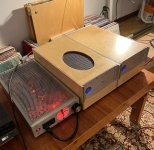
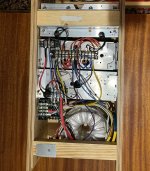
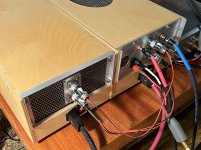
Here's one I just finished, a 2A3 headphone amplifier for my friend Zach Mehrbach of ZMF Headphones. It uses Monolith Magnetics "nanocrystalline" (aka Finemet) interstage and output transformers. Some details:


- Mains and filament transformers from Monolith Magnetics
- Maida style B+ regulators, shunt regulated bias supply feeding the bias pots
- Rod Coleman filament regulators
- 5687 / 7044 / E182CC input stage, LED biased
- Monolith Magnetics nanocrystalline (Finemet) core interstage transformers
- Fixed bias 2A3 output stage
- Monolith Magnetics nanocrystalline (Finemet) core output transformers with 8ohm, 32ohm, and 120ohm taps
- Chassis manufactured by Landfall Systems
Hey Joe, sure, here it is... however after testing I did a few mods:Yes, I know it is more than a year ago since you published this nice design. It happened that I simply overlooked it.
Is it also possible to publish a photo of the bottom of your pcb? I am trying to figure out how you made the pcb layout.
Thanks in advance.
- you can bypass second 5RM caps on the output, they are redundant and even shorted cause no pops after mute is cancelled.
- in case you are planning to feed some solid state amp with it (lower impedances loads) definitely use larger output caps, like 4-6uF as minimum, better 10uF for 400VDC PP
- resistor value of 390k+820k in riaa filter is not that critical as I thought, feel free to use one 270k instead.
- all caps in filter use polypropylenes for at least 400V
edit: just noticed there is no schematic here so here it is below just in case
Attachments
Last edited:
I want to show some of picture about my just finish power amp


Wavac SH-833 replica.🤔I want to show some of picture about my just finish power amp
View attachment 1231521View attachment 1231522View attachment 1231523View attachment 1231524
I think the rest of us can go fishing or start collecting stamps now...😀
Original was once in What Hifi's top ten most expensive amplifiers at 350000£. I guess diy version comes cheaper.😄Yes, the power supply is separated chassis
View attachment 1231927View attachment 1231928View attachment 1231929
Finished my first tube amp last week. It is a single ended EL34 amp design.
I settled on a design that would give me flexibility. Being of Polish descent and really wanting a Nagra but not having the money for it, I wanted to make a homage to Nagra by building an amp reminiscent in design and using European parts only.
Features: 1. Option for SS or Tube rectification using a 5AR4.
2. Triode / UL switch.
3. Negative feedback Switch (3db)
There's some gorgeous work in this thread. Fortunately we're all individuals who all do things a bit differently which makes this interesting.
Years ago I was seeking an All tube signal chain so that I could listen to my records on a device which I could diagnose and fix myself. This led to that, that to another thing and now I've got this preamp design which I put together and worked the bugs out of. It's actually a really good performer. I've sold about ten of them to friends, on an informal basis.
It's an RIAA phonostage, has inputs for moving coil and moving magnet carts. The selector relays all short their signal to ground when not selected. The power supply rides on its own subchassis which helps to keep noise out of the audio circuits. I potted the transformers myself. It's a very simple design, well thought out, well laid out, and extremely reliable. Additionally, I can fix it, should it ever develop problems. I've had a lot of fun building it and over the years it's made several appearances at the Burning Amp festival.
I like the way it came out. My first two amps were plate-skirt design and I've moved away from that style of construction. Now I try and build similar to how commercial hifi gear is built, or should I say was built prior to circus boards and squalid state transistors.
I like my amps to look as if they could have been built yesterday or 60 years ago. Keeps people scratching their heads and it's fun!


It's got the 2 phono inputs, one moving coil one moving magnet, and 3 line level inputs, which makes it incredibly useful in a variety of listening environments.
Check out the DIY power amps in the background! If there's interest I'll do a photo shoot of those.
One was made last month, (i built it) and one was made 50+years ago (by someone else)
Guess which ones which...
Years ago I was seeking an All tube signal chain so that I could listen to my records on a device which I could diagnose and fix myself. This led to that, that to another thing and now I've got this preamp design which I put together and worked the bugs out of. It's actually a really good performer. I've sold about ten of them to friends, on an informal basis.
It's an RIAA phonostage, has inputs for moving coil and moving magnet carts. The selector relays all short their signal to ground when not selected. The power supply rides on its own subchassis which helps to keep noise out of the audio circuits. I potted the transformers myself. It's a very simple design, well thought out, well laid out, and extremely reliable. Additionally, I can fix it, should it ever develop problems. I've had a lot of fun building it and over the years it's made several appearances at the Burning Amp festival.
I like the way it came out. My first two amps were plate-skirt design and I've moved away from that style of construction. Now I try and build similar to how commercial hifi gear is built, or should I say was built prior to circus boards and squalid state transistors.
I like my amps to look as if they could have been built yesterday or 60 years ago. Keeps people scratching their heads and it's fun!
It's got the 2 phono inputs, one moving coil one moving magnet, and 3 line level inputs, which makes it incredibly useful in a variety of listening environments.
Check out the DIY power amps in the background! If there's interest I'll do a photo shoot of those.
One was made last month, (i built it) and one was made 50+years ago (by someone else)
Guess which ones which...
OK, so I'm going back in time, a bit, Sound Practices, issue 13, Gordon Rankin Bugle 45... I tried to keep it just as proposed but One Has To Tweak. 🙂. I gave the PSU an extra LC and used modern Poly caps but it is a clean circuit, true to the original and worthy of anyones time and tubes 🙂
Attachments
It's finally done. The project that kept getting put on the back burner for me that I really wanted to complete.
Design by Alex Cavalli which is a streamlined Futterman OTL. Parts from the four corners of the Internet - I've been buying parts here and there for years. I couldn't really get a front design that I liked which would set it apart from my other pieces. I wanted a vintage look for sure and finally settled on something that might include wing designs from the 1930s and a pilot light from many eras. The front panels were ultimately done by Front Panel Express. The rest of the design started falling into place this year. The wings, in particular, were a bit difficult for me to align with the pilot light as they came from a jewelry supply store so had their own mounting holes...which were not quite what was needed for a panel mount. Many drill bits and measuring(s) later they were done.
The rest of the parts are working really well together. 6922 or 6DJ8 tubes on the input and 6N6P output tubes. Gold Point stepped attenuator, Cardas input jacks, DH Labs Pro Studio interconnect as input, Cardas output wire, the 370DAX transformer and a Muffsy power breakout board which holds a MeanWell 120V -> 5V transformer for the pilot light. I am currently using photo flash caps which are 410uF. In the future I may change these to something lower. Who knows? There are no LEDs on the amp boards and I decided to skip the NFB circuit. So no, the amp isn't particularly great with Grados. As expected.
The amp is a treat with Sennheiser HD600s, of course. It's also happy with a pair of AT-ESW9. There is a musical rightness to it, even with mediocre sources. With great sources: it's delicious! Like most great components, though, it's difficult to describe what it is doing other than giving me more insight and emotion than many other amps I own.
Last edited by a moderator:
Great Work!There's some gorgeous work in this thread. Fortunately we're all individuals who all do things a bit differently which makes this interesting.
Years ago I was seeking an All tube signal chain so that I could listen to my records on a device which I could diagnose and fix myself. This led to that, that to another thing and now I've got this preamp design which I put together and worked the bugs out of. It's actually a really good performer. I've sold about ten of them to friends, on an informal basis.
It's an RIAA phonostage, has inputs for moving coil and moving magnet carts. The selector relays all short their signal to ground when not selected. The power supply rides on its own subchassis which helps to keep noise out of the audio circuits. I potted the transformers myself. It's a very simple design, well thought out, well laid out, and extremely reliable. Additionally, I can fix it, should it ever develop problems. I've had a lot of fun building it and over the years it's made several appearances at the Burning Amp festival.
I like the way it came out. My first two amps were plate-skirt design and I've moved away from that style of construction. Now I try and build similar to how commercial hifi gear is built, or should I say was built prior to circus boards and squalid state transistors.
I like my amps to look as if they could have been built yesterday or 60 years ago. Keeps people scratching their heads and it's fun!
View attachment 1232400
View attachment 1232401
View attachment 1232403
View attachment 1232404
View attachment 1232406
View attachment 1232407
It's got the 2 phono inputs, one moving coil one moving magnet, and 3 line level inputs, which makes it incredibly useful in a variety of listening environments.
Check out the DIY power amps in the background! If there's interest I'll do a photo shoot of those.
One was made last month, (i built it) and one was made 50+years ago (by someone else)
Guess which ones which...
- Home
- Amplifiers
- Tubes / Valves
- Photo Gallery
