Since I haven’t exactly decided on the finish I want, I started sealing the inside of the oak panel with a 70/30 mixture of wood glue and water, which has worked well for other builds and materials. I did my first coat last night, and this morning it looked bone dry! I slapped a few more coats on it today, and it’s looking a lot better. Man, that red oak is like a sponge!I am far from a source for finishing advice, mostly anything other than rubbed oil finishes I leave to my wife or others. I believe, as you say, a good seal on the inside would suffice, sanding sealer and varnish would likely be fine. I was mostly talking about attention to the backside and any cut outs that you might not worry about for appearance sake.

Could you create a 2nd "inner" baffle that sits behind the front baffle? Mount the speakers on the inner baffle with screws as usual and then screw that baffle to the front one? Use a gasket to make sure there are no gaps around the speaker and the front baffle.
You will also be stiffening the front baffle.
In essence, the front baffle will be a "pretty cover" for the inner one... which I suppose you could make with plywood, MDF, depleted uranium, whatever suits your fancy...
The inner baffle doesn't have to be full sized either. It could just be large enough to mount the speakers and thus becomes a reinforcement for the outer baffle.
You had me at “depleted uranium”.Could you create a 2nd "inner" baffle that sits behind the front baffle? Mount the speakers on the inner baffle with screws as usual and then screw that baffle to the front one? Use a gasket to make sure there are no gaps around the speaker and the front baffle.
You will also be stiffening the front baffle.
In essence, the front baffle will be a "pretty cover" for the inner one... which I suppose you could make with plywood, MDF, depleted uranium, whatever suits your fancy...
Also, we’re both now on the terrorist watchlist. 😉
Save the hot melt glue for the kid’s craft projects. It absorbs moisture from the air and will release in a very short amount of time. Trust me, I have found out the hard way. Show me one industrial product made with that stuff, and I don’t mean urethane that looks the same.
Maybe glue your pants on too, will save you the effort of changing them.
Can you find some fasteners that are less objectionable and just listen to some music?
Maybe glue your pants on too, will save you the effort of changing them.
Can you find some fasteners that are less objectionable and just listen to some music?
This is what I do if I know it’s going to be permanent. I’ve broken tweeter frames and bent woofers trying to get them out of enclosures. Now I saw around and chisel the wood off the speakers. If you are careful you can do it. Follow up with a razor blade. I’ve also used JB Weld, which is impossible to get off.I was intrigued by the Speakerlab kits of the 70's, which used silicon glue rather than screws to mount all the drivers. See this 1975 catalogue, page 1, step 7. It works--I've used this technique many, many times. It's not a good solution if you ever intend to repurpose the drivers, because it is hard to completely remove the glue from the frame.
I wanted the 7WA so bad! Ended up with the .1’s. It was the beginning of my loudspeaker obsession. Thanks for the flashback!I was intrigued by the Speakerlab kits of the 70's, which used silicon glue rather than screws to mount all the drivers. See this 1975 catalogue, page 1, step 7. It works--I've used this technique many, many times. It's not a good solution if you ever intend to repurpose the drivers, because it is hard to completely remove the glue from the frame.
Coil springs that push on the magnets. On some tiny speakers I used blocks of foam for the same effect. On my box in a box speakers, the mid/bass and cone tweeter have their own separate enclosures, that fit inside a larger enclosure (hence box in a box), the mid/bass enclosure is vented to the main enclosure ( to increase it's volume and provide some damping) - both the tweeter enclosure and mid/bass enclosure are held in place (against the front baffle, using a foam gasket to machanicly isolate them) by wooden blocks pushed by springs.
Hey y’all, I got busy and forgot to post an update…
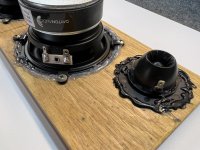
I decided to try some particularly strong hot glue, and added 4 small wire clips (they’re basically pressure-mounted to the speaker rim, basically a safety) with some very shallow screws.
So far so good! I’ve been testing the hell out of the whole unit with zero problems. And most of all, the desired look of the speaker baffle is what I was going for above all else (for this particular recipient, anyway. He’s a style over substance kinda guy)
Currently powered by a basic TPA7492 board running at 19.5V/4A (to best suit the 4ohm drivers/tweeters). Sounds pretty damn good, but I’ve got a cheap NVArcher DSP-equipped TPA3116 on its way from AliExpress. Excited to play with that board and see if the DSP can make much
difference in this build.
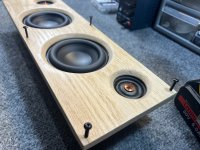
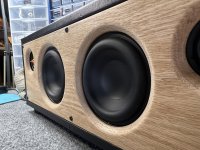
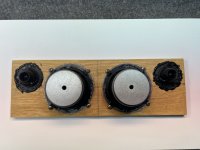
Meanwhile, here’s a few updated pics.
I decided to try some particularly strong hot glue, and added 4 small wire clips (they’re basically pressure-mounted to the speaker rim, basically a safety) with some very shallow screws.
So far so good! I’ve been testing the hell out of the whole unit with zero problems. And most of all, the desired look of the speaker baffle is what I was going for above all else (for this particular recipient, anyway. He’s a style over substance kinda guy)
Currently powered by a basic TPA7492 board running at 19.5V/4A (to best suit the 4ohm drivers/tweeters). Sounds pretty damn good, but I’ve got a cheap NVArcher DSP-equipped TPA3116 on its way from AliExpress. Excited to play with that board and see if the DSP can make much
difference in this build.
Meanwhile, here’s a few updated pics.
Attachments
- Home
- Design & Build
- Construction Tips
- HELP! How can I mount speakers WITHOUT SCREWS?