Since this forum is filled with MUCH smarter people than myself, I’m sure someone’s got advice for me!
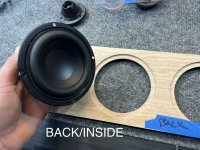
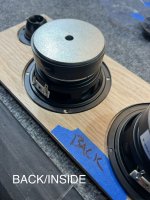
GOAL: I’m building a desktop/Bluetooth speaker that contains two 4” Dayton Audio woofers, and two 2” ring radiator-style tweeters. I crafted a front baffle/panel out of Red Oak, and routed recesses for the both the drivers and tweeters, to get them as close to flush as possible…
QUESTION: How can I securely mount the drivers to the inside/back of the baffle WITHOUT SCREWS?
* I would prefer to simply ”glue” or adhere them to the inside of the baffle with some sort of strong glue/adhesive, but I’ve no idea what would work best. Any ideas?
* I’ve also considered crafting some rings out of wood/MDF and using those as “clamps” of sorts - by mounting them over the outside of the speaker basket, then attaching the rings to the inside oak baffle.
I attached some photos of the speakers/parts, as well as a mockup of my goal. If anyone has some advice, I’m all ears! Thanks in advance!!
Attachments

Member
Joined 2009
Paid Member

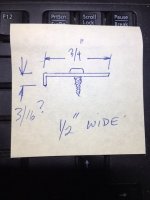
Not the most experienced in speaker design, and assuming the aversion to screws is from the thin section you want to mount them to. However, I would not glue the speaker to the wood, I would use 4-6 (qty) short screws into the full baffle with metal clips holding the speaker (presumably to a gasket and the baffle).
The wood rings would work fine, but I think that would be more fiddly than just using metal clamps.
I'd look an example clamp up, but I promised the kids I'd play Schoko Hexe with them after they finished cleaning up.
A "Z" clip is in the ball-park, but likely NOT the exact shape you want.
As an aside, I might pay a little more attention to sealing Red Oak since it is so porous ... to the point you can actually use it as a straw if you pay attention to the grain - which I had no idea about when I made my first bowl with it. :-/ lol.
-Darrell
Ah…I didn’t consider using some sort of clip, but that’s a great idea. (And I know exactly what you’re talking about!)Not the most experienced in speaker design, and assuming the aversion to screws is from the thin section you want to mount them to. However, I would not glue the speaker to the wood, I would use 4-6 (qty) short screws into the full baffle with metal clips holding the speaker (presumably to a gasket and the baffle).
The wood rings would work fine, but I think that would be more fiddly than just using metal clamps.
I'd look an example clamp up, but I promised the kids I'd play Schoko Hexe with them after they finished cleaning up.
A "Z" clip is in the ball-park, but likely NOT the exact shape you want.
As an aside, I might pay a little more attention to sealing Red Oak since it is so porous ... to the point you can actually use it as a straw if you pay attention to the grain - which I had no idea about when I made my first bowl with it. :-/ lol.
-Darrell
Appreciate your help, thank you! A few questions….
I haven’t worked with oak/red oak very much - Any advice on how to properly seal it? Also, would I have to seal front, or could I just seal the back/inside of the panel?
I was planning to stain the front a little darker, and then use a semi-gloss polyurethane finish. After it’s mounted, I planned on sealing only the edges to the enclosure, using some silicone.
I’ve used hot glue to mount a TON of small/cheap speakers - mostly 2”-3” speakers for inexpensive portable speaker builds. It’s worked really well, too!I’ve seen it done with a ‘hot glue’ gun
But these are much bigger/heavier drivers, and they move a LOT more than the cheap/small speakers. I may have to do some tests with a scrap baffle and a test driver.
Exactly what I was looking for. Between your response and @CANNON-FODDER, now I see the light! 🙂Simple bracket like this works.
Larry
PS - this is why I’ve been reading this forum for years. Smart folks everywhere. Thanks so much!
I was intrigued by the Speakerlab kits of the 70's, which used silicon glue rather than screws to mount all the drivers. See this 1975 catalogue, page 1, step 7. It works--I've used this technique many, many times. It's not a good solution if you ever intend to repurpose the drivers, because it is hard to completely remove the glue from the frame.
Glue them, but do NOT use hot glue, which is very weak and does NOT really adhere to non porous sutrfaces such as metal frames, even less if theyb rd slightly flexible (stamped sheet metal).
You need a glue that sticks to anything but most important has some residual fkexibility (hot glue or Epoxy or similar crack open) so aquatium/window sealing approved silicone (hint, it strongly adheres to glass or aluminum, go figure) or a liberal bead of contact cement.
Do not use it as regular contact cement but as a regular glue, meaning apply a sizeable bead around, put speaker in place while still fresh, let a little ooze around (guarantee yu filled the gap), and lt it dry overnight.
If space is filled and glue dried well, it can stand even a quite heavy speaker.
Member
Joined 2009
Paid Member
I’ve seen hot glue used on 15” drivers, wish I hadn’t because a bit of damage was done when previous owner had the drivers removed. You won’t catch me using the stuff.I’ve used hot glue to mount a TON of small/cheap speakers - mostly 2”-3” speakers for inexpensive portable speaker builds. It’s worked really well, too!
But these are much bigger/heavier drivers, and they move a LOT more than the cheap/small speakers. I may have to do some tests with a scrap baffle and a test driver.
Hot glue is only temporary. It deteriorates quickly and fails. I have been using hot glue for years, all old projects need repair.
Its fast, easy, but not durable.
Its fast, easy, but not durable.
FWIW In have used fresh contact cement to glue transformers as an extra safety measure.
Given the bashing and jumping around musical instrument amplifiers routinely get, it´s quite common to get one for servicing and finding the PT moving around like a not-so-mini wrecking ball, hanging from its wires.
A mess.
All because either vibration loosened nuts and bolts or endbell legs cracked.
Never ever again after I started gluing all of them, either to chassis or plain tolexed cabinet insides.
IF you ever need to remove them, you can, but must pry them away using some leverage, apply pressure and "let it flow loose", you can never peel them straight away, the joint is that strong.
A couple times I had to apply a couple drops Toluene and let it seep in to soften adhesion, go figure.
Again, you need some residual elasticity to absorb impact.
Holy ****, that was a fascinating read. I absolutely love reading old marketing materials and the like.I was intrigued by the Speakerlab kits of the 70's, which used silicon glue rather than screws to mount all the drivers. See this 1975 catalogue, page 1, step 7. It works--I've used this technique many, many times. It's not a good solution if you ever intend to repurpose the drivers, because it is hard to completely remove the glue from the frame.
So I just did a test: I sacrificed an old prototype I don’t have any use for. It’s got some small/cheap speakers that are rear-mounted with hot glue. (I forgot the specific type of hot glue, but it’s notoriously strong stuff. I use it for all sorts of projects) The speakers have steel baskets, and the wood is another variety of oak…
I tried pulling the speaker off of the oak panel, with no luck. Then I tried to pry up the glue with a small screwdriver, also no luck. Then I just whacked away at the glued seam with everything from a fresh razor blade to a hammer and sharp chisel. I dented the hell outta the speaker basket and chipped the wood like crazy, but the speaker is still securely adhered to the wood.
At this point, I’m 99% convinced that this particular hot glue would work perfectly. Since I have zero intention of ever removing the speakers from this build, I’m not really concerned about any future repair/replacements/etc.
Just to be sure, I’m gonna order a few different flexible adhesives and do a few more tests using scrap materials/speakers.
Thanks to everyone for their advice! I’ll make sure to amend this post with my results!
On a side note…FWIW In have used fresh contact cement to glue transformers as an extra safety measure.
Given the bashing and jumping around musical instrument amplifiers routinely get, it´s quite common to get one for servicing and finding the PT moving around like a not-so-mini wrecking ball, hanging from its wires.
A mess.
All because either vibration loosened nuts and bolts or endbell legs cracked.
Never ever again after I started gluing all of them, either to chassis or plain tolexed cabinet insides.
IF you ever need to remove them, you can, but must pry them away using some leverage, apply pressure and "let it flow loose", you can never peel them straight away, the joint is that strong.
A couple times I had to apply a couple drops Toluene and let it seep in to soften adhesion, go figure.
Again, you need some residual elasticity to absorb impact.
As a lifelong guitar player and amplifier aficionado, the idea of taking any vintage amp on the road and beating it up makes me nauseas. Thank god I never became a touring musician.
Oh, of course you shouldn´t.
No need to anyway, if you are really into touring or at least regular shows, there are tons of "user" amps which can take it and worst case, be replaced.
Real vintage amps are to stay at home and be pampered 😉
That said, what we call vintage amps WERE designed and built to be taken on the road and take quite a lot of beating.
Think old Fender amps with their pine or plywood dadoed construction, covered in Tweed or Tolex (luggage covering), metal corner protectors, rubber feet, tough grill cloth, strip handles, clips or clamps to keep tubes in place, the works.
As a side note, enjoy this very worn very beaten 1959 Fender Bassman.
Last edited:
I am far from a source for finishing advice, mostly anything other than rubbed oil finishes I leave to my wife or others. I believe, as you say, a good seal on the inside would suffice, sanding sealer and varnish would likely be fine. I was mostly talking about attention to the backside and any cut outs that you might not worry about for appearance sake.... I haven’t worked with oak/red oak very much - Any advice on how to properly seal it? Also, would I have to seal front, or could I just seal the back/inside of the panel?
I was planning to stain the front a little darker, and then use a semi-gloss polyurethane finish. After it’s mounted, I planned on sealing only the edges to the enclosure, using some silicone.
This thread is interesting,I have been in diy and audio engineering and design for 45 years so remember lots of ideas and gimmicks.
There was a speaker manufacturer that made a bayonet that was threaded on the outside and inside so you could just screw the bayonet to the box or any baffle and then screw the drivers like a lightbulb,not sure where that company went but the idea did finally get a patent and was used in some mobile ( car,boat,camper and even pa ceiling speakers)
So for entertainment and access to the inter tubes I found this
https://staub.ca/origin-acoustics-10-bayonet-ring-68-adapter
And here is the patents for the concept
https://patents.google.com/patent/DE2920836A1/en
So now the new question is how many speaker builders does it take to screw in a speaker?
Oh man, would I love to have that “beat up” Bassman. I’m relatively new to DIY Audio/speakers, and most of my speaker builds are portable units, for gifts/friends/etc. My particular style is heavily influenced by guitar amplifier aesthetics. For example, here’s a photo of my very first build - a small portable speaker made for my friend’s Paul and Angie as their wedding present. (He’s a touring musician)Oh, of course you shouldn´t.
No need to anyway, if you are really into touring or at least regular shows, there are tons of "user" amps which can take it and worst case, be replaced.
Real vintage amps are to stay at home and be pampered 😉
That said, what we call vintage amps WERE designed and built to be taken on the road and take quite a lot of beating.
Think old Fender amps with their pine or plywood dadoed construction, covered in Tweed or Tolex (luggage covering), metal corner protectors, rubber feet, tough grill cloth, strip handles, clips or clamps to keep tubes in place, the works.
As a side note, enjoy this very worn very beaten 1959 Fender Bassman.
I love wrapping these builds in Tolex, using vintage grill cloth, and adding little touches like period-correct knobs, etc.
Here’s a video clip of that first speaker build; I even added a flickering vacuum tube for effect. (Non-functional, of course!)
Paul & Angie’s Fender Champ BT Speaker
- Home
- Design & Build
- Construction Tips
- HELP! How can I mount speakers WITHOUT SCREWS?