So my partner has just seen your kkk ghosts and judging by her laughter I think they're a no?
What about some acoustically transparent curtain just draped in front of them?
😀
I think making them cylinders is the best bet. They could still be freestanding then. Curtains would need a rail on the wall.
I guess any kid entering that room would be scared🙂 A nice project indeed!
😀 Thanks.
How about this grill?
I was thinking something like that but a cylinder because the buckets are round and it will look a little less bulky than if it was square.
A cylinder will also look correct whichever direction it is pointing.
I suppose there is no need for a square cover to be connected to the interior so the interior could be adjusted to point the right way and the cover lined up square with the walls.
I think it’s still possible to build all this in a day; making a frame seems like too much work by comparison. I looked online for cylinders and found cylindrical laundry bags that might work but they were out of stock. Something like that for a small amount of money that could just be pulled down over the speakers would be good.
I could maybe do a square frame fairly quickly with copper pipe, pipe cutter and pipe fittings.
With a decent frame it would be possible to hang the line array from the top inside using a swiveling bracket to allow the angle to be adjusted.
The woofers really ought to hang from the centre of the pens in the middle because that’s the only fixed node when they are operating. The frame could have brackets attaching there to prevent the woofers from transferring energy into the frame and floor.
The line arrays were benefitting from the weight of the woofers hanging underneath which was pulling them straighter. With the woofers hanging off the frame instead it would be good to hang a replacement weight at the bottom of the line array to keep it vertical.
With the (swiveling) axis of rotation of the line array passing through the tweeters and the centre of the (fixed) woofers the geometry would always be correct because the orientation of the woofers doesn’t matter when they are vertical.
This seems doable but my plumbing tools and spare copper pipe is in the loft of a different house and I’m under lockdown. It will have to wait.
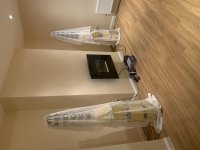
In the meantime, nets are pretty cheap compared to curtains so I tried without the curtains.
It’s like playing dress-up. Not that I would know of course 😀
Attachments
that looked spookey, i liked the speakers better when nude
maybe dressed in short skirts and tops could work too
maybe dressed in short skirts and tops could work too
Last edited:

The craftsmanship isn’t really up to the standard you’d need to leave them nude. Need something to cover up the cable ties and gorilla tape. Also the colors of the cones and buckets are pretty bad.
It could be neater if all the plastic was the same color and the cable ties were replaced with pop rivets. I actually bought 5mm stainless pop rivets but they were too hard to pull and I bent my rivet tool after the fifth rivet. Aluminium rivets would be OK but I didn’t have any so I used cable ties temporarily and then didn’t bother to go back and change them.
I have some fiberglass and resin and black metallic resin color powder to use to make a neat set of speakers. I could do another set in fiberglass perhaps but it’s a lot of effort and I suspect the damping of the plastic is probably good for the sound. Fiberglass would sound different.
I like structures of bits and parts that is all painted in a single color, for this project that means all parts should be painted black since the speaker cones can not be painted. They could then be putted in a large birdcage just to be different or make a statement
Last edited:
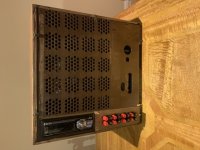
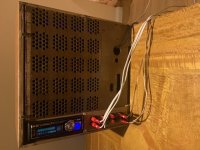
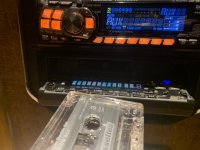
When I bought my 1930s house there was an old (empty) Ultra Electric radio chassis in the loft buried under the debris and dirt. I’ve upcycled it to hold the car radios I’m using for this project. This is a sneak preview; I haven’t finished all the wiring yet.
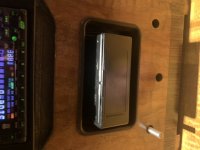
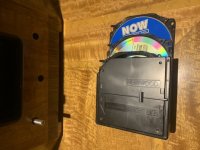
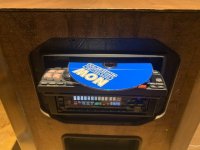
The top radio on the front is the main amplifier, CD player and radio. The bottom one is a Kenwood Mask cassette radio with a 10 CD auto changer. The front of the Mask rotates when you turn it on but you can set it to stay closed if you don’t want to use it. This will be useful to keep the user interface simpler for my family. You can see the CD changer through the convenient hole in the front of the chassis which previously had glass and I guess the lit display of the radio spectrums. The CD box ought to eject through the hole but is so far untested.
I made the front panel holding the radios from resin and fiberglass in a cardboard mould lined with a dustbin bag which is why it looks like dustbin bag. I washed the cardboard mould off after the resin had set and didn’t do anything to tidy up the finish.
The knob made from dowel and aluminium tube switches the AUX of the main amplifier between the Kenwood cassette player and three other sources, one of which will be the Bluetooth audio receiver from before. The RCA switch is from eBay. I haven’t tried it yet.
The radio used as the amp for the woofers is on the back, again to simplify the user interface on the front, but also because it responds to the same remote control as the main amp so it needs to be out of sight of that. This radio only needs to be set up once and then left alone as it turns on and off with the main amp and remembers its settings so the back is a good place for it.
Also on the back are terminals for the front and rear channels of both amps.
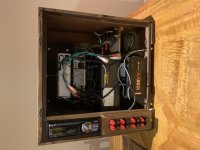
The inside is a bit of a mess and will get worse as I do more of the wiring.
I have hung the rear of the radios from the roof of the chassis inside using picture wire and screw-in eyes. The ATX PSU sits over a hole cut in the base for the fan and is screwed to screw-in eyes in the base and trapped under the shelf the CD changer is mounted on. It’s all secure enough.
The top radio on the front is the main amplifier, CD player and radio. The bottom one is a Kenwood Mask cassette radio with a 10 CD auto changer. The front of the Mask rotates when you turn it on but you can set it to stay closed if you don’t want to use it. This will be useful to keep the user interface simpler for my family. You can see the CD changer through the convenient hole in the front of the chassis which previously had glass and I guess the lit display of the radio spectrums. The CD box ought to eject through the hole but is so far untested.
I made the front panel holding the radios from resin and fiberglass in a cardboard mould lined with a dustbin bag which is why it looks like dustbin bag. I washed the cardboard mould off after the resin had set and didn’t do anything to tidy up the finish.
The knob made from dowel and aluminium tube switches the AUX of the main amplifier between the Kenwood cassette player and three other sources, one of which will be the Bluetooth audio receiver from before. The RCA switch is from eBay. I haven’t tried it yet.
The radio used as the amp for the woofers is on the back, again to simplify the user interface on the front, but also because it responds to the same remote control as the main amp so it needs to be out of sight of that. This radio only needs to be set up once and then left alone as it turns on and off with the main amp and remembers its settings so the back is a good place for it.
Also on the back are terminals for the front and rear channels of both amps.
The inside is a bit of a mess and will get worse as I do more of the wiring.
I have hung the rear of the radios from the roof of the chassis inside using picture wire and screw-in eyes. The ATX PSU sits over a hole cut in the base for the fan and is screwed to screw-in eyes in the base and trapped under the shelf the CD changer is mounted on. It’s all secure enough.
Attachments

I finished the wiring. It’s all working. The CD box eject doesn’t leave much room for your fingers to get a grip but it’s good enough. The Bluetooth and AUX switch is working and the switch has two spare inputs so I can maybe add a phono preamp and put a turntable on top. I have an old goldring lenco somewhere.
I need to go back and do a bit more work on the speakers. The carpet tape wasn’t good enough to hold the cones in the woofers permanently. I need a better tape and/or maybe I’ll pop rivet the corners and seal the rivets.
I need to go back and do a bit more work on the speakers. The carpet tape wasn’t good enough to hold the cones in the woofers permanently. I need a better tape and/or maybe I’ll pop rivet the corners and seal the rivets.
Attachments
-
 0267FF36-1628-46C4-B8DA-362CDB85CCAE.jpeg110.4 KB · Views: 97
 -
 DAA95B0C-A00F-4606-B29B-EA9845EBCB6E.jpeg71 KB · Views: 89
 -
 901CE0C0-CC5D-4F9B-92FC-48C0A4C2092E.jpeg102.4 KB · Views: 94
 -
 E517D104-6679-4EED-A124-4BE231C4817C.jpeg87 KB · Views: 216
 -
 D91F96A9-5878-4C38-8089-0D23ED1BF834.jpeg94 KB · Views: 213
 -
 E662D8EC-AD2B-4C9C-AA3A-A7EEADFB0B85.jpeg96.8 KB · Views: 103
You just took the old "spare parts stereo" to a new level. Good work.
Thanks.
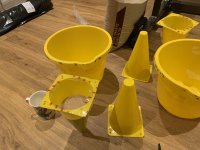
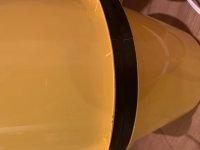
I rebuilt the woofers today. This time with a different tape to hold the cones in. I also put in a couple of cups of kiln dried sand into each woofer cone. The sand makes the woofers a lot heavier and the pens in the middle are easy to break so I think it would be better to use something metal like threaded rod instead of the pens but mine are already stuck to the speaker surround with superglue so I’m going to have to keep them. I also used 25mm gorilla tape to hold the buckets together; it is only slightly narrower than two bucket rims so it looks a lot neater than the super wide tape I used the last time.
The carpet tape held the cones in a long time before failing. I don’t know how long the new tape will last. I didn’t put in rivets because I was worried about cracking the bottoms of the buckets when drilling the holes. If the new tape fails as well then I’ll try it with rivets next time.
The carpet tape held the cones in a long time before failing. I don’t know how long the new tape will last. I didn’t put in rivets because I was worried about cracking the bottoms of the buckets when drilling the holes. If the new tape fails as well then I’ll try it with rivets next time.
Attachments
Major breakthrough today.
After writing last time about worrying about cracking the buckets when drilling through them I realized that there were already two holes in each bucket where the bucket handles used to be. I decided to use those existing holes to bolt on some electrical conduit from B&Q to make a frame to hang the line array from.
There are quite a lot of poles of one kind or another at B&Q. I chose the electrical conduit because it was cheap and black. I also bought some bungee cables to use for hanging the line arrays.
That is the config in the photo but I’ve since realized a more zen solution would be to feed the speaker cables through the conduit and hang the line arrays from them instead to avoid the need for the bungees.
I also replaced the cable ties with 4mm aluminium pop rivets to make that neater. You have to be careful to get them tight to avoid rattle. The cable ties didn’t have that problem.
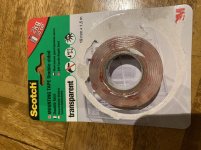
They are starting to look quite good nude now. I think with matching yellow cones for the line arrays and black or silver speaker cable through the conduits they’d be quite professional looking. The one remaining problem would be the hot glue holding the cones onto the backs of the drivers. Perhaps that could be done more neatly with the 3m mounting tape instead.
After writing last time about worrying about cracking the buckets when drilling through them I realized that there were already two holes in each bucket where the bucket handles used to be. I decided to use those existing holes to bolt on some electrical conduit from B&Q to make a frame to hang the line array from.
There are quite a lot of poles of one kind or another at B&Q. I chose the electrical conduit because it was cheap and black. I also bought some bungee cables to use for hanging the line arrays.
That is the config in the photo but I’ve since realized a more zen solution would be to feed the speaker cables through the conduit and hang the line arrays from them instead to avoid the need for the bungees.
I also replaced the cable ties with 4mm aluminium pop rivets to make that neater. You have to be careful to get them tight to avoid rattle. The cable ties didn’t have that problem.
They are starting to look quite good nude now. I think with matching yellow cones for the line arrays and black or silver speaker cable through the conduits they’d be quite professional looking. The one remaining problem would be the hot glue holding the cones onto the backs of the drivers. Perhaps that could be done more neatly with the 3m mounting tape instead.
Attachments
- Home
- Loudspeakers
- Multi-Way
- 1 day ghetto line array build < £200