Thanks JT, I think you solved my problem. It's plan B.😀
Don
Hey Don, if you are thinking of flying leads, be careful there, this is unproven and oscillation could be an issue with this setup. I would be remiss, not to point out that there are reasons why others haven't went this route. For me, it solved a lot of issues and being a ignorant, err "fearless," amp builder, I am willing to see what happens, and if it goes up in smoke, I will rebuild and address it if/when I have a problem.
Why did I do it?
I wanted to be able to change cards easy, I wanted to keep the Edcor as far from the main tranny as possible. I have 8 inches from trans to trans and a big honking aluminum sink between the two. Also, in this case I had to mount the sinks on the horizontal which means natural convection will not work. With one sink per device, it probably isn't needed anyway, but I wanted a solution in place and I like amps that run cool.
I haven't seen any oscillation issues as of yet, but that doesn't mean it can't happen.
JT
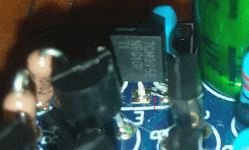
JT: Those flying leads...how long are they, and did you need to add or move any components from the M2X boards to the devices as mounted on the heatsinks?
Looking good!
Looking good!
Love those AC Infinity controls. I just installed a temperature and/or humidity controlled AC Infinity transfer fan into a newly enclosed hot tub room. Really neat control features that aren't much use on an amp, Look so good though.
@Itallinmhead Thanks Pal, if it don't go up in flames/ 😛
@Audiobear Yes, some of the controls are not needed, but since I'm using the fans and the temp probes and also the alarm it works out nicely. For instance, I can shut off the display and still get a warning if things are getting hotter that a point I set.
Also, the fans can be set on smart to keep the temps in a given range by adjusting fan speeds.
I would love to be able to reprogram them though...
Last edited:
Thanks
@ Vunce, Cub & Bones
Thanks guys, time will tell if it remains stable.
Nice work! Enjoy listening to them.
@ Vunce, Cub & Bones
Thanks guys, time will tell if it remains stable.
Last edited:
JT: Those flying leads...how long are they, and did you need to add or move any components from the M2X boards to the devices as mounted on the heatsinks?
Looking good!
I didn't change the design other than to add the leads which are about 13-15cm. 😱
Last edited:
Shave the whiskers!
Switched to Austins and had no sound from one board. I think I found the issue, unfortunately it took out pretty much all the BJTs.
No smoke or pops, just nothing. I pulled the board and went over the soldering first cause it's a very busy board. I found what looked like a tin whisker, that appeared to be short IC1. A few of the SCs looked to be reading okay, but since they are cheap, I'm going to go ahead and replace them all.
Funny thing, when I power down, I hear music just for a sec or so as it bleeds down.
Attachments
Soldering those 131xxx and 132xxx connectors to the boards and getting them straight for a multi swap fit is a PITA. Getting them set with the daughter board closely colocated over the main board and holding them in position is a real art. The pins have "rounded" corners on them so they don't just fit square.
What is the secret to getting these things soldered in square the first time.
Thanks,
Don
Its not so bad.
-Solder one pair of pins/sockets together first. You can use two temporary longer plastic or metal screws and nuts diagonally so that nothing moves while you solder the first pair.
-Solder another daughter card using the main card as reference.
-Solder the second main card using one of the two daughter cars are reference.
-Solder other daughter cards.
this protocol should produce fully swappable pair of cards.
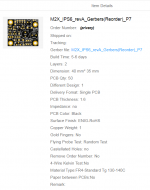
I am asking for the price where I live for making some few IPS6 and 7 boards using the Gerbers offered here.
Standard is 35 um copper. No need to go for 70 or 105 um for these small pre-amp boards?
Standard is 35 um copper. No need to go for 70 or 105 um for these small pre-amp boards?
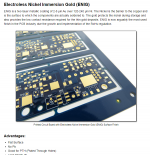
This is what I bought. I'm completely satisfied with the appearance and electrical performance of the boards. For 100 PCBs (50 x IPS6 and also 50 x IPS7) the price including DHL express shipping to California, was less than USD 1.00 per board. Have a glance at the "Build Time" line item.
_
_
Attachments
It looks good!
I decided to support a local Danish company (they make in-house for small quantities). There is an initial startup price which can be saved for post orders but still pr. board it is more expensive.
I get green boards. I can ship out 8 pairs of each to Europe when I get the boards. Maybe in a couple of weeks. I get 20 of each and I keep two pairs myself.
I think quality will be good.
This is what I bought. I'm completely satisfied with the appearance and electrical performance of the boards. For 100 PCBs (50 x IPS6 and also 50 x IPS7) the price including DHL express shipping to California, was less than USD 1.00 per board. Have a glance at the "Build Time" line item.
_
Not a big board but that is quite remarkable. There is a great Tube video on how they make boards. Might even be the same company. Worth watching if you haven't seen the process.
Thanks for doing this.
Don
@ Mark,
My schedule is clear if you still are sending stuff out... I have the mono build too.
My schedule is clear if you still are sending stuff out... I have the mono build too.
Please read post #3416 and if you have any questions, ask here in the Forum. Instruction #3 is especially important.
_
_
Hi Mark,
sorry if I missed it but what is the name of the company you use?
Another question what program you use to make the gerbers? Have not done this in 15 years..
I plan to design some board for a diff project in the near future.
thanks!
sorry if I missed it but what is the name of the company you use?
Another question what program you use to make the gerbers? Have not done this in 15 years..
I plan to design some board for a diff project in the near future.
thanks!
Nice to get confirmed that RevA is the latest for IPS6. Then I sent the right file to the vendor. I can see that from Mark's earlier mail with pictures attached that RevA is used for the production.
The vendor mentioned that a little tweak was necessary in IPS6 rev. to be able to produce it in 70um copper and that was not problem. I have no knowledge in Gerber files so I just said.....fine with me.....
The vendor mentioned that a little tweak was necessary in IPS6 rev. to be able to produce it in 70um copper and that was not problem. I have no knowledge in Gerber files so I just said.....fine with me.....
Mark,
I don't know if anyone did a BOM for this, but here's a cart on Mouser for the ISP6.
ISP6 Mouser Cart for 1 board
Please click buy to add it to your own cart and then mod the parts numbers or anything else you want to change. Check against Marks' excel sheet to confirm everything!
When I get the one for 7 done, I will post it as well.
Last edited:
Thank you for your diligent efforts, @thompsontechs !
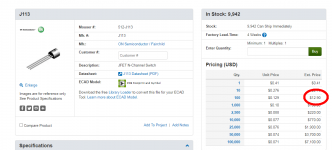
I recommend that IPS6 builders purchase AT LEAST 50 pieces of J113 to increase the odds of getting two pairs that match well. I bought 100 pieces myself, see post #3377 of this thread.
The mouser cart above, only includes two pieces of J113 🙁
_
I recommend that IPS6 builders purchase AT LEAST 50 pieces of J113 to increase the odds of getting two pairs that match well. I bought 100 pieces myself, see post #3377 of this thread.
The mouser cart above, only includes two pieces of J113 🙁
_
Attachments
- Home
- Amplifiers
- Pass Labs
- The diyAudio First Watt M2x