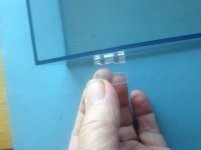
You need a solvent based adhesive which actually melts the perspex and welds the broken parts together.
Such an adhesive has a liquid consistency. An example is shown in the attachment.
Having said that, the break is in in an area subject to stress and there's no guarantee that the weld would be srong enough.
Such an adhesive has a liquid consistency. An example is shown in the attachment.
Having said that, the break is in in an area subject to stress and there's no guarantee that the weld would be srong enough.
Attachments

Many years ago on a Pioneer turntable in the workshop came a similar problem. There were no spares left a Pioneer so I used a very similar product, glued it back together holding in a clamp until set and then drilled three holes, left, centre and right 3/32" diameter 1" long going through the join and into the lid body.
I then inserted three 3/32" silver steel pins 7/8" long by heating them first just above boiling point easing them in place.
Three months later it was back. My repair was perfect and the other side got the same treatment.
That was in 1991. I still see my customer as a friend and it is still working to date.
You need a solvent based adhesive which actually melts the perspex and welds the broken parts together.
Such an adhesive has a liquid consistency. An example is shown in the attachment.
Having said that, the break is in in an area subject to stress and there's no guarantee that the weld would be srong enough.
Hi
Thanks for that info.
cheers
Spike
HiMany years ago on a Pioneer turntable in the workshop came a similar problem. There were no spares left a Pioneer so I used a very similar product, glued it back together holding in a clamp until set and then drilled three holes, left, centre and right 3/32" diameter 1" long going through the join and into the lid body.
I then inserted three 3/32" silver steel pins 7/8" long by heating them first just above boiling point easing them in place.
Three months later it was back. My repair was perfect and the other side got the same treatment.
That was in 1991. I still see my customer as a friend and it is still working to date.
Thanks for that info, very good idea, will look to see if there is enough meat on the hinge and also if I can drill straight, there won't be much leeway there though .
But yes very good way, will def try that ! .
PS: Will post back if I am successful .
cheers
Spike
This Linn Sondek hinge does not require attachment to the cover, and should work on yours as well.
The cover slips into a channel and is held by friction and gravity. Just screw the hinges to the back of the base.
Linn LP12 & Axis Turntable Lid Hinge (Single) - Cymbiosis
PAIR LP12 LID HINGES - House of Linn
The cover slips into a channel and is held by friction and gravity. Just screw the hinges to the back of the base.
Linn LP12 & Axis Turntable Lid Hinge (Single) - Cymbiosis
PAIR LP12 LID HINGES - House of Linn
Last edited:
Perspex (plexiglas) can be glued with chloroform (aka trichloromethane). It is a hazardous liquid.
I'd go with the pin approach, it's worked well for me on a few occasions. Alternative is to glue and then brace the join with something. I've used thin brass or plastic sheet glued with either cyanoacrylate or epoxy, whichever seems more appropriate. But that could be difficult because it looks like there's not a lot of room to play with.
The only problem with using pins is making the holes line up 🙂 I've made drilling jigs to get the best possible alignment.
The only problem with using pins is making the holes line up 🙂 I've made drilling jigs to get the best possible alignment.
As much as I adore the Technics turntables, they make a crappy lid.
For those broken tabs, I'd shave them completely off (Dremel), and install metal/aluminum fittings, with bolts.
For those broken tabs, I'd shave them completely off (Dremel), and install metal/aluminum fittings, with bolts.
Shave them off? Yes, but there's no way back from that. Why not try something else and save the drastic stuff for later.
I can vouch for the Linn hinges, they're what're on my Heybrook TT2 and they're very good. Tomorrow, I'll weigh my TT lid, because for them to work properly you'll need a lid that's roughly in the right weight range.
I'm with wiseoldtech on this one.
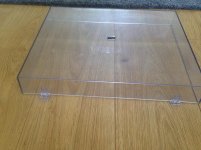
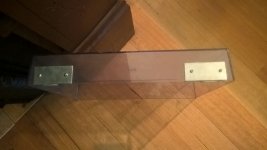
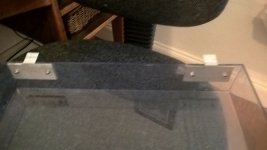
Here's what I did when my Technics TT lid develop the same issue:
shaved off he remaining plastic bits, used leftover pieces of aluminium to shape it exactly like the original bits and secured them through the lid with SS bolts with captive nuts.
The photos are a bit blurry but you'll get the idea.
Here's what I did when my Technics TT lid develop the same issue:
shaved off he remaining plastic bits, used leftover pieces of aluminium to shape it exactly like the original bits and secured them through the lid with SS bolts with captive nuts.
The photos are a bit blurry but you'll get the idea.
Attachments
Shave them off? Yes, but there's no way back from that. Why not try something else and save the drastic stuff for later.
No way back?
Who'd want to "go back" to flimsy plastic tabs that are prone to breaking?
I've used a sturdy aluminum "L" channel across the rear that looks fine, and lasts forever.
Never have to "baby the lid" after that.
I'm with wiseoldtech on this one.
Here's what I did when my Technics TT lid develop the same issue:
shaved off he remaining plastic bits, used leftover pieces of aluminium to shape it exactly like the original bits and secured them through the lid with SS bolts with captive nuts.
The photos are a bit blurry but you'll get the idea.
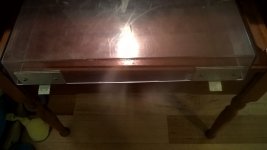
SEE?
They look fine!
I've even went fully across the rear of the lid with aluminum channel, with tabs like you have.
Didn't mean you'd be stuffed, just that once you'd sawn them off you'd passed the point of no return, committed, like the bacon in a sandwich.
If you're set on sawing you could keep the transparent look. There are plenty of transparent acrylic/perspex piano hinges available. You can glue them or use perspex/acrylic nut and bolts. Fleabay and Amazon have a good selection of both.
Choice paralysis awaits...
FWIW the TT2 lid weighs 820gm and has 4mm thick perspex that sits snugly in the Linn hinge.
Last edited:
- Home
- Source & Line
- Analogue Source
- Turntable Lid