Today I showed these bad PCB's to a Galavanic Professionel, he had only one sentence.. BAD BASIC MATERIAL. Over Aged. I gave him one Brand New double sided PCB not processed yet to test.. We will know in a few days.. Ordered the PCB's for the ongoing Project from Silver Circuits in Malaysia.. these will be here in about 3Weeks..till then we need to wait
One thing I can suggest, just to see exactly how the photo resist is operating with these PCBs, is pull off the protective layer and develop it immediately, without exposing it to any light at all. Everything should develop as if to preserve the copper. If a test with no light exposure also causes copper to etch away then there's a problem. If developing the board as soon as you've removed the backing doesn't cause copper to etch away then you've got a problem with the exposure and developing stage.
'Problem' in this case is a word that I use loosely because your technique has been fine up until now.
I say this because I too had my technique completely sorted. Perfect PCBs every single time. Then the supplier of my PCB blanks no longer stocked what I wanted and I was forced to go to a different supplier. I tried using my old technique and ended up with problems. This was frustrating and I had to change the way I did things. To solve my problem I basically needed to blacken up the blacks that my printer makes and increase the exposure time.
I didn't know that a spray existed to do this and I will order some and give that a go. If we get the model number of printer from JMF I'll consider that because my printer has other issues that could do with being solved too.
Blacker blacks always help during the exposure/developing part and although my printer was seemingly fine for the previous PCB blanks, there's no guarantee that it'll be good for other stuff I buy in the future. And although I've seemingly solved my current issue I do not involve the process required to make it work, it's laborious and time consuming. So a new printer/spray would be excellent.
If you have some of your blanks left, try developing some unexposed PCB and just see what happens.
Yes - Your completely right.
The problem is, that I did not change the supplier nor the manufacturer of the PCB's. The only thing what has change is the Ferro Chloride 3. Before I used 60 and that time I got 100% Globuli, that's small balls.. diameter about 5 mm.
But I adjusted the percentage of that.. might I need to recalculate this one more time.
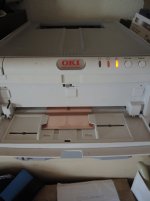
Tonight, I just modified my Laser -printer OKI C3400, now I can print the PCB directly without Film. It has one minus point.. The PCB can have a max thickness of 1.2 mm.. have ordered them from Germany just a hour ago.. BTW * here it's 1am * already again..
The OKIC3400 is easy to modify to print PCB's directly, all one needs to modify is the Fixing unit or FUSER make a cut out at front of the FUSER so that the PCB can go straight into the FUSER and does not to use too much force..
As I said, I'm in the need of good PCB,s so I ordered them from Malaysia,. All together for 8 double side, connection points gold plated, Drilled, double sided with shipment 320US.. so is one piece around 40 USD. And that is cheap if I compare and count all that time I wasted with now already 12 dead boards..don't need that.
Making this series finish and then try with that Direct printing.. For the moment, I'm fed up with making boards., have more better things to do than wasting time and money..
Coming up soon, I need to make some larger boards and then it has to work from beginning, because the larger the board the more money is wasted when it fails,
Fail one time I would never complain. but not every second and third piece..No don't need that..Lucky you are, that Swearing is forbidden here, otherwise you would hear a Swiss swear in the highest level.. LOL
Thanks 5th element again.
See you as soon as possible I show the mod of that Printer.
Chris
The problem is, that I did not change the supplier nor the manufacturer of the PCB's. The only thing what has change is the Ferro Chloride 3. Before I used 60 and that time I got 100% Globuli, that's small balls.. diameter about 5 mm.
But I adjusted the percentage of that.. might I need to recalculate this one more time.
Tonight, I just modified my Laser -printer OKI C3400, now I can print the PCB directly without Film. It has one minus point.. The PCB can have a max thickness of 1.2 mm.. have ordered them from Germany just a hour ago.. BTW * here it's 1am * already again..
The OKIC3400 is easy to modify to print PCB's directly, all one needs to modify is the Fixing unit or FUSER make a cut out at front of the FUSER so that the PCB can go straight into the FUSER and does not to use too much force..
As I said, I'm in the need of good PCB,s so I ordered them from Malaysia,. All together for 8 double side, connection points gold plated, Drilled, double sided with shipment 320US.. so is one piece around 40 USD. And that is cheap if I compare and count all that time I wasted with now already 12 dead boards..don't need that.
Making this series finish and then try with that Direct printing.. For the moment, I'm fed up with making boards., have more better things to do than wasting time and money..
Coming up soon, I need to make some larger boards and then it has to work from beginning, because the larger the board the more money is wasted when it fails,
Fail one time I would never complain. but not every second and third piece..No don't need that..Lucky you are, that Swearing is forbidden here, otherwise you would hear a Swiss swear in the highest level.. LOL
Thanks 5th element again.
See you as soon as possible I show the mod of that Printer.
Chris
Alzheimer attacks again 🙂
Now that I checked, I was fully convinced to buy a Samsung ML1600 because my ex partner used that for his PCBs with excellent results, so I wanted the same.
But I was in a hurry to finish and deliver a job before Saturday Night (remember my customers are Musicians and tend to play on such hours and days 🙂 ) and it already was Saturday morning, so when salesman told me "we have just run out of Samsungs" he then offered me a little Brother HL1200 ... "exactly same thing" as he said.
Bought it and as I told you earlier it works flawlessly, so much so that I "ignore" it, just use it when needed.
I bet any small Kodak or Kyocera or similar **new** printer works as good as these and have the deep suspicion there is a HUUUGE Factory in China, OEM making them for everybody, under different labels but with almost same guts.
This is the one I wanted:

instead got:

Same thing, same price, just different label and MINOR differences.
We are talking 150U$ entry level printers, but from responsible brands.
Again, I guess all come from same "mother" Factory.
I half expect something similar to this, the Chinese Factory which makes ALL the cofee makers, electric grills and pressing irons for EVERYBODY, think Oster, Philips, Westinghouse, you-name-it and they make it.
And this video is 8 years old!!! 😱
Factory City: EUPA . Documentary China labors and the largest factory in the world - YouTube
EDIT: don´t expect the exact model numbers but small variations. Each now and then they add some very minor change and upgrade model number, so ML1600 becomes 1602/4/6/12/14 and HL1200 becomes 1202/4/6/20/etc.
No big deal, same guts.
I bought the simplest one, just USB input, maybe the one you get has other connectors, Bluetooth, Wi Fi.
Doesn´t add or detract from basic functionality: printing good black Toner.
Now that I checked, I was fully convinced to buy a Samsung ML1600 because my ex partner used that for his PCBs with excellent results, so I wanted the same.
But I was in a hurry to finish and deliver a job before Saturday Night (remember my customers are Musicians and tend to play on such hours and days 🙂 ) and it already was Saturday morning, so when salesman told me "we have just run out of Samsungs" he then offered me a little Brother HL1200 ... "exactly same thing" as he said.
Bought it and as I told you earlier it works flawlessly, so much so that I "ignore" it, just use it when needed.
I bet any small Kodak or Kyocera or similar **new** printer works as good as these and have the deep suspicion there is a HUUUGE Factory in China, OEM making them for everybody, under different labels but with almost same guts.
This is the one I wanted:
instead got:
Same thing, same price, just different label and MINOR differences.
We are talking 150U$ entry level printers, but from responsible brands.
Again, I guess all come from same "mother" Factory.
I half expect something similar to this, the Chinese Factory which makes ALL the cofee makers, electric grills and pressing irons for EVERYBODY, think Oster, Philips, Westinghouse, you-name-it and they make it.
And this video is 8 years old!!! 😱
Factory City: EUPA . Documentary China labors and the largest factory in the world - YouTube
EDIT: don´t expect the exact model numbers but small variations. Each now and then they add some very minor change and upgrade model number, so ML1600 becomes 1602/4/6/12/14 and HL1200 becomes 1202/4/6/20/etc.
No big deal, same guts.
I bought the simplest one, just USB input, maybe the one you get has other connectors, Bluetooth, Wi Fi.
Doesn´t add or detract from basic functionality: printing good black Toner.
Last edited:
As I said, I'm in the need of good PCB,s so I ordered them from Malaysia,. All together for 8 double side, connection points gold plated, Drilled, double sided with shipment 320US.. so is one piece around 40 USD. And that is cheap if I compare and count all that time I wasted with now already 12 dead boards..don't need that.
OMG. I had some boards made from PCBWAY, absolutely fine. production time 1 day,
10*10 cm, double sided. The drawback was they use DHL express as courier that goes
via the Leipzig customs office and that causes lots of delays. The boards cost $5 for
10 pcs. The customs questions the price, wants copies of the bank transfer, wants
my EORI number because 10 boards cannot possibly be a private job etc.
DHL express pushes the price of the transfer by €22 or so and since the transport price
is included in the worth of the merchandise, they can earn another €15
"Kapitalbereitstellungsgebühr" for lending me the import VAT of €5 for 3 days or so.
The last board was made by JLCPCB, also technically excellent, production time 2 days.
They have a proxy man somewhere in Germany where they ship the the daily
production for all European customers who use that service. He unpacks the big box
and resends the jobs to the single customers. Taxes are paid in advance so I have
nothing to do with customs, looks just like an inland buy. Total wall clock time was
about 11 days from Gerber to door bell, most of it for DHL. Price was €14 for 10 boards,
everything included.
I have no idea if this proxy service works for Switzerland, too.
This is the JLCPCB board, btw. But when I'm in a hurry and the board is
simple enough, then Gerber to solder is less than 2 hours if I do it myself.
Gerhard
Attachments
You make high frequncey I see..
Also I modded my old OKIC3400 to DLP - direct laser print. this Means I stick the PCB in front loading indent, and in the back it comes out just right to go into Etching..There is one drawback though.. Had to modify the Fixing unit and some plastic which was to thight on the front loader.. this done it works.
Fixing unit has to be modified that PAPERJAM LEVER is engaged, so we have enough space to pass the PCB which is 1.6mm.
If the Paperjam isnt engaged it will stop.. Best would be to use just 1mm or 1.2 mm PCB's.
The good this on this is: we are able to take regular PCB no need to be fotopositive.!
In the meantime I found out where the problem was.
I used a Printed and already developed board and drew the lines whit waterproofe Black Magic pen. and then edged it with Ferro Chlorid 3.. And the ferro just went through the resist. Which usually does not let ferro pass.
So I checked the Bottle of that Ferro and Of course it was in my mind before that it could be too strong. Before I used Ferro Chloride 3 60% and this was Ferro Chlorid 3 100% bit I mixed it the same way as the 60%, and honestly I think this is the point..
About that Malaysian PCB Manufacturer, they have gave me the Quota but they are still not about to produce that PCB..and I sent them all what actually they need..
Back to the MOD of thsi OKI Printer.. if you guys have a Printer LASER which has a straight and even Loader and Pass through from input to output, but the PCB sticks at the Fixing unit. There - I have read on the net - is the possiblilty to remove the Fixing unit then on the motherboard of the Printer you have to find out where the signal for FIXING UNINT INSTALLED is checked and this we need to short with resistor or whatever it takes to make the Printer think, that fixin unit is installed.
then also we need to have the PCB - using conductive DUCT TAPE connecting to ground, so that the Color which is tranfered from Transferbelt or from DRUM unit sticks to the PCB, so that it don't fly away when blowing onto it, and it don't get removed by just touching it.. then when you have the PCB Printed you can either heat it up or use ACETON and let the FUMES from ACETON harden the Toner out. takes about 2 - 3 Minutes. after that just etching is ok..
With that printer you will also be able to print Silkscreen and Text on the board as well as apply soldermask to the PCB.. Easy enoug I think.. In a Few Day I will be done with my mods.. on that OKI
I need to adjust the hight of the Fixing unit and level it out that it is in straight order with the Transfer Belt. I have the images on the PCB already very clear but also need to find a way how I can get the copper negative charged so hat the Toner stickst to it..
The guy who does this with a LEXMARK Printer, did cut out much from the inside that he can pass a Carriage where the PCB sticks to it.. this is too much of mods.. I wish to go with at least as possible mods for that Project..
Give you some Pics later tonight. For these guys in EUROPE, and of course Switzerland.
Will also Place the source of that Printer mod..
Regards
Chris
Last edited:
Please post some pictures of your modded OKI printer .
And of the now good PCBs of course.
Glad you solved it.
And of the now good PCBs of course.
Glad you solved it.
Yes of course I will, Pictures of the Printer you can have, the PCB will take a day or two till its finished.. as for I wish to make that in the printer.. and not with a film..
That printer is from year 2007 is 4 coulours and very efficient and good. Seldom Problems.. But I will show you the Frontloader with PCB 1.6mm
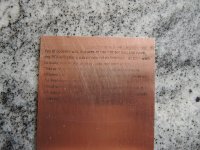
About within the next 2 Hours then also the print on it. I will place that TEXT on the PCB.. just for fun
That printer is from year 2007 is 4 coulours and very efficient and good. Seldom Problems.. But I will show you the Frontloader with PCB 1.6mm
About within the next 2 Hours then also the print on it. I will place that TEXT on the PCB.. just for fun
The Pictures of the DLP
All together I spend about 3 hours to get that Printer printing PCB.
Now I see I have to get that PCB Grounded or negative loaded, so that the TONER INK is pulled to the PCB better..
If I have thinner Basis Material and clean this well and have Ground on that, PCB while it's traveling throughout the Path of printer then I am sure that this will just work out fine..
Give me a few days to think how I could invent Ground while PCB is passing through the Printer..
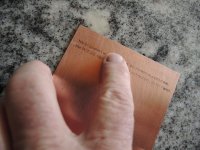
The Picture which I hold the thumb on the PCB just to test if it can be rubbed of..
NO WAY it stays put.. But still the PCB get stucked in the fixing unit because it's not leveled even with the rest of the Printers components. So there is some work to be done or cheat the printer that he thinks there is a FIXING UNIT but in fact there is none. But first I need to get that Ground on the PCB..
that guy who was one of the first one to do this spent 4 years and about 10 different Printers..
Here is that link: Credit goes that person!
Modification of the Lexmark E260 for Direct Laser Printing of Printed Circuit Boards : 10 Steps - Instructables
Regards & Greetings
Chris
I missed out Picture 2 on Purpose.!
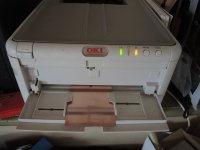
The Warning lamp lits up because Magenta Toner is finished.. But since I print BLACK and White, it's of no concern..
All together I spend about 3 hours to get that Printer printing PCB.
Now I see I have to get that PCB Grounded or negative loaded, so that the TONER INK is pulled to the PCB better..
If I have thinner Basis Material and clean this well and have Ground on that, PCB while it's traveling throughout the Path of printer then I am sure that this will just work out fine..
Give me a few days to think how I could invent Ground while PCB is passing through the Printer..
The Picture which I hold the thumb on the PCB just to test if it can be rubbed of..
NO WAY it stays put.. But still the PCB get stucked in the fixing unit because it's not leveled even with the rest of the Printers components. So there is some work to be done or cheat the printer that he thinks there is a FIXING UNIT but in fact there is none. But first I need to get that Ground on the PCB..
that guy who was one of the first one to do this spent 4 years and about 10 different Printers..
Here is that link: Credit goes that person!
Modification of the Lexmark E260 for Direct Laser Printing of Printed Circuit Boards : 10 Steps - Instructables
Regards & Greetings
Chris
I missed out Picture 2 on Purpose.!
The Warning lamp lits up because Magenta Toner is finished.. But since I print BLACK and White, it's of no concern..
Attachments
-
 10. Paperjam Lever.jpg183.2 KB · Views: 63
 -
 9. Fixed Paperjam Lever.jpg480.8 KB · Views: 64
 -
 8. Printed letters on PCB - Rub no problem.jpg218.9 KB · Views: 73
 -
 7. Text on PCB Board.jpg292.9 KB · Views: 69
 -
 6. Paper Jam - PCB JAM.jpg133 KB · Views: 63
 -
 5. Printing.jpg171.4 KB · Views: 61
 -
 4. Printing on PCB DLP.jpg346.7 KB · Views: 65
 -
 3.Text.jpg390.1 KB · Views: 89
 -
 1. OKI-C3400.jpg106.5 KB · Views: 94
Last edited:
Thanks 🙂
I had thought you preheated PCB to make toner stick.
Ok, will wait for some finished PCB 🙂
Whenever possible, of course.
I had thought you preheated PCB to make toner stick.
Ok, will wait for some finished PCB 🙂
Whenever possible, of course.
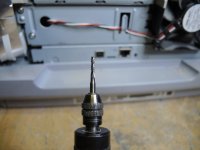
Working on it. did you take a look at the guys site with the LEXMARK.. in this link you see his latest one .. Double sided ..
Getting close to the real thing about DLP
Guys
This evening I modified the OUTLET on that OKI Printer.
I have good news:
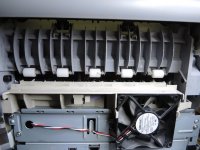
If you are going to modify an OKI C3300, C3400 Color Printer then you don't need to worry about negative loading on the PCB which will be printed. The Transfer-belt is automatically negative loaded, so Toner just sticks beautiful to it. all what you have to do is making contact from the EXPOXY side to Copper side with some conductive DUCT TAPE.. I dont use it and it still works.
The big thing is to Modify the FIXING UNIT that the 1.6 mm PCB passes easily. Fixing unit we need to take apart, so that we can lower the Roller underneath the PCB for about 2/10 of a Millimeter. this will be somewhat tricky because the Housing isn't screwed, but molded on three spots..
But I will sure find a way..
Regards
See you
Chris
This I'm going to do tomorrow, But I have here the last test for you too look at the Quality of the PCB when Printed and FIXED by Fixing unit..
This is 14point letters from the test side of the printer.
Check out the pictures..
I think in 2 or 3 days I will be ready to print the first PCB on regular PCB none PHOTO-POSITIVE.
I like to say that I no kind cleaned the PCB just to test how it comes out.. and it looks GOOOOOOOOOOOOOOOOOOOOOOOOOOOOOOOD.!
Guys
This evening I modified the OUTLET on that OKI Printer.
I have good news:
If you are going to modify an OKI C3300, C3400 Color Printer then you don't need to worry about negative loading on the PCB which will be printed. The Transfer-belt is automatically negative loaded, so Toner just sticks beautiful to it. all what you have to do is making contact from the EXPOXY side to Copper side with some conductive DUCT TAPE.. I dont use it and it still works.
The big thing is to Modify the FIXING UNIT that the 1.6 mm PCB passes easily. Fixing unit we need to take apart, so that we can lower the Roller underneath the PCB for about 2/10 of a Millimeter. this will be somewhat tricky because the Housing isn't screwed, but molded on three spots..
But I will sure find a way..
Regards
See you
Chris
This I'm going to do tomorrow, But I have here the last test for you too look at the Quality of the PCB when Printed and FIXED by Fixing unit..
This is 14point letters from the test side of the printer.
Check out the pictures..
I think in 2 or 3 days I will be ready to print the first PCB on regular PCB none PHOTO-POSITIVE.
I like to say that I no kind cleaned the PCB just to test how it comes out.. and it looks GOOOOOOOOOOOOOOOOOOOOOOOOOOOOOOOD.!
Attachments
So I just bought a new laser printer in the hopes that it would help with some issues I was having with my ageing HP.
The HP I bought second hand for £50 back when I was 18 and I'm now 35, so all in all it's had its monies worth, but it was starting to show its age. Either through transparency compatibility or parts wearing out it had its issues.
This was a laserjet 4100TN. 1200x1200 DPI and more meant for a small office than a home.
The paper tray had stopped working and the feeder for the manual feed tray had snapped in two a couple of times (superglue the rescue) but for all intents and purposes it still works. Replacing the toner cartridge in this machine also replaces the drum, which I had to do on one occasion because the drum had become damaged. Servicing kits for the 4100 appear to include replacements for all the parts I've had trouble with so that's likely all it would need in that direction to get the paper tray working again.
The main issue I was having was with toner voids or holes left in traces some of the time. It was fine with large blocks of black but had difficulties with traces of a certain width. Back when I first got it this was never a problem and this could just be compatibility with certain types of transparency film, but the takeaway is that it was not happy. Sometimes the print would come out perfect, sometimes there would be voids all over the place. Not ideal. Printing the copper top several times, until a perfect copy comes out, is one massive waste of resources.
The other thing I was never happy with was how poorly the toner adhered to the transparencies. It wasn't terrible but you could easily scrape some off with an accidental fingernail swipe. When I was forced to change supplier of my PCB blanks I needed to darken up the printed black (the photoresist wasn't as good) by going over the entire printed transparency with a black, water based, felt tip pen. The ink would stick to the printed area but still less well to the none printed. I'd then dry the ink with a hot air heater and wipe away the excess with a tissue. This wasn't as easy as it sounds. The pressure from the felt tip pen could scrub away the toner and wiping away the excess could also do the same thing. Another pain. Still I made it work and was able to make excellent PCBs for my AK4499 projects with a pitch down to 0.4mm and traces 0.23mm in width.
Enough was enough though and after seeing this thread with JMFahey's recommendation that basic lasers actually work decently well figured it was time to get a new printer.
I ended up getting a Xerox B210. 1200x1200dpi, just like my old one and from what I can tell this is a must if you want to use very fine pitch parts. When printing on the lower resolution settings you can tell things aren't as good so a budget laser might be good enough but do get one that can do 1200x1200dpi if you can.
So what of the B210? Much better than the 4100TN at printing transparencies. First of all there's no voiding, none whatsoever. Unless there's grease on the film and then the toner doesn't come out as intensely but still not a void.
Then there's the toner itself. Whereas the 4100TN's toner fell off the transparency rather easily with the B210 that's not the case. Sure you can scrape it off if you really want to but it takes considerably more effort to do so.
What about using a water based felt tipped pen to touch up the print like before? Far easier. There's no worry about scuffing off the toner, either when applying the ink or, when removing the excess with a tissue. In fact I don't even have to wait for the ink to dry. Wiping off the excess when it's still wet and allowing it to dry whilst doing so works very well. Obviously this speeds up the process considerably and not having to worry about accidentally removing the toner makes things a lot easier too.
How about making a PCB then?
I didn't need a PCB but I cut out two small pieces of material and tried one transparency straight out of the printer and one touched up with the felt tipped pen. Both worked. A small edge went to the one that was touched up but both worked well. It would be interesting to see what the results would be like with a toner density spray thing instead of the felt tipped pen. One suggestion was to use Indian ink instead of the pen.
Either way the Xerox B210 seems like a safe bet and it comes with Wi-fi connectivity too.
Glad it worked for you 🙂
In the old days, Brand mattered a lot, say, certain Electrolytic capacitor factories had researched and operfected processes, in hous, if you wnted to buy high quality you had to buy from them or else. Aplplied to everything: solder, tubes, transistors, batteries, you-name-it.
Since good quality stuff was EXPENSIVE , there was a lot of market share for lesser quality stuff, so both coexisted; you pick quality level and pay your price.
Fast forward 20 to 40 years, NOT ANY MORE.
A few monster companies, (say Vishay, ST, HP, etc.) have absorbed smaller ones, prices have fallen dramatically because of competition and sheer output, snmall cheesy improvised companies simply can´t sell because mainstream product is so cheap and abbundant that no niches are left for underachievers.
Now look at that one..
I managed to get a clean print out of my OKI C3400 Printer down to a 1.6mm PCB and also onto a 0.8mm Aluminum plate.. Both neat and Clean. Had to mod the Fuser as I wrote above..
Yesterday afternoon my Brother gave me 4 A4 PCB just about just 0.4mm thick, with copper.. I was quite happy because I thought now all my problems in DLP Direct Laser Printing PCB's would be history.. Far off..
These don't even take the image.. the 1.6mm PCB wich will eventually stuck in the FUSER, at least have all the images on it.. so applying heat in the oven and it works.. but these - no image at all.. Still after cleaning the same using Scotch Brite, Acetone and all what usually help..
I contrary to Aluminum.. just takes all the images.. Strange..
So it will take time to find out why.. have more important Work to do..
Hi everybody everyone.
I ordered some new PCB from Germany, I think a dealer which is honest enough to sen me new and not outdated PCB Positive Film boards..
I have three ways now to make the PCB.. I'm in a hurry one is really important it's a part of my new build.. you know, that class a.. But this in the other thread..
Having mega stress *for USA and all who do not understand the word MEGA, but if you know then good..* this means much more than a lot..at our Business, because of corona. Just all what Govt releases hits us for almost 4 months now and really cuts down our daily life to a minimum.. Except the work is still there, as before..
I used to use Megaelectornics in the UK for my boards. They they stopped selling what I wanted. The last few I got from RS components directly.
Both have worked although the stuff from Mega was better in that it was easier to work with/more forgiving of the procedure used.
Both have worked although the stuff from Mega was better in that it was easier to work with/more forgiving of the procedure used.
Anybody of us who can say that their daily work isn't affected by the pandemic can call himself a very, very glad guy. There are many outside who can't…Except the work is still there, as before..
Back on topic: Who's the German distributor you've placed your order? And did you again order photopositive or blank PCB material?
Best regards!
Last edited:
I always ordered my Bungard blank PCB from Reichelt. Never had any problems and they're cheaper than Conrad. But I would also have thought Conrad serious about quality.
I usually buy mine from segor.de. When I lived in Berlin, it was the
shop in the hood. No problems ever.
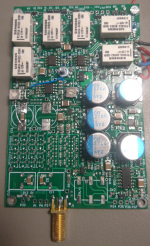
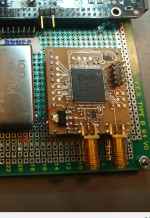
While this discussion was raging, I silently made this using bungard
and my unmodded Kyocera color laser printer. It did take an hour
from computer screen to solder. 0.5 mm pitch flatpack.
Gerhard
shop in the hood. No problems ever.
While this discussion was raging, I silently made this using bungard
and my unmodded Kyocera color laser printer. It did take an hour
from computer screen to solder. 0.5 mm pitch flatpack.
Gerhard
Attachments
- Home
- Design & Build
- Construction Tips
- Help! on Bunggard Fotopositive PCB