Not as advanced as some of the articles discussed but I've sent a couple of microridge tipped cartridges for imaging by someone I know in CA who has a fancy focus stacking rig. Gives a nice view of the contact point, which in this case is 0.1mil by 0.8 mil. Hoping to solve the question of what the wear limit is for this cut. I suspect that that stylus starts to bottom out in the groove before the laser cut wings wear out.
Attachments
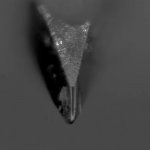
Not as advanced as some of the articles discussed but I've sent a couple of microridge tipped cartridges for imaging by someone I know in CA who has a fancy focus stacking rig. Gives a nice view of the contact point, which in this case is 0.1mil by 0.8 mil. Hoping to solve the question of what the wear limit is for this cut. I suspect that that stylus starts to bottom out in the groove before the laser cut wings wear out.
Nice picture, but how to interpret this.
Is the black area to be considered as polished by the groove while playing ?
An image from the frontside would reveal if the tip is still in topshape.
Hans
Hi Hans,
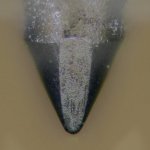
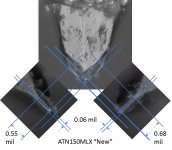
The method has been developed to get maximum contrast on the actual contact patch which is the black stripe. This works really well with standard cuts but this is the first imaging of a worn microridge. For comparison front vs side of a new elliptical
The method has been developed to get maximum contrast on the actual contact patch which is the black stripe. This works really well with standard cuts but this is the first imaging of a worn microridge. For comparison front vs side of a new elliptical
Attachments
It is always surprising how a comparatively large rock ending in a super small tip can follow the track of an LP.Hi Hans,
The method has been developed to get maximum contrast on the actual contact patch which is the black stripe. This works really well with standard cuts but this is the first imaging of a worn microridge. For comparison front vs side of a new elliptical
It is like landing with a 747 on a small table.
Even more so is the fantastic labour quality to produce this tip as can be seen in your nice pictures, very very smooth.
Hans
Sadly not my pictures. I just wish I had time and space to setup a rig for this. It's not expensive in real terms I'm just super space constrained. Once again modern camera and PC tech makes it possible to do these things without the budget of Shure brothers!
Ray who did the pictures started off imaging coins and then combined the microscope with his love of vinyl.
Ray who did the pictures started off imaging coins and then combined the microscope with his love of vinyl.
Check this out, all the way down: $10-20 and 0.25 liter of storage volume does it.
Maybe even a jeweller's loupe held against your telephone could do the job; I once fixed leakage problems by finding and polishing scratches in pneumatic valves (scuba regulators) with this technique.
With all respect, but the stacked pictures that Bill provided are far superior.
Hans
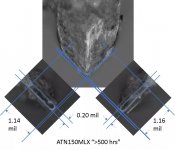
I'm just checking it's ok then will post the latest stacked images from Ray. I do daft things for learning sometimes. In this case I bought a worn out ATN150MLx stylus and posted it to California to try and settle an argument.
I've always thought that the microridge stylus would bottom out in the groove before the laser cut wings wore out. Turns out this is exactly what happens.
I should admit at this point that I am a stylus tart and have gone out of my way to collect examples of as many of the extreme stylus profiles as I could find/afford. This is a silly use of time and money which makes it completely compatible with listening to vinyl in the first place 🙂
Attachments
With all respect, but the stacked pictures that Bill provided are far superior.
Hans
Of course!
I was just showing an alternative that can be put together if $ or volume are tight. Btw, the article I linked to showed a 640x480 'scope; nowadays, you can get 1080p 'scope for the same price.
composite images
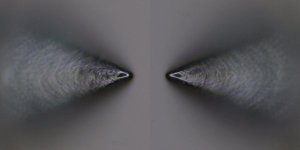
Here are the composite images from Ray showing how the wings on the diamond wear down until eventually the stylus bottoms out. This should be a 'soft' end of life as it will start to sound awful before it is worn enough to cause damage.
Here are the composite images from Ray showing how the wings on the diamond wear down until eventually the stylus bottoms out. This should be a 'soft' end of life as it will start to sound awful before it is worn enough to cause damage.
Attachments
Of course!
I was just showing an alternative that can be put together if $ or volume are tight. Btw, the article I linked to showed a 640x480 'scope; nowadays, you can get 1080p 'scope for the same price.
I got one of those USB microscopes off Amazon UK for about £20.
Use it for checking SMD solder joints on IC’s that solder down.
#2890 photos are excellent.
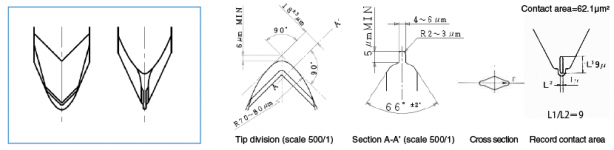
SHURE was using a modified microfilm viewer to project on it’s flat screen the shiny and shady reflections of a light source when illuminating a cartridge tip placed below the objective lens of the viewer.
On the flat screen there were pattern lines for spherical, elliptical and super elliptical profiles (Last time I saw it was ~30 years ago). It was very easy to evaluate the condition of a cartridge tip.
George
The old optical method was a good ready reckoner. I just love how you can actually measure the size of the contact patch as see how it grows over time. It answers questions that are fun, whilst totally irrelevant in the 21st century.
Here are the composite images from Ray showing how the wings on the diamond wear down until eventually the stylus bottoms out. This should be a 'soft' end of life as it will start to sound awful before it is worn enough to cause damage.
What a wonderful pictures.
Surprised about the damage after 500hrs.
Hans
That was a great tip. I bought one from banggood, and it worked as promised.If you're talking about the LCR-T4 Mega328, yes, it's my absolute favorite too.
And yes, the guy who designed it is a mad genius! Video here.
Only the accuracy is a bit below expectation, 4% off for a 47K precision resistor.
Is there a way to calibrate ?
Hans
The old optical method was a good ready reckoner. I just love how you can actually measure the size of the contact patch as see how it grows over time. It answers questions that are fun, whilst totally irrelevant in the 21st century.
Find yourself an old Nikon V12 with DRO:

You will have hours of fun projecting microscopic details onto a 12" screen! I used one for years to check head profiles during lapping. Most machinists use them for cutting tool profile verification. You print out or draw a large version of what you are trying to achieve on Vellum, then clip it to the screen (clips provided), then project the tool profile and iterate grinding it until it matches the drawing.
Cheers!
Howie
That was a great tip. I bought one from banggood, and it worked as promised.
Only the accuracy is a bit below expectation, 4% off for a 47K precision resistor.
Is there a way to calibrate ?
Hans
I found the calibration menu.
Now 1,8% for a 47K precision resistor,
Hans
Me too. I wonder if the previous owner counted correctly. I can only go on what he told me.What a wonderful pictures.
Surprised about the damage after 500hrs.
Hans
Find yourself an old Nikon V12 with DRO:
Howie: that is a wonderful beast, but not sure I'd want to either try and find room for it or focus stack with it.
I have a very good friend with one of these:
iNEXIV VMA-4540 | iNEXIV | Nikon Metrology
Trouble is I aint got a clue how to use it😀
iNEXIV VMA-4540 | iNEXIV | Nikon Metrology
Trouble is I aint got a clue how to use it😀
I have a very good friend with one of these:
iNEXIV VMA-4540 | iNEXIV | Nikon Metrology
Trouble is I aint got a clue how to use it😀
Nice! The trouble I could get into with that. I ruined a $5000 Nikon lens trying to do photomicrographs of DVD pits. The focal distance was so small, I crashed it into the disc and rurnt it. I only made that mistake once.
Cheers!
Howie
- Home
- Member Areas
- The Lounge
- The Black Hole......