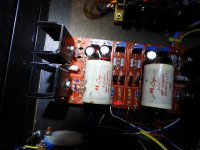
How in the world do you get the test leads on the resistors on the board????? .
One meter across R10 (Black arrows)
One meter across R11 (Blue arrows)
To measure bias. (You can measure just one, then zero offset, the other one will balance.)
One meter before C3 and ground to measure offset (Red arrows)
Attachments
mini grabbers
AKA mini hooks, or "J" hooks. I just got 2 and it made a world of difference but I should have bought 6. So, I went back to Amazon. Really hard to do some of this stuff without the right tools. Good luck.
Don
AKA mini hooks, or "J" hooks. I just got 2 and it made a world of difference but I should have bought 6. So, I went back to Amazon. Really hard to do some of this stuff without the right tools. Good luck.
Don
I just bought 4 pairs of the J hook style on Amazon, delivered next day. I powered it up about half way since I'm still new to this but it just sat there at half power seemingly happy as can be. No transformer hum, no burning, power LED lit up.
Thanks for the picture and the luck 😀
Thanks for the picture and the luck 😀
I powered it up about half way...
Are you looking for permission to turn the variac up to 100%? Go ahead!
LOL!!! Yes, permission is required to turn it up ahead of schedule....the quantum matrix needs to burn in gently so it doesn't suffer a polarity shift and go up in smoke necessitating a delay while black market contacts are contacted for rare unobtainum Toshiba parts....
Actually I was just tired and happy I didn't see smoke at that point, so I shut it off and watched TV....LOL
Actually I was just tired and happy I didn't see smoke at that point, so I shut it off and watched TV....LOL
You watched TV when you could be listening to a Pass amp?
Wind the bias up to 11 and start listening to music!
(Actually 1v bias.) 😉
Wind the bias up to 11 and start listening to music!
(Actually 1v bias.) 😉
Let it cook at 1V with the lid on for an hour or so and recheck bias before you button it up.
I'll try to post pics tonight, but we can add another successful build to the list 🙂 Fully powered up without any issues, was running last night for several hours at 90% bias. When hooked up to my test rig of a simple class-T amp and some spare speakers I could immediately hear its clarity and noise free background. I can't wait to hook it up to the main rig tonight!


Amazing...
Soundwave: First, congratulations on a successful build. But...
Holly c___. That thing is beautiful.Tell us about the case. It's off the charts cool.
Don
Soundwave: First, congratulations on a successful build. But...
Holly c___. That thing is beautiful.Tell us about the case. It's off the charts cool.
Don
Yup, that's the one. Machine work was very well done, everything lines up, sits level, not a scratch on it when I received it. The source selector has holes for LEDs but I have not seen anyone make this chassis and develop a way to have LEDs light up with your source position - that would be extra cool.
It looks legitimately high-end sitting on the shelf 😀
It looks legitimately high-end sitting on the shelf 😀
It's really nice but "I" have to support the store. Diyaudio is my lifeline to learning. Couldn't do it without them.
But, Congratulations your whole build is beautiful.
Regards,
Don
But, Congratulations your whole build is beautiful.
Regards,
Don
The source selector has holes for LEDs but I have not seen anyone make this chassis and develop a way to have LEDs light up with your source position - that would be extra cool.:D[/QUOTE said:Hello soundwavesteve
just duplicate the line selector, one half selects the input and the other selects V+ for the led you want to turn on.
Something like this:
Best regards
carlos
Ah, simplest solution is best! I don't know if I can do that with Glassware's Select Switch:
Stereo selector switch
If my power supply wasn't in the way I could put the GW switch as second behind another switch that was connected to the leds......
Stereo selector switch
If my power supply wasn't in the way I could put the GW switch as second behind another switch that was connected to the leds......
You'd need a different switch, there's a drawing in this .pdf that would help explain. It's pretty easy. https://www.diyaudio.com/forums/att...-input-selector-volume-control-i_select-2-pdf
from here - GB For Salas I-Select Mesmerize Type input selector and volume control
from here - GB For Salas I-Select Mesmerize Type input selector and volume control
Stereo Selector Switch
Has anyone tried the Stereo Selector Switch linked in post 1716? The selector switch itself could be a rip-off of the Mesmerize, but I am primarily interested in the relay operated volume control: 128 steps! Besides the selector board board is possibly available through Tea-Bag if I can get in on a GB sometime Two of these goodies could be used to drive a BBA-3giving tracking as accurate as the builder was fastidious, as long as they were kept independent it could also allow for balance adjustment. Hmmmm, I'm interested especially because I have two BA3Gs ( only one of which is yet populated, but that could easily change,,,.
Hal
I use the Glassware one from post 1716. Not sure where you are seeing 128 step volume control though.
That is an amazing looking case. Beautiful job. 11/10.
- Home
- Amplifiers
- Pass Labs
- The BA-3 as preamp build guide