 still learning, but I think (mostly) I got it
New version of XMachina : [1190117]
New version of XMachina : [1190117]
1) Impedance phase equalization option introduced.
2) Protection against impedance module fall for high frequencies added. Basically the impedance targets are checked a decade beyond the end frequency for dBspl target (that is to 200kHz typically).
3) To avoid application of large inductors/capacitors/high power resistors it is recommended that dBspl target curve follows the woofer characteristic in the low frequency region. You can use "follow the woofer" tool to set it this way, it's available in the context menu of the chart area:

then click some points to define the rest of the target, for example:

New version of XMachina : [1190117]
1) Impedance phase equalization option introduced.
2) Protection against impedance module fall for high frequencies added. Basically the impedance targets are checked a decade beyond the end frequency for dBspl target (that is to 200kHz typically).
3) To avoid application of large inductors/capacitors/high power resistors it is recommended that dBspl target curve follows the woofer characteristic in the low frequency region. You can use "follow the woofer" tool to set it this way, it's available in the context menu of the chart area:
then click some points to define the rest of the target, for example:
Attachments

ZIP file continues downloading ver 1190115 again and again, and tellin' there's a new one, in a loop..
Thanks for the notification. The new version number is actually 1190115, all descriptions updated.
I haven't tried myself but saw videos. Getting a feeling that this would be a great tool. It actually will save lot of efforts and time. Good job.
The UI, Looks bit for engineers. So sure there is going to be a good learning curve. Or in other words I can say It will save lot of time and efforts of engineers. DIYers (from non-tech domain) will need some simplified UI.
But I am loving the work.
The UI, Looks bit for engineers. So sure there is going to be a good learning curve. Or in other words I can say It will save lot of time and efforts of engineers. DIYers (from non-tech domain) will need some simplified UI.
But I am loving the work.

Set the delay to 0 for the nearest speaker, then for the second way set it with relation to the nearest speaker (positive value). The delay can be entered in distance units (in this case it will be automatically recalculated to seconds assuming vs=340m/s).
Is there a way to set a limit to the number of components in the crossover?
i.e. maximum of "x" components.
Thank you,
David.
i.e. maximum of "x" components.
Thank you,
David.
Is there a way to set a limit to the number of components in the crossover?
i.e. maximum of "x" components.
Thank you,
David.
There is no such limit to set, at least not in that "hard" way. You can tell XMachina to use fewer components by adjusting "Part application strategy" options in the Design Task Settings window.
Hello there,
For whatever reason, I have great difficulty translating anything other than a simple crossover Xmachina provides into what I would consider a "normal" looking crossover schematic that I can actually understand and build.
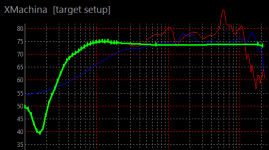
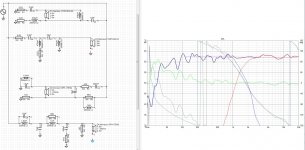
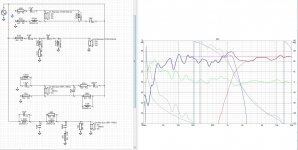
The first image is my interpretation of image 3 and looks like I have done it correctly.
The second image is me translating it into a "normal" crossover layout, and obviously I have done it wrong.
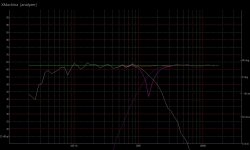
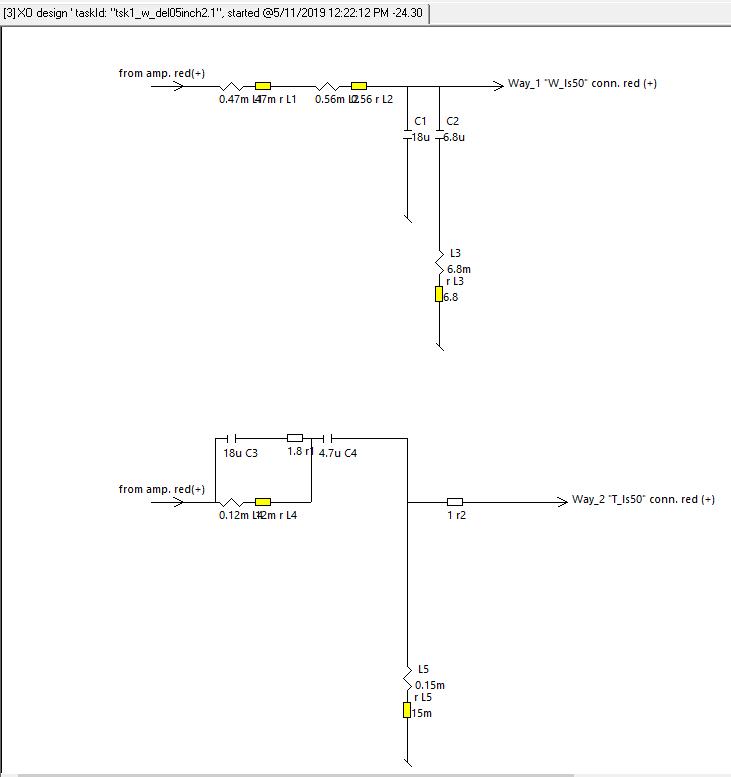
The third image is the actual Xmachina circuit drawing and fourth is the graph.
What mistakes did I make and where?
For whatever reason, I have great difficulty translating anything other than a simple crossover Xmachina provides into what I would consider a "normal" looking crossover schematic that I can actually understand and build.
The first image is my interpretation of image 3 and looks like I have done it correctly.
The second image is me translating it into a "normal" crossover layout, and obviously I have done it wrong.
The third image is the actual Xmachina circuit drawing and fourth is the graph.
What mistakes did I make and where?
Attachments
Understanding Xmachine Design Task Settings?
Hello,
I was wondering if you could help me understand Xmachina Design Task Settings?
1 - What does the number in the "Octave part step" represent?
2 - I understand what "Reduce number of Parts" means, but what is "Reactances"?
2b - Is there a way to turn off "Reduce number of Parts"?
3 - What does the number in "s/f" represent?
4 - What does the number in "x base time" represent?
5 - What does the number in "Strategy Strength" represent?
5b - In Strategy Strength, what is more "Delicate" and what is more "Strong"?
Thank you,
David - London, Ontario, Canada.
Attachments

Hello there,
For whatever reason, I have great difficulty translating anything other than a simple crossover Xmachina provides into what I would consider a "normal" looking crossover schematic that I can actually understand and build.
The first image is my interpretation of image 3 and looks like I have done it correctly.
The second image is me translating it into a "normal" crossover layout, and obviously I have done it wrong.
The third image is the actual Xmachina circuit drawing and fourth is the graph.
What mistakes did I make and where?
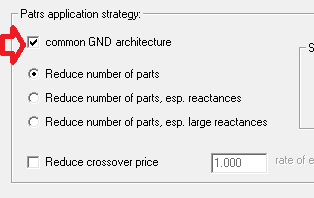
Transformation for D2(Monacor) is not correct imho. I'm afraid that this type of circuit (impedance bridge) is not easily transformable to the "common ground" architecture.
In the next version of XMachina (coming in a week or two) there will be an option of limiting designs to the "common ground" architecture only.
"Reactance" here means a coil or a capacitor.but what is "Reactances"?
You can set the "strategy strength" to 0. But it can easily end with the fact that the designed circuit will have several dozens of elements, so it will be expensive and difficult to implement.2b - Is there a way to turn off "Reduce number of Parts"?
It's all described in the "Design Task creation" chapter in the pdf document.Hello,
I was wondering if you could help me understand Xmachina Design Task Settings?
1 - What does the number in the "Octave part step" represent?
(...)
3 - What does the number in "s/f" represent?
4 - What does the number in "x base time" represent?
5 - What does the number in "Strategy Strength" represent?
5b - In Strategy Strength, what is more "Delicate" and what is more "Strong"?
Latest version of XMachina: [1190515] download
New features:
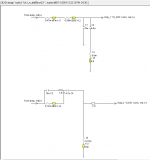
1) Common ground architecture option in the design task setup window.
Check it to get circuits designed with common ground, for example:
I got some feedback that previous output from XMachina was difficult to read. I hope that it will get better with the new feature.
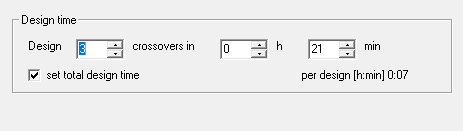
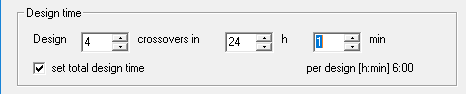
2) Design time manager.
For example, to get 4 designs until the same time next day set it this way:

so XMachina will spent 6 hours on each design.
Needless to say the longer design time the better results to be expected, however before starting such long lasting designs it’s recommended to execute few test 5 to 10min designs just to make sure that there are no issues in the design task settings. It’s also easy to setup a test run with the time manager feature, for example:
XMachina can design in the background. No special settings are needed, for example while XMachina is working on design nr 3 of 4 you can analyze or edit finished designs nr 1 and 2. The design process nr 3 is being continued in the background (next nr 4).
New features:
1) Common ground architecture option in the design task setup window.
Check it to get circuits designed with common ground, for example:
I got some feedback that previous output from XMachina was difficult to read. I hope that it will get better with the new feature.
2) Design time manager.
For example, to get 4 designs until the same time next day set it this way:
so XMachina will spent 6 hours on each design.
Needless to say the longer design time the better results to be expected, however before starting such long lasting designs it’s recommended to execute few test 5 to 10min designs just to make sure that there are no issues in the design task settings. It’s also easy to setup a test run with the time manager feature, for example:
XMachina can design in the background. No special settings are needed, for example while XMachina is working on design nr 3 of 4 you can analyze or edit finished designs nr 1 and 2. The design process nr 3 is being continued in the background (next nr 4).
Attachments


Just finally tried XMachina for the first time and am quite intrigued! Thank you for the effort.
One question: how do you add drivers in series or parallel? Couldn't find that in the manual.
Best regards, G
One question: how do you add drivers in series or parallel? Couldn't find that in the manual.
Best regards, G
Norton flags this software and deletes it
Norton keeps flagging this Xmachina software as ws.reputation.1 network threat. What is up with that?
Norton keeps flagging this Xmachina software as ws.reputation.1 network threat. What is up with that?
Norton keeps flagging this Xmachina software as ws.reputation.1 network threat. What is up with that?
Here is what I found on this subject and I don't think there is something I could do.
WS.Reputation.1 | Symantec
Last edited:
- Home
- Design & Build
- Software Tools
- Automatic crossover designing with XMachina