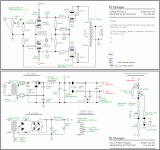
Hi everyone, I decided to put my own project (807 monoblocks) on the back burner for a bit, as a friend of mine asked me to build him an amplifier. He wants something in the 10w range, and wants it somewhat cheaply, so I decided to attempt to find/build a circuit based on the tubes I have on hand, and a power transformer I have on hand. So, I came up with this schematic.
Dynaco Push-Pull EL84/6BQ5 or 6V6/6AQ5 Tube Amp Schematic
One small issue however, the transformer I have seems to spec out fine for a project like this, (came from a pp 6v6 stereo console) but it does not have a 5v line. What 6.3v filament rectifiers would you suggest to replace the 5y3? I have 6X5s and 6AX5s, but I think those would not be rated high enough to handle both channels, and I would need one per channel(this isnt a bad thing per se... but I would like to keep the chassis as small as possible)
Please let me know your thoughts on this schematic, and any suggestions for a rectifier tube are appreciated.
Thanks for reading!
OK … I deleted my whole comment.
I was going to propose you just use a filament drop resistor.
But the thing is… to remember WHY tube designers made rectifiers 5 volts.
Because their filaments cannot be powered using the same winding as the main electronics tubes
_______
Does your power transformer have a separate 6.3 VAC winding? If so, you could take my original advice and use a 0.56 Ω 5 Watt series-with-filament resistor to drop the voltage sufficiently. BUT THAT WINDING will be elevated to full B+ by the vacuum tube rectification topology. It cannot be used to also heat up the 12AX7 and EL84s.
IF you don't have a separate winding, then you could always just install a small (25 VA) filament transformer inside the chassis, underneath the big boy(s) on top. No one knows, no one cares. You get your isolation that way, and you can choose the cheapest transformer you like, for all intents and purposes.
GoatGuy
Last edited:
Thank you!
I will be using a pair of these output transformers for the project
EDCOR - GXPP15-8K
They seem to be the right spec and are certainly low priced, Can anyone confirm/deny that these will work with the above schematic?
Thanks
I will be using a pair of these output transformers for the project
EDCOR - GXPP15-8K
They seem to be the right spec and are certainly low priced, Can anyone confirm/deny that these will work with the above schematic?
Thanks
They will work but if you are using 8 ohm speakers and order the transformer with an 8 ohm tap you may need to adjust the feedback resistor, most likely cut it in half. Also, the feedback compensation cap will need to be found empirically.
I figured that was the case, considering the feedback loop is coming from the 16 ohm tap.
Anyway, with some quick (and probably incorrect 😀) math, I don't think the 5y3 has the muscle to drive two of these circuits. perhaps I can sub in a 5r4 or 5u4 with some adjustments to resistor values?
Anyway, with some quick (and probably incorrect 😀) math, I don't think the 5y3 has the muscle to drive two of these circuits. perhaps I can sub in a 5r4 or 5u4 with some adjustments to resistor values?
OK … I deleted my whole comment.
I was going to propose you just use a filament drop resistor.
But the thing is… to remember WHY tube designers made rectifiers 5 volts.
Because their filaments cannot be powered using the same winding as the main electronics tubes
_______
Does your power transformer have a separate 6.3 VAC winding? If so, you could take my original advice and use a 0.56 Ω 5 Watt series-with-filament resistor to drop the voltage sufficiently. BUT THAT WINDING will be elevated to full B+ by the vacuum tube rectification topology. It cannot be used to also heat up the 12AX7 and EL84s.
IF you don't have a separate winding, then you could always just install a small (25 VA) filament transformer inside the chassis, underneath the big boy(s) on top. No one knows, no one cares. You get your isolation that way, and you can choose the cheapest transformer you like, for all intents and purposes.
GoatGuy
Yes, I have 2 6.3v windings.
Anyway, with some quick (and probably incorrect 😀) math, I don't think the 5y3 has the muscle to drive two of these circuits. perhaps I can sub in a 5r4 or 5u4 with some adjustments to resistor values?
Sure. That'd do. You ALSO could take one big step back and “have your cake and eat it too”. What?
Single 5Y3 for rectifying the B+. But, “saving it” for the front end exclusively. Much lower amp requirements.
1 ea FWB 1000 PIV, low VF rectifier (https://www.mouser.com/datasheet/2/115/ds21205-87779.pdf 75¢) for delivering the B++ (separate supply). There's a certain elegance to it.
The total cost of the supply is hardly different than stepping up the vacuum rectifier, and WAY more likely to last for decades. You don't have to stand on your head and wiggle your toes to keep the maximum C1 charge-pulse current below the Spec Book vacuum rectifier max rating. The use of premade FWB modules capitalizes on their durability. Use a simple CLC configuration for the B++ supply: you're going to be running what, 300–325 VDC on B++ (per your original diagram)? Easy to spec.
300 VDC winding
→ FWB
… → 100 μF, 450 V
… … → 1 Hy choke
… … … → MOSFET source follower (ref: 300 V zener to gate, etc.)
… … … … → 100 μF 450 V
… … … … … → B++ supply
Use Hammond 158SA (Mouser 546–158SA (1 Hy, 240 mA, 40 Ω) ), and be a happy camper. It'll be dissipating 10 Watts in service. You'll have the smoothest, cleanest, cheapest power supply possible, with no hassle. The MOSFET should have a good insulating (nylon screw, mica mount) attachment to chassis to dissipate heat. The B++ supply will be rock stable regardless of power line wiggle.
On the 5Y3 side, just do per the diagram. It'll be fine. Even with 2 12AX7's being powered.
GoatGuy
PS: I specifically use B++ with 2 plus signs to separate it symbolically from B+, the regular vacuum-rectified supply. The EL84s "don't care" where they get their HV electrons from. Neither does your friend, in the end.
Last edited:
Hmmm, that sounds like a fantastic plan. still contemplating subbing in a 5u4, as I found a nice NOS 5931 in my big box o rectifiers. There's certainly plenty of time to plan things out right, since edcor's lead time is so long 😀
Hmmm, that sounds like a fantastic plan. still contemplating subbing in a 5u₄, as I found a nice NOS 5931 in my big box o rectifiers. There's certainly plenty of time to plan things out right, since edcor's lead time is so long 😀
Well… if you're going to substitute from the Good Ol' Parts Bin, you still might do well to consider my “fantastic plan” approach. Its easier that my words make it out to be, and the results are outstanding. And … freed of a particularly onerous milliamp total B+ budget for a Stereo amp, you can use most any rectifier you like for the front ends. That appeals to my Box-o-Parts sensibilities.
GoatGuy
If you want 10+ WPC, the O/P "iron" needs magnetic headroom to avoid core saturation from the NFB deep bass error correction signal. This Edcor model is what's needed. The GX stuff is good down to 40 HZ., not 20 HZ. The headroom necessary for 10+ WPC is not present, sorry.
You want a 6.3 VAC heater rectifier with cojones. The 6CA4/EZ81 is as good as it gets.
6V6 family tubes draw less heater current than 6BQ5s. An "El Cheapo" with UL mode "finals" will yield about 12 WPC. The 6CM6 is a low cost Noval base tube, which will work well.
You want a 6.3 VAC heater rectifier with cojones. The 6CA4/EZ81 is as good as it gets.
6V6 family tubes draw less heater current than 6BQ5s. An "El Cheapo" with UL mode "finals" will yield about 12 WPC. The 6CM6 is a low cost Noval base tube, which will work well.
Attachments
If you want 10+ WPC, the O/P "iron" needs magnetic headroom to avoid core saturation from the NFB deep bass error correction signal. This Edcor model is what's needed. The GX stuff is good down to 40 HZ., not 20 HZ. The headroom necessary for 10+ WPC is not present, sorry.
You want a 6.3 VAC heater rectifier with cojones. The 6CA4/EZ81 is as good as it gets.
6V6 family tubes draw less heater current than 6BQ5s. An "El Cheapo" with UL mode "finals" will yield about 12 WPC. The 6CM6 is a low cost Noval base tube, which will work well.
Thank you, it's better to spend more on a single pair of OPTs than buy one pair and realize they are not what you need! I'll take a look around for a 6CA4, but if I cannot find that, I will most likely go with GoatGuy's rectifier plan.
The 6P1P russian tube is a nine pin 6AQ5/6V6 equivalent, and it is fantastically affordable (usually around ~$2 each!) as well. The pinout is different than the EL84 types, but it will let you shift some of the heater current over to the capability of running the EZ81/6CA4 (hey, I have one of those here, apparently)
An El Cheapo built with the 6N2P and 6P1P would be a very affordable, very high quality build, And if doing monoblocks, an EZ81 per channel is plenty. If anything build it with the needed sockets for now, and run 1N4007/UF4007 with series resistors in the mean time to mimic the drop of the EZ81. I'm not a tube rectifier guy usually, but the EZ81 sounds like a good fit for this.
Funny enough, I have plenty of NOS rectifier tubes, and I haven't had a transformer with a 5 volt winding in years. I went diode-bridge (I even use 1N4007 diodes on occasion!!!) a few years back, and only use the tubes as replacements (on the house, of course 🙂 ) for when I fix stuff for friends/acquaintances. I might have to use that lonely EZ81 I have for a preamp or something, for that Olde Schoole vibe.
Last edited:
Hmmmm... well the original plan for this project was to build around a power transformer and tubes I had in my parts bins to save my friend some $. Buying tubes isnt out of the question, but it's kindof out of the scope of my original plan.The 6P1P russian tube is a nine pin 6AQ5/6V6 equivalent, and it is fantastically affordable (usually around ~$2 each!) as well. The pinout is different than the EL84 types, but it will let you shift some of the heater current over to the capability of running the EZ81/6CA4 (hey, I have one of those here, apparently)
An El Cheapo built with the 6N2P and 6P1P would be a very affordable, very high quality build, And if doing monoblocks, an EZ81 per channel is plenty. If anything build it with the needed sockets for now, and run 1N4007/UF4007 with series resistors in the mean time to mimic the drop of the EZ81. I'm not a tube rectifier guy usually, but the EZ81 sounds like a good fit for this.
Funny enough, I have plenty of NOS rectifier tubes, and I haven't had a transformer with a 5 volt winding in years. I went diode-bridge (I even use 1N4007 diodes on occasion!!!) a few years back, and only use the tubes as replacements (on the house, of course 🙂 ) for when I fix stuff for friends/acquaintances. I might have to use that lonely EZ81 I have for a preamp or something, for that Olde Schoole vibe.
hmmm, im sure I have a few of those lying around. 6BY5Gs aren't a drop in replacement? I think I have a few of those as well.
I meant a replacement for the GA version, I read something in a quick skim of that site that they are slightly different.
Moving the negative feedback resistor from the 16 Ohm tap to the 8 Ohm tap will reduce the voltage to 70% (not by 50%). Use a 700 Ohm feedback resistor that is bypassed by the compensation cap (start with 1.4 times the original compensation cap). The final adjustment will be according to the output transformer you use.
You also need to use a 300 Ohm resistor in series with the '700 Ohm/cap' network and a large bypass capacitor in parallel with the 300 Ohm resistor. If you fail to remember the 300 Ohm resistor, then the self bias resistance to one cathode will be 700 Ohms, and to the other cathode will be 800 Ohms (the original self bias resistances were 1k and 1.1k respectively).
If you forget the bypass cap across the 300 Ohm resistor, the negative feedback will be reduced quite a bit.
Do not just calculate that bypass cap to work at 20Hz, 10Hz, etc. Instead use a larger cap to reduce the phase shift of the negative feedback at low frequencies.
I recommend using individual self bias on the output tube cathodes. Double the resistance, but because the cathodes are no longer tied together, use 200uF for each capacitor across the new 260 Ohm resistors.
One 'little" change usually requires one or more others.
The input splitter is simple, but is not DC nor AC balanced. Negative Feedback somewhat takes care of the 2nd harmonic that is thus generated by the imbalance. I do like the simplicity of this circuit.
Using a long tailed pair would make it much more complex, and the loop gain would go down by 6dB, so just leave the input circuit as it is.
Last edited:
- Status
- Not open for further replies.
- Home
- Amplifiers
- Tubes / Valves
- Help with 6BQ5 PP schematic