I had always understood that the motor was made by Papst for Thorens. At least this was the story in London & Ireland in the late 60s...not that that means anything whatsoever!
The Papst ,, aussenlaufer ,,
motor came from Papst and was used in the last years 1977 as replacement for the E50 motor from Thorens .
I have one, still waiting for me to finish my 3 phase drive and then it will go on one of my TD-124s, most likely the MKII which has the lousier motor of the two. (Yes the older motor runs better..)
Cadmium Plated Linkages
Some of the linkages on these tables are or may be cadmium plated, this is also true of Garrard idlers of similar and much newer vintages. I have noticed on some FB groups lately that people are madly polishing corroded linkages which really concerns me. Cadmium is very toxic if handled incorrectly.
Basically I have done nothing to cosmetically enhance the linkages on my 3 tables, just lubrication is it. I recommend thoroughly washing hands after handling. Perhaps gloves are in order.
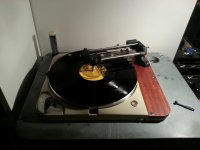
Souther/TD-124 Combo
An odd combination that works really well. This is the older of my two TD-124 and yesterday I installed a 30yr old Souther Tri-Quartz linear tracking tonearm which I have brought back from the dead. A very kind friend gifted it recently having concluded that he had no further use for it.
I cleaned it up, hacked together a serviceable tonearm cable and installed it on the 124. Was not quite sure what to expect, would it pick up rumble or other odd noises.... Apparently not even though this is table has a MKI motor on it with nothing more than a single set of geltec bushings.
The cartridge is a Benz Ebony H that I had lying around that came to me in return for some work I did on a friend's turntable a year or so ago.
It all works together to the extent that it will be the permanent set up on this table going forward, and has had about 12 hrs of use this week-end which is a definite record for this table and the Muscovite Mini III phono pre. I've had no inclination to switch to the "better" table and electronics.
Attachments
An odd combination that works really well. This is the older of my two TD-124 and yesterday I installed a 30yr old Souther Tri-Quartz linear tracking tonearm which I have brought back from the dead. A very kind friend gifted it recently having concluded that he had no further use for it.
I cleaned it up, hacked together a serviceable tonearm cable and installed it on the 124. Was not quite sure what to expect, would it pick up rumble or other odd noises.... Apparently not even though this is table has a MKI motor on it with nothing more than a single set of geltec bushings.
The cartridge is a Benz Ebony H that I had lying around that came to me in return for some work I did on a friend's turntable a year or so ago.
It all works together to the extent that it will be the permanent set up on this table going forward, and has had about 12 hrs of use this week-end which is a definite record for this table and the Muscovite Mini III phono pre. I've had no inclination to switch to the "better" table and electronics.
Highly interesting.
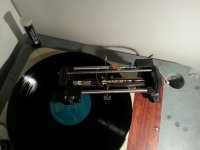
It also brings about the conversation regarding many different linear tracking tonearms that might be used on the TD124. Most often the ET2 tonearm comes up in the conversation. The Rabco.
But the Souther tonearm is fascinating. And it doesn't need a supply of conditioned oil-free, moisture-free air.....at just the right pressure. It is entirely mechanical. I like the idea of it. Cool score.
-Steve
Hi Steve,
I really like it a lot, enough so that I purchased a NIB SLA-3 to install on the other table. It's basically this one missing the quartz beam right down the middle. I suspect I can remedy that it I work at it a bit.
It has been getting a lot of use over the past 4 days, and is particularly convenient to use, queuing is so easy because I can actually see the grooves and position the cartridge directly over the blank grooves! This was unanticipated.
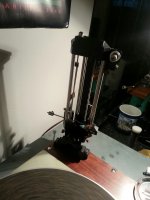
I've solved the skipping issue I had initially, nothing more complicated that the way I've arranged the tonearm cable. Vertical loop to the block where the travel of the carriage is translated into a simple twisting motion, because of the leverage applied the force at the cartridge is small.
If everything is working correctly the carriage just glides imperceptibly along the rods you are not even aware of the fact that it is moving. If it jerks periodically this is a pretty good indication that the cable is fighting it.
Set up is a bit more complicated than for a typical pivoted arm, but basically consists of doing things in a specific order and getting things really level. I found it intuitive, and it worked immediately. It took me less than 5 minutes to know I liked it. It seems particularly synergistic with TD-124s. I thought about buying an ET-2 for a minute or two, but the thought of a compressor, tank and drier was unappealing for the moment. Clear Audio now owns this design and makes several very fancy looking LTAs that use the principles developed for this arm.
I really like it a lot, enough so that I purchased a NIB SLA-3 to install on the other table. It's basically this one missing the quartz beam right down the middle. I suspect I can remedy that it I work at it a bit.
It has been getting a lot of use over the past 4 days, and is particularly convenient to use, queuing is so easy because I can actually see the grooves and position the cartridge directly over the blank grooves! This was unanticipated.
I've solved the skipping issue I had initially, nothing more complicated that the way I've arranged the tonearm cable. Vertical loop to the block where the travel of the carriage is translated into a simple twisting motion, because of the leverage applied the force at the cartridge is small.
If everything is working correctly the carriage just glides imperceptibly along the rods you are not even aware of the fact that it is moving. If it jerks periodically this is a pretty good indication that the cable is fighting it.
Set up is a bit more complicated than for a typical pivoted arm, but basically consists of doing things in a specific order and getting things really level. I found it intuitive, and it worked immediately. It took me less than 5 minutes to know I liked it. It seems particularly synergistic with TD-124s. I thought about buying an ET-2 for a minute or two, but the thought of a compressor, tank and drier was unappealing for the moment. Clear Audio now owns this design and makes several very fancy looking LTAs that use the principles developed for this arm.
Attachments

Does anybody knows dimension of idler oilite bushing or part number?
You can get a new (and better) idler wheel from Audiosilente. It is also either the same price or only slightly more expensive than buying the bushings separately.
I have the idler from Audiosilente: highly recommended
Does anybody knows dimension of idler oilite bushing or part number?
These from eBay (link) work a treat. I fitted one to one of my idlers a couple of weeks ago and it is running really quietly with no slop.
PS My new Turntable Basics FM13.9 belt is working really well. It's been on over a week and the deck is still running really quietly with no increase in noise since I fitted it. I suspect this is my best (50Hz) belt so far and by a good margin.
Idler wheel noise reduction
Schopper AG - Idler Wheel Noise Reduction KitHello,
FYI , this is an interesting mod for the Thorens 124

Has anyone tried this mod? Looks like a oil bath for the idler wheel bearing assembly.
How is the oil kept from leaking out?
Regards,
David
Schopper AG - Idler Wheel Noise Reduction KitHello,
FYI , this is an interesting mod for the Thorens 124
Has anyone tried this mod? Looks like a oil bath for the idler wheel bearing assembly.
How is the oil kept from leaking out?
Regards,
David
Last edited:
You could try filling the cup bottom with grease. If the two mix there seems to be no problems, usually it seals quite well.
Schopper AG - Idler Wheel Noise Reduction KitHello,
FYI , this is an interesting mod for the Thorens 124
Has anyone tried this mod? Looks like a oil bath for the idler wheel bearing assembly.
How is the oil kept from leaking out?
Regards,
David
The plastic container has a tight fit arround the idlerwheel shaft .Schopper use a heavy oil this oil stays where it is put. Seems a kind off Renotac 343 .
From the link it shows rubber washer to be placed below the cup. Which if tight will prevent any leaking. Or one can use felt washer or thin layer of blu tack putty. Blu Tack may isolate/absorb tiny amount of vibrations too.
Regards.
Regards.
or a seal that is resistant to the oil.
I would use a silicone sealer between the shaft and the cup.
I would use a silicone sealer between the shaft and the cup.
Hello. New member here.
I hope these thing haven't been mentioned before. I'm going through the whole thread, but I'm still at page 69. 🙂
I have a couple questions:
1) Why do people always mention either removing the platter from the spindle and then recentering or just pulling up on the platter and reoiling? I have been unscrewing the spindle from underneath and removing the whole thing. It doesn't need recentering and haven't had any problems. Is anything wrong with my method?
2) Re slate plinths: do you just leave the deck on top or have you used the posts to secure it to the plinth? (Perhaps fastening it to the topmost layer) Also have you made the top even or have you let the unevenness of the slate runout show? It would look better left uneven, but then you don't get uniform contact with the player.
Btw it has already been a very informative read! Thanks.
A2.)
I would try to support the chassis evenly on the slate (or other hard plinth) as is possible.
A continuous contact around the whole perimeter might be better than numerous, or a few, point contacts. The chassis might ring between the point contacts.
I have only once tried decoupling the chassis from the case, that being a record player with a ceramic cartridge, before I requested a Thorens TD150 as a birthday present in 1970 when Curry's were selling it for <£50. I still have a very modified version of that deck.
But I wonder if using something like "Blu-Tack" might be a good way to connect the ring free chassis to a hard plinth?
I should also clarify: I mean I unscrew the bearing from the chassis and lift the whole bearing-spindle-platter complex.
I don't think Blutac is a good idea in the case of slate, since you don't want to decouple the deck, you actually want to couple it to something massive and lossy.
I don't think Blutac is a good idea in the case of slate, since you don't want to decouple the deck, you actually want to couple it to something massive and lossy.
Both of my TD-124 are directly mounted on slate plinths, their considerable weight should be sufficient to ensure good contact with the slate. (You can also bolt the table to the slate if you'd like.) Mine are both true and sit completely flat on the periphery all the way around the chassis. I'd not use blu-tac because it most likely will decouple the plinth from the slate and given the weight involved would most likely be displaced anyway. It also stains slate like crazy.
Nothing wrong with your technique, but once installed not practical either considering the fairly frequent service required with some examples of the genus.
I just remove the platter and spindle as one piece and carefully reinsert when I am done doing what needs to be done.
Hopefully you have serviced the main bearing since you got the table, and I strongly recommend replacing the flimsy bearing end cap and leaky gasket with a new, substantial end cap - many examples of which exist on eBay. Choose one that allows you to use either a nylatron thrust plate or steel. Consider a silicon nitride ball bearing upgrade. I run my main bearings fairly wet.
Viscosity of the lubricants used is pretty important, apparently a turbine oil with a viscosity index of 46 is closer to the original lubricant than the 20wt SAE electric motor oil I recommend elsewhere in the thread. (Motor and main bearing)
- Home
- Source & Line
- Analogue Source
- Restoring and Improving A Thorens TD-124 MKII