I've sourced the micro gloss, flat acrylic paint and speedball pens A1-5 and am ready to go...but am confused here from all the info..am I doing EnABL v.1 or v.2 do I gloss before and after appling pattern or just after? treat both sides of cone or just front...sorry so many questions...I'm determined to get this right as I hope if I am successful in unlocking the potential of these drivers, particularly the 8" I will have some glorious sounds going on
Garuda 77,
Sorry to have missed your post!!!!! I no longer get notifications for posts in this thread... well, at least they are spotty. Then again, I don't frequent diyAudio or any other web site very much anymore.
The gen1 / gen 2 question is actually moot. Performing gen 1 patterns just provides the outer patterns, with gen 2 filling in the inner patterns. All about taping radially up the cone until you hear a difference in the direction of the decay from the tap. No, really!! In addition, far less Gloss coat is used since that was effectively the stand in for gen 2 patterns. So, an elaboration of gen 1, for gen 2. It is drastically more effective, but then so is any EnABL application that is done correctly. The Gloss coat is always applied after the patterns. It is Dave's modge podge and trifoil design that are applied before any EnABL procedures.
If you post close up pics, from straight on axis, of each of the drivers, with a ruler laying across them with one edge at mid point or laying very nearby, I can actually provide you with patterns appropriate to gen 1. I suspect this will drive you to learn the tap test method. Given diameter dimensions for the center of each needed ring set, I can generate the gen 2 patterns for you.
Again, sorry my reply has taken so long, wasn't an intended slight.
Bud
Here are some additional EnABL aids (and some fun). People ask for a template for a specific driver. I work with the driver and fit a generic family of templates to the driver.
Here are some circular patterns that can be scaled before printig to provide almost any size template (up to size of paper) for almost any driver. When working around a dustcap, an exact circle in the middle of an appropriate size can be used to create a self centreing template.
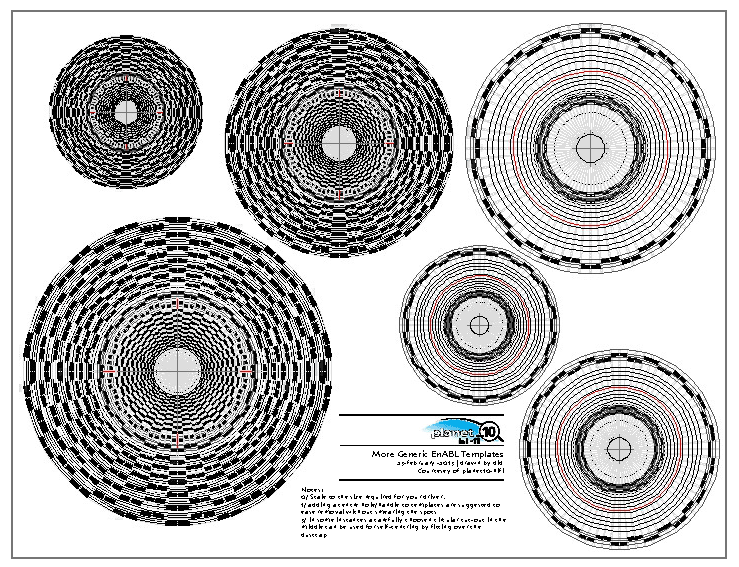
http://frugal-phile.com/boxlib/More-generic-EnABL-patterns.pdf

dave
Here are some circular patterns that can be scaled before printig to provide almost any size template (up to size of paper) for almost any driver. When working around a dustcap, an exact circle in the middle of an appropriate size can be used to create a self centreing template.
http://frugal-phile.com/boxlib/More-generic-EnABL-patterns.pdf
dave
old Boston Acoustics speakers
Walter,
Get those up off the ground -- even 6" -- on some open stands and i bet things get a bit better yet.
dave
G'day wlowes,
Thankyou for sharing. There is more fun to be had if you EnABL all external edges, then run a pattern left to right across the middle of the top panel and continue it down the middle of both side panels vertically. Lastly, run a vertical pattern down the middle of the back panel. Bud put me onto this, and it works a treat.
Are those Boston Acoustic speakers ported?
If so, treat the port as described earlier in this thread. Then place an additional pattern immediately around the port where it becomes flush with the outside of the box. Then kindly share your thoughts with us. 🙂
Cheers,
Alex
Thanks for the suggestions!
Dave,
I would never have guessed. I'll give it a try! I have much to learn about speakers.
Alex,
I'll report back in a couple weeks. Now if I see an improvement here, should I also plan similar when I build the Open Baffles?
Dave,
I would never have guessed. I'll give it a try! I have much to learn about speakers.
Alex,
I'll report back in a couple weeks. Now if I see an improvement here, should I also plan similar when I build the Open Baffles?
Now if I see an improvement here, should I also plan similar when I build the Open Baffles?
G'day wlowes,
Yes, I would be using this on open baffles.
Your Boston Accoustics are virtually sonically invisible because of the effect of EnABL near the baffle edge. The additional treatment suggested just makes the disappearing act more complete.
Try the port treatment first as it will change the way the speaker interacts with the room. Do one port, then listen. Then do the port on the other speaker.
With the open baffle, the EnABL effectively nullifies the audible impact of diffraction on any edges. Essentially the same reason why your 'box' speakers have disappeared.
My experience with vintage HMV speakers was that when the speakers disappear, diffraction from other objects between the speakers becomes audible.
Have fun with it. 🙂
Cheers,
Alex
Try the port treatment
This gen of BA were all sealed AFAIR.
dave
Thanks dave,
I suspected they might be sealed. If they are, then there's one thing less to fix. 🙂
Cheers,
Alex
I suspected they might be sealed. If they are, then there's one thing less to fix. 🙂
Cheers,
Alex
Sealed they are.. or more accurately without port. These are hardly a precision build ..
Alex, what do you use for enable on the cabinet. I recall some time ago you were using some kind of tape. Have you also used clear coat painted on? As you can see on the BA black front I used stick on felt. It is not so obvious. It would not look ok on wood or finished surfaces where as some kind of satin finish clear lacquer could go almost anywhere.
Alex, what do you use for enable on the cabinet. I recall some time ago you were using some kind of tape. Have you also used clear coat painted on? As you can see on the BA black front I used stick on felt. It is not so obvious. It would not look ok on wood or finished surfaces where as some kind of satin finish clear lacquer could go almost anywhere.
I use the regular paint for this, until I don't. Then I use clear, glossy, 0.003 " thick, self adhesive peel and reattach cabinet shelf covering material. From the local girl hobby store. I determine the size of blocks needed and cut up areas made up of that size. I then use a template and peel and stick.... seemingly forever.
Bud
Bud
Alex, what do you use for enable on the cabinet. I recall some time ago you were using some kind of tape. Have you also used clear coat painted on? As you can see on the BA black front I used stick on felt. It is not so obvious. It would not look ok on wood or finished surfaces where as some kind of satin finish clear lacquer could go almost anywhere.
G'day wlowes,
I have mainly used black pvc duct tape for baffles and ports. The clear shelve stuff Bud uses is great because it's clear and virtually invisible. I've used this as well. Also used a much thicker clear tape called Norton All-Weather Tape which I understand is an Australian product. It's about twice the thickness of duct tape.
I have not used paint myself, but if one used a template or masked off the pattern that would also be effective.
I think the reason tape and contact paper works so well is that it has an edge that is perpendicular to the surface - creating the equivalent of a brick wall for the sound waves to hit.
As Bud says, cutting the blocks and laying them out is laborious and time consuming. To break up the tedium, I do sections at a time on one speaker (like say a baffle) then listen to the changes, then do the other side and listen again. It's a good way learning the value of the pattern in certain locations. And it's fun to do!
Felt is not something I've tried, but if it works, why not? I would not use felt in ports though.
Hope that ramble helps. 🙂
Cheers,
Alex
Box Enable results
OK, curiosity got the better of me and I did some quick and dirty experiments.
First the speaker stands. I put the speakers up on a bucket filled with sand. About 12” off the floor. Tweeters right on the plane of my ear. Definite change in sound; Less bass; Different sound stage. Hard to describe, but I am not sure I liked it. It was a bit muddled. Likely needs placement fine tuning.
After checking the block calculator in Alex’s signature (cool little XLS, thanks) I realized that ordinary scotch tape would be pretty close to right width. The tape on hand is the stuff that is a matt finish and it pulls off reasonably easily. I figured these speakers are ending up in the dumpster later this year.. what is to lose by using the tape as box enable pattern. Hard to believe that a thin piece of tape could in any way affect sound, but it did and fairly dramatic. I did the pattern around the edges of both sides and exposed top while an Adi Braun cd played away. With the left one done the balance shifted well to the right and required large adjustment in balance setting. The muddled effect of the speaker stands was clearing a bit. With the second done and a run around the edge of the back of the boxes the balance returned to center and the sound was sharply changed. Imaging had returned and was very precise. It was almost clinical, but very good. I am inclined to use the word glare to describe a bit of a hard edge. Now comes the part that truly floored me. I put the line of enable pattern down the middle of the rear panel of the box. Whatever that glare was disappeared and everything was right and natural.
I had about 30 minutes to audition the final setting. Voices and instruments are very precise and natural. A lot more detail is available. It struck me to go to a live concert and see what I hear. I put on Dianna Krall, Live in Paris. Before these changes I would marvel that through the number you can occasionally pick up the sounds from the audience. Kind of a “that was a cough, right?” After these changes it was not only clearly a cough from someone in the audience, but with clear and natural human sound accurately placed in the distance. Also a first for me, I was actually ducking involuntarily as I’d hear the illusion of things move in the room in which the performance took place. You know the kind of thing where you try not to flinch but you can’t help it. I relate this because the illusion has never been this complete in this system.
There are some other things going on in my system. Some BG Caps are still running in on pretty new amps and every day it is getting better. I had just the day before exorcised the last bit of noise and hum from the amps so they are performing at their best. I can report with confidence that this box Enable is not imaginary. The impact is significant.
My conclusion with this quick and dirty experiment is I will design box Enable into my open baffle project. I don’t really like the look of Enable, but if it is a pattern built into the surface it could be well integrated into the look of the device.
Bud, it amazes me that speaker builders haven’t picked up on this and pay you a license fee for every pair sold. Peter at Audio Note latched onto the clear advantage of BG caps and bought up the existing inventory. He has an edge that no one else can duplicate. Speaker manufacturers could add your innovation and have an edge over all their competitors for a small license fee with little or no Cost of Goods Sold.
I am prepared to be flamed by the crowd. I don’t care. I’m enjoying the music.
Last edited:
OK, curiosity got the better of me
Lol, that's how it starts.
After checking the block calculator in Alex’s signature (cool little XLS, thanks)

The harshness you describe when you first lay down the tape patterns is something I have noticed. Another member who knew about tape and adhesive suggested that it could be the adhesive settling in. I do know it disappears in about 24 hours. You'll be in for a treat with your next listening session.I am inclined to use the word glare to describe a bit of a hard edge. Now comes the part that truly floored me. I put the line of enable pattern down the middle of the rear panel of the box. Whatever that glare was disappeared and everything was right and natural.
Fun isn't it? The cool thing is getting friends over and watching them flinch involuntarily as well. 🙂Also a first for me, I was actually ducking involuntarily as I’d hear the illusion of things move in the room in which the performance took place. You know the kind of thing where you try not to flinch but you can’t help it. I relate this because the illusion has never been this complete in this system.
I am prepared to be flamed by the crowd. I don’t care. I’m enjoying the music.

That's awesome wlowes; your post put a put smile on my face this morning.
Thanks for sharing your experience with us.
Cheers,
Alex
I use old Boston Acoustics speakers I bought new in early 80's.
They look like A70's. I had a pair many years ago, sitting about 8" off the floor, as Dave suggests.
jeff
Actually they started life as A100. Great tweeter. Average driver. Good consumer value in their day. Awesome now by comparison.They look like A70's. I had a pair many years ago, sitting about 8" off the floor, as Dave suggests.
jeff
Actually they started life as A100.
Well, it's been a while.😉
Great tweeter. Average driver.
Yes, average woofer, but responds to basket and cone treatment quite well. I also owned A200's, which were out-shined in the mid-bass by 1970's Sansui speakers.😱
jeff
... I don’t really like the look of Enable, but if it is a pattern built into the surface it could be well integrated into the look of the device....

dave
Ok. don't want to upset any one unduly here..... hehehehe but you can apply the paint or tape to a surface and paint over it. You know, the matt black stuff. You can also Gloss the surfaces and paint over them. The paint has so little effect it can be ignored.
Now, gen 2 box patterns. Take the trusty pen nib holder by the thik end, between thumb and one finger. Start taping away from the4e driver/s radially. You will find a simillar but more diffuse "change" in direction across a place you need a pattern set. There will be a number of them, they will follow the basic shape of the holes cut in the box face. Placing patterns here is even uglier than at the edge, but even a paint pattern makes a substantial difference. And, if you thought you had detail before, grab your socks...
Bud
Now, gen 2 box patterns.
😀 😀 😀
I wasn't sure whether to put that out there just yet.
Glad you did! And yes, gen 2 on cabinets is pretty awesome.
Cheers,
Alex
- Home
- Loudspeakers
- Multi-Way
- EnABL - Listening impressions & techniques