Kaz, I am pretty sure they were ferrite. The frame was definitely cast but I didn't have a spec sheet for the specific drivers. My memory is that the Alnico version was not yet available when these arrived at my door.
I have very little experience with open baffle Octavia. These were mounted and tested, during treatment, on the floor and then up about 2 feet on monitor stands, nude. This last is actually my preferred mounting and with bass support from Planet 10's wonderful slant transmission line towers the sound was the best I have heard, overall. The Fostex F200 A was more precise and less colorfully dynamic and the Lowther PM6A was more colorful, less complete, with equivalent detail reproduction.
Bud
Hmm so Bud does that mean you were running the AN 15's with a full range signal and having the transmission line towers add in for bass? OR were the 15's crossed over so they didn't have to carry any of the low bass signal?
The AN 15's were running full range, the subs are on plate amps with variable phase, FR to 320Hz and volume. I adjusted phase and FR and volume to match the AN audible output. I was not interested in measurements, since I do not have wavelet analysis software and wasn't after anything more than added transparency and reduction of the few rather benign resonance peaks that were audible from the AN. These being dispersed with mid cone rings and damped with the 2way Zig glue out at the backside ends of both cone and whizzer.
Bud
Bud
One more try. Does this process involve using a stencil? or NOT!?
I seem to be missing a whole lot of info, steps etc about how to treat a driver with enabl.
People have tried to help me a few time heres but what I really would like is some straight answers to my questions. The patterns prescribed seem to me to be the kind of thing you don't want to do free-hand, perhaps not even for a calligrapher. So is there a range of stencils I can use? or cut-away circles?
IE a stencil you overlay onto the driver cone so that you put the ink in the right place. I'm aware there are coatings to do as well, and I'd need to be very careful to use exactly the same amounts so that cone masses remain reasonably similar
My drivers are Coral Flat 5's and are a good match for Fe107s. The cones are 3 and 3/4 inches in diameter. Is there a stencil for that size cone that I can use?
Dave Dlugos sent me a PDF file. HOW do I rescale that thing? And, how do I cut out each tiny slot so I can actually get the precise spacings and sizes?
I can read what the kit content is, but it does NOT mention a stencil.
I am hoping there is ONE page or URL where it is all explained.
Yes? no?
TIA
Last edited:
So how do YOU do it?
Do you mark things out, at all?
I am not at all confident that my 62 year old hand is steady enough, nor that I could possible get the spacings consistent without some kind of guide / markings.
And Just BTW what was the outcome with the eight by 3" Fosters? I have a few FE103s, both cream and black cones.
Shipping from Aussie to to DD in USA would require a LOT of certainty on my part that it would be worth it.

TimboinOz
Do you mark things out, at all?
I am not at all confident that my 62 year old hand is steady enough, nor that I could possible get the spacings consistent without some kind of guide / markings.
And Just BTW what was the outcome with the eight by 3" Fosters? I have a few FE103s, both cream and black cones.
Shipping from Aussie to to DD in USA would require a LOT of certainty on my part that it would be worth it.
TimboinOz
Well Tim..... the answers are yes and no, just as you have already found.
However. If you have or can borrow, a digital camera and take a photo from about 2/3 of a meter away right on the center of the axis of the voice coil and place a ruler across the top of the mounting plate, with an edge that has useful markings bisecting the CL of the cone, I can make you a set of pattern guide rings.
If you page back through this thread you will find a couple of folks have performed just this act. Look at how they provided me with size and scale information and duplicate that, if my words do not help.
To scale a PDF you must use the Adobe print page, look around for scaling and increase and decrease by %. First you have to know what you are doing, which will mean quite a bit of reading. I have attached a text file containing most of the relevant sites and there are three training posts near the beginning of this thread.
You do not cut out slots and use the pattern guide as some sort of masking device. I spent years making increasingly complex "printing" tools using masks of one sort or another. They don't work.
Anyone can learn to use the calligraphy pens that do work. In the three tutorials I mentioned, and the text file will give you the URL for them, I lay out exactly how to do this work. It is tedious, not terribly exacting and well worth the effort. I would suggest that you look at the Picassa site noted in the text file. Once there, look for a set of pictures that show a light yellow colored driver with a bunch of patterns laying on it, a Lowther. If you open that picture set and step through them, and read the tutorials, the two will make the cranial processor boot into the right zone and then it is just a matter of practicing on a couple of cheap speakers close to the size of the drivers you care about.
Under no circumstances should you attempt the Coral drivers as your first speaker set. Go find a cheap boom box, pull the drivers and train on them. Put them back in, you will be amazed, even with poorly developed skills. This is another thing that "close" works well on.
Bud
Attachments
I see, well bits of it anyway, and thanks to you both!
I apologise for not getting it straight off and for any grumpiness apparent! 😉
Fortunately I have a tripod and I think BOTH my digital cameras have the threaded hole to match. should be able to get a good steady picture
Email me? I think I have allowed for that in the options.
Good points about the Corals, I have three lined up, two in their spheres, possibly a third sphere.
I've got a pair of old alnico magnet grey-black 6 inchers that don't have whizzers, and will start with them. They have already been treated with a dilute coating of that German waterproof white wood glue. It didn't hurt!
Is there a treatment for whizzered drivers? Apart from using a scalpel 😉!?
You do not cut out slots and use the pattern guide as some sort of masking device. I spent years making increasingly complex "printing" tools using masks of one sort or another. They don't work.
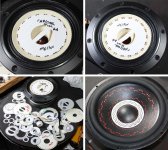
To expand on this: The pattern guides are placed near where you wan to put a ring. For instance on the outmost ring-set i create a disk sized such that the outer ring is just outside the guide. I lay down that ring, remove the guide (carefully, the paint is still wet, more than once i've not pulled the guide off cleanly and smeared spots). I then use the ring set i just laid down as the guide for the other half of the ringset.
As you move down the cone, it becomes harder to centre the disk, i have a marked popsicle stick that makes a handy measuring stick. Around the dust cap, one can use a guide with a circle cut out of the centre to centre the guide.
To do extra rings on the dustcap (sometimes needed) a guide on the inner circle cutout of a guide like the one described above works. The thing i have the biggest trouble with is getting the spot in the centre of the dustcap.
I have more elaborate guides for some tricky spots, the elaboration almost always a way to ensure the guide is centred or to makeit less likely to move while i'm working around it.
Practise is essential before you tackle anything valuable.
Alex in Oz (near Canberra) is competent, for some reason he decided not to pursue commercial work, but he might be sweet-talked.
dave
ncdrawl,
You have a response to your pm. The list of materials is in the opening post of my thread listed below in my sig.
You have a response to your pm. The list of materials is in the opening post of my thread listed below in my sig.
ncdrawl
I have attached a text file with all of the pertinent EnABL threads. Note that there are two posts with step by step instructions for applying EnABL 1.0. To move on to 2.0 you will have to read the last few hundred posts in the "listening and instruction" thread as that extended format is still under going investigation. The basics are there but not the subtle stuff. I will be showing up shortly with a treatment for a Lowther and Eminence driver combination that will push that gen 2.0 rope a bit further.
I did attempt to email you but the email was rejected as undeliverable.
Bud
Attachments
Erm.. Buy some Letraline tape
Letraset - Product Information : Letraline Tapes
Many configurations available .. apply it as you wish. Major advantage is that it's removable.. if it fails to impress.
Entire sections in Aero theory/technology foucus on boundary layer effects and resonance.
You don't actually believe that a bunch of old guys dicking around in their basements on recycled tv speakers have discovered perpetual motion. ? 🙂
ncdrawl
I have attached a text file with all of the pertinent EnABL threads. Note that there are two posts with step by step instructions for applying EnABL 1.0. To move on to 2.0 you will have to read the last few hundred posts in the "listening and instruction" thread as that extended format is still under going investigation. The basics are there but not the subtle stuff. I will be showing up shortly with a treatment for a Lowther and Eminence driver combination that will push that gen 2.0 rope a bit further.
I did attempt to email you but the email was rejected as undeliverable.
Bud
thank you sir. my email is teddyraybullard@gmail.com
Erm.. Buy some Letraline tape
Now, if they could be convinced to provide more than one width, this would be helpful to those who are frightened of pens and paint. No less tedious however....
And I will have you know we don't hide in our basements to display our dicking around!
Bud
control!...refrain!...aargghh!...I could not prevent the visual...🙄And I will have you know we don't hide in our basements to display our dicking around!
Well then, let's get down to it, since off topic is queening here.
Imagine a gently rounded hill crest, with POV from 50 feet away and 20 feet down. The sky is midwinter darkling, the air is frosty and there is that silence you find, just before dawn. Suddenly a skirl of early bag pipe adjusts that silence with a stark contrast and at the beginning of that biting scree, sunlight illuminates just the top edge of sparse grass, bristling from the hill. And just above that scintillation, with startlingly revealed detail, caper 12 human shapes, covered in dark blue.....and nothing else...... the very earliest instance of Modern Dance.
Bud
EnABL for Saba 8"
Hi All,
Very interesting thread/s...lots of material here, my poor head is spinning. I have saba 'greencone' 8" mids and 4" tweeters in an OB set up with eminence deltalie II 15" bass, the baffles are along the lines of Troels Gravesens OB11 project. I love the sound from my speakers...massive improvement from my previous KEF boxes...however...beaming is a major problem and I have to listen bang on axis both vertical and horizontal or I'm missing a lot (not too bad for me, no good for those 'off-axis'). I have taken the decision to EnABL mids and tweeters (and possibly bass??) ...I've sourced the micro gloss, flat acrylic paint and speedball pens A1-5 and am ready to go...but am confused here from all the info..am I doing EnABL v.1 or v.2 do I gloss before and after appling pattern or just after? treat both sides of cone or just front...sorry so many questions...I'm determined to get this right as I hope if I am successful in unlocking the potential of these drivers, particularly the 8" I will have some glorious sounds going on. Any help advice or pointing in the right direction of suitable posts would be greatly appreciated. As would comments from anyone who has wprked on these drivers. I should add I have removed the dustcaps and coated the corrugated the surrounds of the 8" with thinned bookbinders glue as per Troels suggestion on his website, don't know if this will affect how I approach EnABL'ing the drivers?? Also damped with 'duct seal' type putty around magnet and outward facing surfaces of basket with felt pads on inside faces of basket.
Cheers
Terry
Enable listening impressions
When I started my DIY audio journey in 2007-8, the first thing I played around with was at the outside fringe. Cables then speaker tweaks. Now after cleaning up the source and having finished my second generation of amps it is time for me to think about building some great speakers.
I thought it would be worth noting however how much great listening I got out of speakers that would be found in a thrift shop for a few $$ thanks to Enable.
I use old Boston Acoustics speakers I bought new in early 80's. After pulling them out of storage and re doing the surrounds I set about to see if I could improve the sound. I added Planet 10 tweaks like modelling clay on the metal baskets. Replaced the internal wiring with solid copper 18guage. This then lead to Enable. Man, huge improvement. Next came virtually removing the cheap crossover. Without knowing any better I ran the driver full range and just crossed the tweater with a single BG F 10u cap. It was like removing curtains from in front. Final stage was to enable the outside of the box. I believe equal gain to doing the Enable.
I am not sure when the speakers disappeared from the room. I believe it was with the Enable on the box that I last heard the speakers. Now sound just floats in a 3d space that is a bit wider than the speakers and out about 10 - 15 feet out behind the speaker plane.
With a fairly trivial amount of work and almost no investment, these thrift shop specials have been delightful. Any time I have gone to a retail stereo shop speakers and heard speakers costing $3k it seems like a big step down. The only other comparison I have is a pair of Totem bookshelf speakers that I can swap in for comparison. No comparison.
The front end of the system is fairly well behaved. A hi res digital server into a tda1541a DAC with tube output stage through lightspeed into a pair of OTL tube monos. There is not a lot of stuff in the signal path other than triodes. Interestingly I tried attenuating the tweeters with a single MIlls resistor. Easy to tell that something was in the way and it had to come out. So I think the speakers are fairly well resolved without much investment. No doubt not anywhere in the league of a well designed and implemented speaker system. But still if I compared the sound where it started, I think I'd be surprised at the sound that can be had using vintage commercial grade speakers and Enable.
Next project will be single driver full range on OB. Enabled of course.
Attachments
Last edited:
- Home
- Loudspeakers
- Multi-Way
- EnABL - Listening impressions & techniques