just found a lot of these at home: NORMPLADE CE 40X160X2,0 MM - Best.nr. 9272 would one of them be enough for the heatsink for amp6 running 4 ohm speakers (hammond boxes not an option! 🙂 )
couple of questions on glues, smallest to largest 🙂
Mod to the piezo's:
Rope Caulk in the grooves of the piezo and on the back.
- I am guessing that rope caulk is putty rolled up in a rope shape? (don't have rope caulk at bunnings that I can see).
Alternative product for Australia?
Woofers:
to glue the woofers to the baffles (with the grill in between) - Epoxy - any particular epoxy? ie
Adhesive Parfix 35ml Epoxy - Bunnings Warehouse
Cabinet:
Can I use Selley's Aquadhere PVA+ Woodworking glue Exterior: (Industrial grade Plyaliphatic crosslinking PVA) <- what ever that means as it was taking from the blurb on the container.
I assume the PVA+ is not as strong as the epoxy, but is it not designed for cabinets?
is the reason the the epoxy is for superstrength, ie incase it falls our of a lorry 🙂
ie if i'm not going to drop it out of a lorry at 40mph, then PVA+ will be fine? (assuming I paint/polyurothane the whole thing) 🙂
Cheers, SteveC.
Last edited:
steveodude,
Any type of chalk or (non-corrosive) silicone will do for the piezos. I recommend silicone as that absorbs more high frequency vibrations in the horn.
To glue the woofers, both on the center brace and the baffle with grills in between I recommend chemical metal. Remember to remove the rubber band on the grill.

I recommend epoxy glue (phenolic resin) for the cabinet, especially if you've gone all the way and used construction grade plywood as recommended. That's because it's much stronger but it also bonds to the glue used in that type of plywood. If you've built it with regular plywood then PVA glue will work fine.
Any type of chalk or (non-corrosive) silicone will do for the piezos. I recommend silicone as that absorbs more high frequency vibrations in the horn.
To glue the woofers, both on the center brace and the baffle with grills in between I recommend chemical metal. Remember to remove the rubber band on the grill.
I recommend epoxy glue (phenolic resin) for the cabinet, especially if you've gone all the way and used construction grade plywood as recommended. That's because it's much stronger but it also bonds to the glue used in that type of plywood. If you've built it with regular plywood then PVA glue will work fine.
The Boomwagon from Northern Finland
Hi, I just wanted to thank you all for making this great thread. And of course Saturnus for making this awesome Boominator design. 😀
There's some pictures of our build: (it was build last spring)
Only minor change for original design, is that I changed dimensions to make that shorter and bit higher. And also put it in a bicycle trailer. 😉
Almost ready boominator
Boomwagon in action 🙂
Last edited:
I've decided to wait for your new bracing design and since i get a little extra time for shopping I decided to get the amp6 and some better tweeters.
I read on Festivalanlaeg.dk that you recomended p.audio PHT-407T or Monacor MHD-220N/RD for this setup. Which of these is the prefered one?
I found the PHT-407T very cheap here but if the MHD-220N/RD is better i will try to find that one
Are these ok for coils
Will I still need a resistor when using real tweeters?
/Magnus
I read on Festivalanlaeg.dk that you recomended p.audio PHT-407T or Monacor MHD-220N/RD for this setup. Which of these is the prefered one?
Will I still need a resistor when using real tweeters?
/Magnus
Actually it's PHT-407N I recommend. If I wrote "T", that's a mistake. The "N" version and the Monacor are almost identical (the Monacor one is just an OEM version of the p.audio one with slightly different parameter but still made by p.audio). The p.audio one have better parameters for this use.
No. You will need a real filter. It's described somewhere in this thread. (Or is it on a different site? I lose track sometimes). Maybe someone will jump in and tell me where I wrote it down.
You need a 2nd order Linkwitz-Riley high-pass at 2000Hz and a 2nd order Butterworth low-pass at 1400Hz. Which together with the actual frequency response of the drivers gives an acoustic 3rd/6th order Bessel filter at 1800Hz.
Remember to invert the tweeters and dampen them by 3dB with a series resistor.
😕
Here's a simple and fast drawing of how it should be connected. Please note that I made a mistake. The plus on the tweeters should be connected to minus on the amp, not the plus on the amp as I have drawn here.
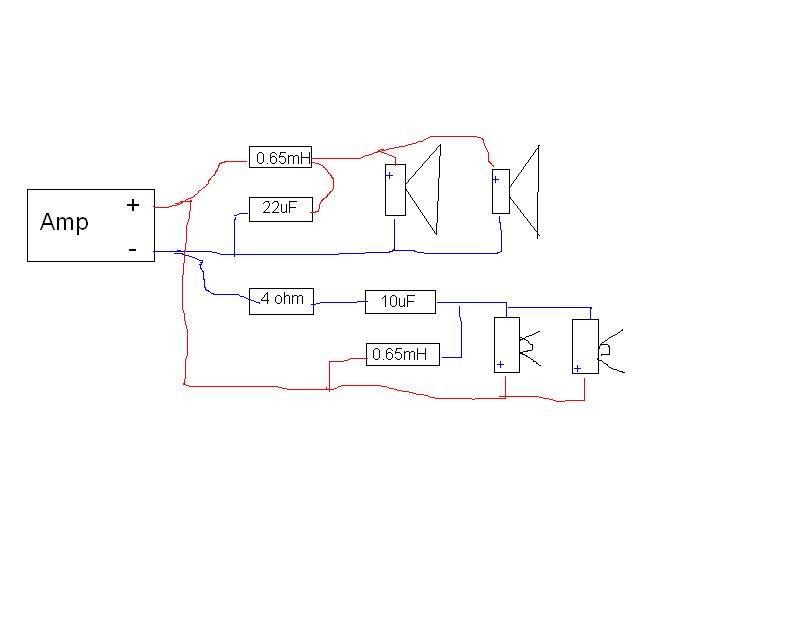
Would this be the way to do it?

An externally hosted image should be here but it was not working when we last tested it.
Sorry if any of my questions on glue, but I just want to be sure.
Keep in mind that I am making 2 Boominators:
Would 1 tube of this be enough for 1 boominator, ie 4 woofers:
Polyester Resins & Adhesives Plastic Padding,chemical metal,130ml tube Henkel 360646
The epoxy glue I assume you mean similar product to araldite 2 part epoxy, or 2 ton epoxy.
Would 1 tube of 130ml be enough for 1 boominator?
Epoxy Resins & Adhesives Adhesive,2 Ton Epoxy,std cure,200ml cartridge ITW Devcon 20222
To glue the woofers, both on the center brace and the baffle with grills in between I recommend chemical metal.
I recommend epoxy glue (phenolic resin) for the cabinet
Keep in mind that I am making 2 Boominators:
Would 1 tube of this be enough for 1 boominator, ie 4 woofers:
Polyester Resins & Adhesives Plastic Padding,chemical metal,130ml tube Henkel 360646
The epoxy glue I assume you mean similar product to araldite 2 part epoxy, or 2 ton epoxy.
Would 1 tube of 130ml be enough for 1 boominator?
Epoxy Resins & Adhesives Adhesive,2 Ton Epoxy,std cure,200ml cartridge ITW Devcon 20222
Sorry if any of my questions on glue, but I just want to be sure.
Keep in mind that I am making 2 Boominators:
Would 1 tube of this be enough for 1 boominator, ie 4 woofers:
Polyester Resins & Adhesives Plastic Padding,chemical metal,130ml tube Henkel 360646
The epoxy glue I assume you mean similar product to araldite 2 part epoxy, or 2 ton epoxy.
Would 1 tube of 130ml be enough for 1 boominator?
Epoxy Resins & Adhesives Adhesive,2 Ton Epoxy,std cure,200ml cartridge ITW Devcon 20222
One tube of chemical metal will be enough for 2 easily. Just remember that it sets pretty fast.
130ml 2-tonne would be stretching it for 2 but it might be possible. I'd be more at ease with 200ml. Keep in mind this is nasty stuff, and you must wear PVC gloves and in a very ventilated space (outside) when using it as a bare minimum of personal protection.
Saw my own mistake there but I wasn't able to edit the post.
This was how i meant:

Looks right.
If I was to add something about component choice on the x-over, it would be that the 22uF should really be 20uF realized by 2x 10uF in parallel. the 4 ohm resistor should be 3.8ohm standard value, and finally the coils (both) should be low resistance types (within a resonable price range) and it really doesn't matter much for the the nominal value as long as it's within about 5%, so anything from 0.60mH to 0.68mH will do as long as they are both the same.
So shopping is really easy as you only need this for stereo:
2x 3.8ohm resistor 5W minimum, ceramic will do
4x 0.65mH coils, low resistance
6x 10uF capacitors, MKP type
Coils are magnetically interdependent, so you they must be angled against eachother at 90 degrees and kept away from large magnetic influences like big magnets.
ok ordered:
130ml of chemical metal
200ml of 2 ton epoxy
I've got some regular silicone tubes floating around here somewhere, I'll use that.
130ml of chemical metal
200ml of 2 ton epoxy
I've got some regular silicone tubes floating around here somewhere, I'll use that.
Build finished. very happy but one major driver issue
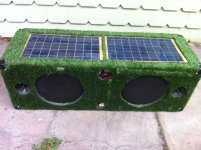
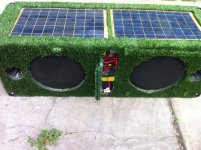
Thanks for all the help Saturnus and others. I finished my build a couple of weeks ago, and I am really happy with the results! I hope you all like my 'green' touch. Saturnus, your wonderful design became so much more apparent during construction.
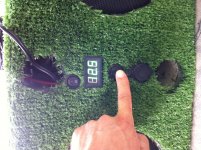
I also included two USB chargers, a solar controller, optional 15v mains charging via controller, two 10w epoxy resin solar panels from china, a green LED voltmeter with momentary switch, and I made the compartment door at the back a little hidden from view.
My boominator has just seen two weeks of rough Australian bush and beach camping over new year's eve - full heat and sun. We had it cranking at a lovely volume from midday on new year's eve, to 10am on new year's day. Mission successful and it was the talk of camp all the time.
I'm very happy with it, but I found a pretty big problem.
After carrying it around, I noticed that air wasn't porting on one side. Then I realised that only one channel is working properly - I should have picked this up earlier but didn't.
One channel (both drivers on one side of box) is only playing very softly upper register sounds, no bass and hardly any mids. I switched the channels on the amp, and found out it's the same drivers that are affected - this means it's a speaker problem.
I triple-checked wiring when I was building, and I tested the drivers twice before securing and closing the box (permanently, sadly I built this thing with a lot of sealant, glue and expoxy.)
Does anyone have ideas? I am very very worried that one side of the drivers are blown, but I have no idea how because they weren't driven anywhere near high volume before I found the problem. If the drivers are blown, I cannot even get into the box, let alone remove them. This makes me very sad! Help please! The only thing I can think to do is cut doors in the bottom panel, but then I can't even get to the terminals orientated towards the top side.
Overall I'm very happy with it, because it's still a great party machine, but knowing only one side is delivering bass makes me really want to get it right and hear the results.
tom.
Thanks for all the help Saturnus and others. I finished my build a couple of weeks ago, and I am really happy with the results! I hope you all like my 'green' touch. Saturnus, your wonderful design became so much more apparent during construction.
I also included two USB chargers, a solar controller, optional 15v mains charging via controller, two 10w epoxy resin solar panels from china, a green LED voltmeter with momentary switch, and I made the compartment door at the back a little hidden from view.
My boominator has just seen two weeks of rough Australian bush and beach camping over new year's eve - full heat and sun. We had it cranking at a lovely volume from midday on new year's eve, to 10am on new year's day. Mission successful and it was the talk of camp all the time.
I'm very happy with it, but I found a pretty big problem.
After carrying it around, I noticed that air wasn't porting on one side. Then I realised that only one channel is working properly - I should have picked this up earlier but didn't.
One channel (both drivers on one side of box) is only playing very softly upper register sounds, no bass and hardly any mids. I switched the channels on the amp, and found out it's the same drivers that are affected - this means it's a speaker problem.
I triple-checked wiring when I was building, and I tested the drivers twice before securing and closing the box (permanently, sadly I built this thing with a lot of sealant, glue and expoxy.)
Does anyone have ideas? I am very very worried that one side of the drivers are blown, but I have no idea how because they weren't driven anywhere near high volume before I found the problem. If the drivers are blown, I cannot even get into the box, let alone remove them. This makes me very sad! Help please! The only thing I can think to do is cut doors in the bottom panel, but then I can't even get to the terminals orientated towards the top side.
Overall I'm very happy with it, because it's still a great party machine, but knowing only one side is delivering bass makes me really want to get it right and hear the results.
tom.
Attachments


If it's sealed, just cut off the magnets from the broken drivers
Swap the working ones within the channels L and R.
You have then a passive radiator! ( and double Z 🙂 )
Edit: just joking! You would then have to recalculate the inductor for the woofer, the output power would drop due to double Z,
and the passive radiator would not work as the internal volume would not permit to utilize it as subtitute for a duct in a resonant chamber.
Last edited:
whalebreath, very happy to hear about your good experiences and praise. Really cool turf camo too 😀
And so sad to hear about your problems. However, you are the first builder to experience it, and while at Roskilde Festival this year I was told the answer by Camp Fri Ost. The easiest way to see if you can fix the problem without having to build a completely new box is to route off the whole bottom by routing a 12mm deep 12mm wide groove around all edges. With a bit of force (with a crowbar or hammer) you should be able to get the bottom off after that in one piece.
Then you can see if the problem is fixable and put a new bottom on with epoxy and screws and it'll be almost as good as new after some paint.
It goes without saying that after prying off and before gluing the new bottom on you'll need to sand everything flat.
If indeed it is a blown driver which could happen if it was faulty from the start but your description of the problem really suggests it's as simple as a faulty connection as I'd consider it highly unlikely that both drivers could be faulty, and there'd by a notable difference in the midrange output of the 2 if both had blow. Anyways, if indeed a driver is faulty or blown, there is really no other option than taking it all apart again and try again.
That's the only problem of it being built to last a nuclear holocaust really.
If it's sealed, just cut off the magnets from the broken drivers
Swap the working ones within the channels L and R.
It's a bass reflex so that's not a solution. And you really can't "swap" drivers at all. They are glued to the cabinet. Only way to take the drivers out is to destroy the box.
Yes I know, since I did 2 boxes with 2 woofers in each in isobaric-push pull, the
problems related with drivers mounting in such tiny space and make everything air proof...I should have had tentacles instead of hands 😡
Regarding the audibility of broken ( or not working) speakers, it took me about a year to discover that the mids and tweets of a box were mute 😱
🙄 ( PF's 'Money' was a bit...unbalanced)
It's gotten to the point were i've started thinking about building a "Half-Boominator" but i need the help of this forum to see if im on track!
First of all, i'm planning on buying 2 P.Audio HP-10W woofers as suggested, aswell as 2 Motorola KSN1001A, the Lepai Class Tripath TA2020 and a 9800 mah Li-ion chargeable battery pack.
My main concern is that i've forgotten some important part (mainly the crossover filter, do i need it!?) as well as wiring, is it just as easy as hooking the tweeter up with the woofer and then hooking thoose up to the amp?
Last question: Would a mobile phone solar charger shorten the circuit if the mobile is both being charged by the solar charger and playing music from the audio output at the same time?
It's gotten to the point were i've started thinking about building a "Half-Boominator" but i need the help of this forum to see if im on track!
First of all, i'm planning on buying 2 P.Audio HP-10W woofers as suggested, aswell as 2 Motorola KSN1001A, the Lepai Class Tripath TA2020 and a 9800 mah Li-ion chargeable battery pack.
My main concern is that i've forgotten some important part (mainly the crossover filter, do i need it!?) as well as wiring, is it just as easy as hooking the tweeter up with the woofer and then hooking thoose up to the amp?
Last question: Would a mobile phone solar charger shorten the circuit if the mobile is both being charged by the solar charger and playing music from the audio output at the same time?
Haven't found any edit button yet so i guess i will have to make a new post.
Anyways, i've looked over my piezo choice and found two worthy contesters:
QLM-1005 and the Monacor MPT-001
I'm wondering how much of a downgrade these will make instead of the KSN1001a i was originally planning, aswell as if the two new piezos need any crossover filters or resistors and if they can be wired up with the rest of my purchases (see the post over this one)
- Home
- Amplifiers
- Class D
- The Boominator - another stab at the ultimate party machine