Just saw this post....
I have been running this Kit for 6 months now. LOVE IT....
I use I2S to a 4x TDA1541-S1 DAC, the sound is great. The detailing is world class.
I did not like the SPDIF from the standard CD-Pro pin out to the power board. So I went straight from the SPDIF output on the controller chip on the CD-PRO to one of the buffer chips in the power boards SPDIF circuit. That really improves the SPDIF. But I2S sounds the best to my ears.
I also reclocked the CD-Pro with in power broad crystal. That is a must.
I tried an off broad .5ppm crystal with its own supply, it simply was not as nice as the on power board 1ppm unit. So I went back to on power board crystal.
So my next step is to mount the stock 1ppm on the separate board with its own supply.
jk
Hi jstang,
Can you post some photos?
I'm in particular interested in your SPDIF wiring. Do you still get the AES/EBU output in this configuration? How did you connect the power board crystal to the CD-PRO? Is a series resistor needed to bring down the voltage to 3.3V?
I'm assembling my unit in these days...
Nic
Hi jstang,
Can you post some photos?
I'm in particular interested in your SPDIF wiring. Do you still get the AES/EBU output in this configuration? How did you connect the power board crystal to the CD-PRO? Is a series resistor needed to bring down the voltage to 3.3V?
I'm assembling my unit in these days...
Nic
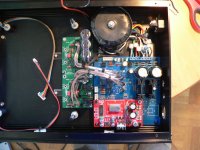
Well I would have disassemble the unit to take a pic of the wiring mods. But follow the instructions I followed.
For the clock
Parts
The power board has a resistor on the clock output.
For the SPDIF
Parts
I ran SPDIF direct to one of the buffer chips on the power board. Which would allow all the outputs to work. But I removed the balanced output to install a connector for I2S.
U1 pin 1 is where I ran the CD-PRO control chip to. U1 ( DIP ) has a few inputs that are also feed along with pin 1. Look for the run that goes back to the surface mount U3. I cut that run and connected the CD-Pro SPDIF to it.
johnk
Last edited:
Thanks johnk,I ran SPDIF direct to one of the buffer chips on the power board. Which would allow all the outputs to work. But I removed the balanced output to install a connector for I2S.
U1 pin 1 is where I ran the CD-PRO control chip to. U1 ( DIP ) has a few inputs that are also feed along with pin 1. Look for the run that goes back to the surface mount U3. I cut that run and connected the CD-Pro SPDIF to it.
johnk
I will have a look at it. As I have not assembled the board yet I might leave out some components. I was actually also thinking about replacing the balanced output connector with a Neutrik RJ45 for the I2S.
Nic
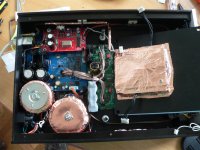
By the way, looking at the shipping packing... THEY VASTLY IMPROVE THE PACKING....
Mine was all just parts in plastic bags in the box. The pre-assembled chassis with the parts inside is light years ahead.
johnk
Mine was all just parts in plastic bags in the box. The pre-assembled chassis with the parts inside is light years ahead.
johnk
I could thank the member "n_maher" for helping out Hifidiy with the initial delivery problems.
CD Transport Kit, Anyone heard it? - Page 2 - Head-Fi: Covering Headphones, Earphones and Portable Audio
CD Transport Kit, Anyone heard it? - Page 2 - Head-Fi: Covering Headphones, Earphones and Portable Audio
Hello,
So I2S is the thing to use. The Cdpro2 I2S has a 6 pin connector, must I use (inside) flatcable or shielded cat5 ? At the Neutrik site I saw these 2 connectors, which one to prefer ?
Neutrik - Audio - DL Series - NC6MD-L-BAG-1
Neutrik - Audio - etherCON B Series - NE8FBH-S
I2s datastream is before the conversion to spdif, so I don't have to upgrade anything except using I2S and upgrade the Cdpro clock ?
What kind (brand) of cable to use between the transport and DAC?
Thanks, Erik.
Quote : "The use of i2s is most audible if you use the DAC as slave to a digital source. In that case, since there is no possibility to re-clock the jittery data stream, it is better not to convert the data stream's format in the first place, but it is still very important to keep all sorts of other factors in order: constant impedance over the digital lines (i2s has more signal strands than SPDIF, which needs just one coax cable), high shielding effectiveness, good connectors, etc. So it is not so simple as to justify saying: "i2s is better than SPDIF". You can only say that on a certain system configuration, "i2s may be better than SPDIF", and that this system configuration is the one where there is no re-clocking possibility, and where the I2S digital cables are at least as good as the SPDIF cable".
Member
Joined 2002
Erik,
Just for your info in case you want to use the I2S with the Buffalo....
It won't work as the I2S format output from the CDPRO is not accepted by the Buffalo (maybe do a search at the TP forum for details). You will need some kind of reclocking circuit between the CDPRO and the Buffalo (like the Metronome sold by TP).
Nic
jleaman,
The price is 480US$ with snail mail. Worth the money. Great chassis and very good component quality. Quite a bit of a puzzle assembling it and also some smd solder work involved.
Member
Joined 2002
Erik,
Just for your info in case you want to use the I2S with the Buffalo....
It won't work as the I2S format output from the CDPRO is not accepted by the Buffalo (maybe do a search at the TP forum for details). You will need some kind of reclocking circuit between the CDPRO and the Buffalo (like the Metronome sold by TP).
Nic
jleaman,
The price is 480US$ with snail mail. Worth the money. Great chassis and very good component quality. Quite a bit of a puzzle assembling it and also some smd solder work involved.
Id like to buy one, do you have any more pictures ? Smd soldering to me is pretty easy i have all these tools 🙂
J'
J'
I don't have any more photos at the moment. I'm in the (slow) process of assembling the unit. I'm changing quite a deal in the electronics to make it absolute top (mostly PSU mods). There are some pictures in this thread and tons of pictures on the vendors site.
Below find the links I got by mail but you can find a lot of additional pictures as essentially the same chassis/circuit is used in other of their kits:
Here is for the assembly Instructions:
HIFIDIY-KITS*Assembly*Instructions
Aluminum Remote Control Assembly
CD Transport Assembly ----Aluminum Remote Control-HIFIDIY
Chassis Assembly you can check here:
Hifidiy CD Transport Assembly ( I )-HIFIDIY

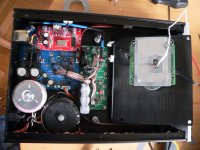
Just upgraded the on power supply board clock to this one... Separate power supply and divider circuit just for the clock. I use the HIFIDIY 16.9mHz crystal. WOW.....
The Power supply board clock was an improvement over the CD-Pro on board clock...but this off board clock/power supply is even better....
1PPM 33.8688 16.9344 MHz Low Jitter TCXO Crystal DAC - eBay (item 300374623889 end time Jan-04-10 09:20:40 PST)
johnk
The Power supply board clock was an improvement over the CD-Pro on board clock...but this off board clock/power supply is even better....
1PPM 33.8688 16.9344 MHz Low Jitter TCXO Crystal DAC - eBay (item 300374623889 end time Jan-04-10 09:20:40 PST)
johnk
Member
Joined 2002
I almost bought one of these kit's however the seller of the company had me emailed 40 times a week and it drove me nuts, GRR!!
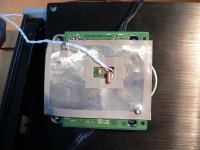
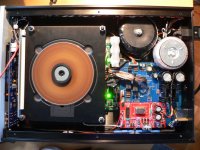
I have recently upgraded my cd-pro2 chassis :
-used the clock upgrade from the link listed above + extra toroid
-made 2 TP shunt's for 5V & 9V supply
-removed the non used parts from the powerboard.
-only using i2s for data to TP metronome + B2 DAC
It looks simple but it was a lot of work, specially because here is little space.
result : solid, easy, wide, pure sound 🙂
your local diy-addict, Erik.
Attachments

I will be ordering the Mini cd pro kit soon but I would like to use the best possible parts.
Has anyone got the circuit diagram available so I can choose the parts to upgrade ?
Thanks, Alex.
Has anyone got the circuit diagram available so I can choose the parts to upgrade ?
Thanks, Alex.
- Status
- Not open for further replies.
- Home
- Source & Line
- Digital Source
- Chassis for CD-Pro2 transport