I heard from a discussion about driver measurements. The topic was about generating xover filters, and about the best compromise measuring distance. I consider this an interesting playfield, and this motivated me to perform some simulations. It’s all about anechoic, direct sound and the influence of the measuring distance on the baffle diffraction step (BDS).
Assume a linear monopole point source on a circular baffle. When the pressure wave reaches the rim of a baffle, its’ room geometry changes from half-space to full-space. This is a change by a factor of 2.
In the time domain, this change theoretically will cause a negative impulse. As the room geometry changes by a factor of 2, the magnitude of this negative impulse might be half the amplitude of the initial positive impulse. In the frequency domain the response will show the well-known BDS and some comb filtering towards higher frequencies with a first minimum corresponding to the baffle width. This is widespread common knowledge.
Most models and graphs for the BDS assume an observation point in infinity. For the infinity case, in time domain the negative impulse occurs after the time needed for the soundwave to propagate from the centrepoint of the baffle to the periphery.
Instead, theoretically approaching the observation point to null distance from the baffle plane into it’s centre will double this time: The sound has to travel to the periphery first, and then return to the centre where it gets assessed. In time domain the negative impulse occurs delayed by a factor of 2 compared to the one assessed at Infinity. In frequency domain, this leads to a combined squeeze/shift of the typical frequency response along the frequency scale. The first minimum of the comb filtering pattern will occur one octave lower than in the infinite case.
In analogy to these both extreme cases, it becomes evident, that even without taking any room response (such as first reflections, echos and the like) into consideration, measuring at 1m and listening at 3m will not be the same in terms of frequency response. Therefore, relying to a measurement from 1m distance to optimize a set of xover-filters, and then later on listen to the result at 3m may lead to a mismatch between the filters and the actual frequency responses and thus to an awkward and unwanted experience.
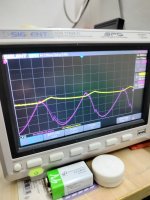
Let’s do some simulations to explore this one. For the following graphs sampling rate was set to 192kHz. For the first three graphs the baffle diameter was assumed to be 34.3cm which corresponds to a wavelength corresponding to a frequency of 1kHz.
Curves show measurement distances of
green: 0, theoretical measure flush on the baffle's center, e.g. spot-on the point sound source
brown: 1 == 0.343 measuring distance (in baffle diameter length, 1 == 34.3cm)
blue: 2.9 == 1.0m measuring distance
grey: 8.7 == 3.0m measuring (=hearing) distance
black: Infinity theoretical measuring distance
Red individually shows the resulting magnitude difference between two test distances.
The time domain graph. The negative impulses of the baffle diffraction occur with different delays from the initial positive impulse:
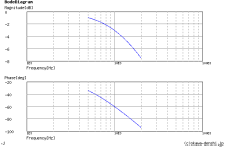
Frequency domain: Red shows theoretical null distance vs. infinity BDS model distance
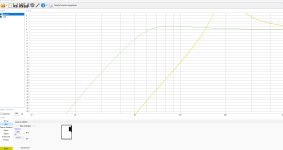
Frequency domain: Red shows the frequency response difference between 1m vs. 3m measuring distance:
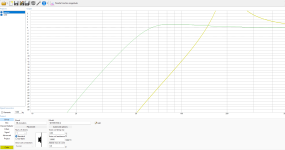
Frequency domain: Difference 34.cm vs. 3m measuring distance … measuring very close is no good idea at all …
And now, what about a more narrow baffle at 17.15cm diameter, e.g. half the size of the former one?
Time domain for 1m vs. 3m measurement:
Same 17.15cm baffle, but in frequency range
Red 1m - 3m
Blue at 1m (5.8 times the baffle diameter)
Grey at 3m (17 times the baffle diameter )
Small baffles, as expected by geometry/trigonometry logic, show less severe shifts at the typical measuring/listening ranges of 1m/3m than large baffles. It’s evident, because relative to the smaller baffle width, the distance/bafflewidth quotient get bigger. By the way, this might be a contributing reason why baby baffles sound more pleasing at any listening distance than adult ones.
Caution: Take all these simulations all with a grain of salt. These graphs show a theoretical workout of the subject, highlighting a possible issue. In practice you will ideally not have to deal with central point sources on circular baffles. But the take-home message seems clear: Do not measure too close in a false idea to best possibly exclude room interferences. This will jam your measuring validity range. The closer you measure, the messier the result gets for more distant locations. Same goes not only for x-over filters, but also for whole speaker system measurements.