Made the drive to the electronics recyclers today, I usually buy stuff online when the reverse auction hits a low price and pick it up every couple of months. There's usually something easy to fix. Today was a TI 83 Plus for $7, seemingly dead, all it took was pulling the the main batteries plus the backup flat cell to get it do a hard reset and come alive. Also a Dell laptop with 10th gen i5 for $195, had to fix a cracked underside cover with super glue and substitute a 90W brick for the 65W brick it came with to get the battery to charge. Both for my 11 year old.
The lesson that I learned, and shared here is that buying anything in nonfunctional condition from a company that also sells "fully reconditioned, tested, and calibrated" versions of the same equipment is risky. If they have the in house capability to swap boards, test and calibrate, but are not capable or willing to do board level repair, you are likely to get a unit filled with all of their bad boards.Heh. That reminds me of the auction house that wanted me to repair a pallet load of RF signal generators they imported from the USA. I got one working but there were so many faults it wasn't financially viable, and since I was a contractor I just told them to dump the whole lot.
I learned this back in the 1980's and early 90's when myself and some friends who were building PCs used to visit all the "computer stores" in South Florida that built their own PCs. We did quite well by walking into a store, asking to talk to their "techie" and it he didn't know an ohm from a gigawatt, we would offer to buy all of their defective hardware for about 10 cents on the dollar. However, we did get burned by a dishonest store with a couple of complete PC's that were "as returned by the customer" where every board and the power supply were bad.
Apparently, they did something similar with their customer service because they were only in business for about a year. We went to the liquidation auction of that store and only three bidders showed. After the first two had bought all the good stuff and ran out of cash, we paid about $2500 for "everything left in the building." Somewhere I have a picture of myself driving a Dodge Omni down a 6 lane road with an 8 foot workbench tied on top. We found a cabinet containing about 20 full tubes of DIP memory chips, which were scarce at the time due to a fire in a factory in Japan that made the plastic resin for the chips. That led to a year long PC building spree where our slogan was "Get your Memry for nothin and your chips for free!"
Much of the high $$$ equipment made in the 1980's through 2000's used tantalum caps that are now failing. Tantalums usually fail to a short. The short may be obvious because tantalum caps often burn. It's also possible to look over a board for resistors that have overheated or burnt, then measure all the nearby tantalum caps with an ohmeter for shorts.
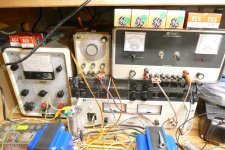
All of the power supplies I use for tube stuff were purchased as "non-working, for parts or repair" Some like the Fluke 407D in the lower left cost $25 on Ebay, but $45 to ship it from California to Florida. It worked fine when I got it and just recently failed after 15 years of my abuse. Autopsy revealed an open can type electrolytic cap, so I put another cap in parallel with it and put it all back together. The control loop will go unstable when you draw enough current from it to peg the meter, so I have a motor run polypropylene cap across its output ( the silver can connected with clip leads).
There are two black Sorensen supplies on top of the 45 pound HP. The shiny one is one of three 33 volt 33 amp units I got cheap at an auction, all worked. The well worn unit on top of it is a 600 volt 1.7 amp version of the same supply. It was sold as junk on Ebay and I was the only bidder, as it looked even worse when I got it. I don't know what happened to it in the past, but The box it came in was full of dirt, trash, grime and an unknown crusty dark grey substance. All of this had shaken out of the power supply in shipping. The power supply itself was too nasty to bring into the house. My guess is that it had been in a building that had flood damage, or fire, then water to put out the fire damage. Removing the cover an attempting to blow it out with an air hose proved fruitless, so I washed the crud out with the garden hose, a toothbrush, and some dish soap. I blew it out, then rinsed with distilled water, blew again, then left it in the sun to dry for several days. While it was still outside I decided to leave the cover off and plug it in. I even had my camera on a tripod to catch the fireworks. I was prepared for a show, but quite surprised when it powered up without flames and actually worked. I did have to remove the fan and douse it thoroughly with WD40 to make it spin again. I still use that power supply today.
Attachments
I think the best deal I ever got was a brand new Israeli function generator that was DOA at the wholesaler. Opening up the case revealed that whoever had slotted the boards into the case had snagged one of the wires on the case and ripped it clean off the board.
I made $250 on that one.
The abovementioned RF Sig Gens had tons of shorted tantalums, so I know about those.")
I made $250 on that one.
The abovementioned RF Sig Gens had tons of shorted tantalums, so I know about those.
My best so far was an Elgar CW801P AC Power Source. Bought off ePay for about $200 due to "no output." Turned on, changed voltage set menu setting from external to internal. Sold in perfectly working condition the next day for $1,495 + shipping.
Even with sellers getting more knowledgeable lately I still see a lot of things where the fix is simple - line voltage set wrong, oscillator set to external instead of internal and such. Unlike some of the prior posters, I personally have had very good luck with the initial condition of the TE I've bought. I do try to study the pictures and don't hesitate to ask questions - plus, I suppose I've developed good instincts both with the equipment as well as the sellers. As @Tubelab_com pointed out above, pay attention to what is being sold by who. Those selling a 20 lb item and charging $100+ shipping... just assume a scam and go on. I put the following in the description of any items that I sell and, as I say at the end, it unfortunately is the truth way too often.
Hal
1) “Untested" -- Tested and doesn't work.
2) "Works" -- Powers up, possibly with a light, and no obvious smoke.
3) “Power cord cut off” -- Sparks and/or smoke happened, so THEN we cut it off.
4) "Rare" -- Like an Edsel; there is a reason that no one has one.
5) "We don’t have the equipment to test this item" -- See #1 above.
6) "I don't know anything about this equipment" -- Don't blame me for you buying this junk. Also see #1 above.
7) "Needs a good cleaning" -- Has cockroaches, bedbugs, black widows and rodents living in it.
8) “Cosmetic damage” - Was present in a war zone and/or hurricane.
9) "Restored" -- A new cord was installed.
10) "Professionally restored" -- A new cord was installed and it was wiped down with Windex.
11) "In excellent shape for its age" -- I'm asking top retail for this and I’m not going to haggle.
12) "Contact us before leaving a Neg." – Will refund your money if you realize you were ripped off.
* This is satirical. And, regretfully, quite often truthful. Hopefully humorous. For those of you who actually had to be told this: As we in the South say, "Well, bless your heart!"
Even with sellers getting more knowledgeable lately I still see a lot of things where the fix is simple - line voltage set wrong, oscillator set to external instead of internal and such. Unlike some of the prior posters, I personally have had very good luck with the initial condition of the TE I've bought. I do try to study the pictures and don't hesitate to ask questions - plus, I suppose I've developed good instincts both with the equipment as well as the sellers. As @Tubelab_com pointed out above, pay attention to what is being sold by who. Those selling a 20 lb item and charging $100+ shipping... just assume a scam and go on. I put the following in the description of any items that I sell and, as I say at the end, it unfortunately is the truth way too often.
Hal
Beginner's Guide to eBay Terminology*
1) “Untested" -- Tested and doesn't work.
2) "Works" -- Powers up, possibly with a light, and no obvious smoke.
3) “Power cord cut off” -- Sparks and/or smoke happened, so THEN we cut it off.
4) "Rare" -- Like an Edsel; there is a reason that no one has one.
5) "We don’t have the equipment to test this item" -- See #1 above.
6) "I don't know anything about this equipment" -- Don't blame me for you buying this junk. Also see #1 above.
7) "Needs a good cleaning" -- Has cockroaches, bedbugs, black widows and rodents living in it.
8) “Cosmetic damage” - Was present in a war zone and/or hurricane.
9) "Restored" -- A new cord was installed.
10) "Professionally restored" -- A new cord was installed and it was wiped down with Windex.
11) "In excellent shape for its age" -- I'm asking top retail for this and I’m not going to haggle.
12) "Contact us before leaving a Neg." – Will refund your money if you realize you were ripped off.
* This is satirical. And, regretfully, quite often truthful. Hopefully humorous. For those of you who actually had to be told this: As we in the South say, "Well, bless your heart!"
Most of the test equipment that I bought from Ebay was bought in "For parts or not working" condition. In most cases I was pleasantly surprised.
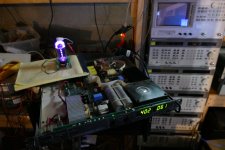
The cruddy power supply was "untested" and looked a bit dirty in the pictures. Even though it took several hours of cleaning and it is still the ugliest piece of equipment on my bench, I have less than $50 invested in it.
It can be seen here after cleanup and dry out. It is being used to make a bad vacuum tube even badder!
Attachments
Just had one of those "fixes" you hope for: Bought a HP 5334B for pretty much nothing off of ePay in a ""For parts" condition due to the nice big "NO OSC" error on the display. Pictures showed the INT/EXT oscillator switch on "EXT." <grin> Anyway, just received it yesterday and it survived the best FedEx could throw at it (literally) and I changed the switch to "INT" and plugged it in. "NO OSC." Well, huh... Opened the case and there was the hi-perf oscillator that should be working. After thinking a minute and then a spritz of DeOxit into the INT/EXT switch... everything worked perfectly. Of course I immediately started patting myself on the back and bragging to my wife about the quick fix marathon genius debugging session 
Perhaps not so much a repair as modification.
I've been single dosing my Eureka Mignon Specialita grinder for a good while now.
I switch between caffeinated (for guests) and water method decaf coffee (for me).
The standard hopper was just not ideal.
Always had to shake the quite heavy machine to get the last of the beans to drop.
I set about a quick DIY fix.
A bit of turning.

This is African Blackwood, used on clarinets and oboes because of it's antiseptic qualities, I thought it would be ideal here.
Hole cutting out for the grind feeder size.

Turning out the mini hopper.
Shallow curved sides. No beans should get stuck

Smoothed and sanded to 800grit
A coat of food grade (when dried) Danish oil.

On the machine ready for use.

2 scoops of beans is all it takes ☕
I've been single dosing my Eureka Mignon Specialita grinder for a good while now.
I switch between caffeinated (for guests) and water method decaf coffee (for me).
The standard hopper was just not ideal.
Always had to shake the quite heavy machine to get the last of the beans to drop.
I set about a quick DIY fix.
A bit of turning.
This is African Blackwood, used on clarinets and oboes because of it's antiseptic qualities, I thought it would be ideal here.
Hole cutting out for the grind feeder size.
Turning out the mini hopper.
Shallow curved sides. No beans should get stuck
Smoothed and sanded to 800grit
A coat of food grade (when dried) Danish oil.
On the machine ready for use.
2 scoops of beans is all it takes ☕
Replaced the lead acid batteries on three rechargeable LED lanterns with 2.4 A-h 18650 cells.
A kettle base, oxidized contacts for the ring in kettle for power supply, took 15 minutes.
Then hot glued the cord to base as tug protection.
A hydraulic hose, end of life in my molding machine.
Got it made in 10 minutes at a hose maker in my estate, I was back in half an hour.
He just cut a 330 bar hose to length, and crimped the ends....that is the normal procedure.
My 'Aquaguard' filter, main PCB, no supply to UV tube, so it would not work the solenoid valve.
Total dismantle and check, finally removed the hot melt glue on a capacitor, it was connected between opposite side pins to the UV-C lamp...that has worked, LDR sensed UV-C, and it let water flow.
'Aquaguard' is the brand name for a series of water filters, mine is from about 1994, it has a candle fiter in an external housing, then a charcoal filter and a UV-C lamp on either side of a housing with the electronics.
Just had a lesson in don't overreact, work the problem.
Went to start my Flex, completely immobilized by an ABS/TCS error on the dash, shocking as I had just driven home earlier without any problems.
I had the same error a couple years ago caused by a brake failure that only took a regular brake job to fix, so I knew it could be caused by a modest problem.
What to check first? I knew from experience on my Vette that just having multiple low pressure errors on the TPMS caused a similar immobilization. I knew the tires were low as we just had a cold snap and I didn't trust any of my cheap tire pressure gauges in -38C so I left the tires underinflated.
Inflated all the tires. Error wouldn't clear. I thought maybe it won't self clear because I only have 2 or 3 TPMS sensors on my winter set of wheels, so there can never be an all clear condition.
I knew I couldn't force an ABS/TCS reset because I don't have the pricier OBD II systems that can do that. So I disconnected the battery and watched TV a bit.
Reconnected the battery, started, and all good!
Don't laugh - I repaired my wife's hair dryer. She gets attached to things if they've given her good service nd this dryer is about 15 years old. It spluttered and there was sparking from the motor so I deduced the brushes were worn out. It turns out the motor was very good quality with replaceable brushes, (not like those sealed hobby type motors) and as I had a few spare brushes in the shed of various sizes I sanded an appropriate pair down to match the originals, and Bob was my uncle.
Unusually, one brush was worn to about 2mm long and the other was still around 6mm. The worn one had a spike in its mounting hole stopping free movement, so I filed that so the replacement slid freely.
Too bad I have minimal hair on which to test it. Wife was happy though.
Unusually, one brush was worn to about 2mm long and the other was still around 6mm. The worn one had a spike in its mounting hole stopping free movement, so I filed that so the replacement slid freely.
Too bad I have minimal hair on which to test it. Wife was happy though.
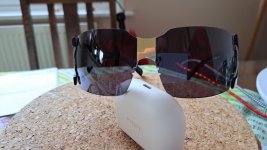
My partners sunglasses. Split down the bridge. First attempt just with CA adhesive survived a couple of drops. For the second attempt I shaped some thin brass strip, the shape of the plastic at the bridge is complex, curving both vertically and horizontally and I had to spend half an hour trying to match the brass to it...
I used slow set CA to join edges then roughened the plastic and brass and glued with slow set araldite. Lasted 2 years. Finally brass popped off when she dropped them. AGAIN!!!! Looking at the debris it was clear the araldite hadn't adhered well to brass. So was more careful in gluing made cuts at 45deg on the brass and worked the araldite into it. Decided to try a pair of reverse tweezers as clamps to get a better bond between plastic and brass. The green tape is there to keep glue off the glasses obviously. Less obviously it ensures that the brass can be positioned precisely where I want it without any loss of temper.
I used slow set CA to join edges then roughened the plastic and brass and glued with slow set araldite. Lasted 2 years. Finally brass popped off when she dropped them. AGAIN!!!! Looking at the debris it was clear the araldite hadn't adhered well to brass. So was more careful in gluing made cuts at 45deg on the brass and worked the araldite into it. Decided to try a pair of reverse tweezers as clamps to get a better bond between plastic and brass. The green tape is there to keep glue off the glasses obviously. Less obviously it ensures that the brass can be positioned precisely where I want it without any loss of temper.
Attachments

Add a few drops of epoxy paint thinner to Araldite, and prime the surface with Araldite, that makes it stick to many difficult materials like Polycarbonate.
I have used fiberglass mesh as reinforcement for Araldite, it is used in electric motor winding, I always have a meter or so of 3/4" material in my drawer.
I have used fiberglass mesh as reinforcement for Araldite, it is used in electric motor winding, I always have a meter or so of 3/4" material in my drawer.
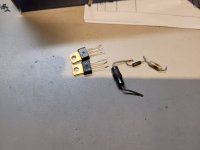
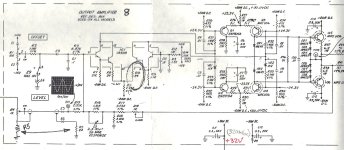
Repaired my trusty F47 Sweep Function generator, probably the piece of test gear I used the most on my bench.
I let it functionning for the weekend, in sweep mode, and when I was back on Sunday the power on switch was dark, blown fuse...
Open the unit and found rapidly burned parts, right on the top part of the final amplifier. Out of the 4 amp transistors, 2 were blown Q3 (Pre-Driver) & Q6 (Final), the MPSU56, PNP...
Replaced the burned resistors, but I had no more MPSU56 in stock. Just to test the rest of the circuit I installed two MJE350 I had in stock, just waiting for the original from ebay to arrive.
They were not really equivalent at 300V/0.5A instead of the original 80V/2A, but I itried. I had to twist the B & C pins to do so.
The generator was then working ok except for sligthly different DC voltages throught the amp stage and a small problem.
Output was ok with no attenuator inline, but as soon as selected an attenuator (50ohms impedance, so quite a load), the negative part of the waveform cropped and lost amplitude.
Guess what the MJE350 I installed on the final (Q6) for test was on the negative side, not enough drive maybe?
At full drive the amp can put quite a high amplitude of 40Vpp. In 50 ohms that's more than 0.4Apk, too close to the maximum of the MJE350 for my taste.
And I remimbered the Toshiba TTA004B we used in the Pearl 3, 160V, 1.5A and about the same hfe as the original. So I installed this one instead.
Guess what? Perfect output waveform, no change with the attenuator in line, amp dc offset stable, DC readings accross the amp back to normal, as good as new...
MJE350 seems perfect as pre-driver, will leave it there. I'll put the old MPSU56 in stock when they'll arrive.
SB
Attachments

Last edited:
I've been working on a HP 8672A in my (very few) free moments the last couple of weekends. Fixed several minor issues but ran into a problem where the 20dB stage of the attenuator was not working. I was evidently not the first to attempt to fix this since the solenoid driver board showed signs of previous... well what was there could not be dignified by calling it a "repair." After some judicious "for real" repairs, the driver board was working as it should but the attenuator's 20 dB section was still DOA. The solenoid coils for the other 3 sections measured 33K as they should... the problem child measured 85K, so the problem is definitely in the attenuator. As tends to often be the case, it is difficult to remove and requires a lot of disassembly to access. That being the case, the unit is going back into storage for a while since I just don't have time to tackle that now but I'm going too look for a replacement attenuator in the meantime as it's iffy that that one can be repaired. Oh, well... you win some, you lose some.
So far today I have managed to absolutely confirm my belief that it is an impossibility to do anything cheaply when it comes to RF equipment. Buying a decent (and relatively cheap) piece of RF gear is much the same as buying a tractor - it looks nice and impressive just sitting there but it takes a much larger amount of money to buy the implements to actually make it do something useful. Sigh.
It can be difficult to recognize quality sometimes. It may come up in the finishing of the product, or the material used to make it, sometimes even the weight is an indicator. Unfortunately, brands names can change over the years to less reputable products, making it again more difficult to assess.
I repaired my Starbucks espresso machine.
The "spreader sprayer disc" attachment screw had come off; there was no getting it to grab the threads any longer. So I got out my assorted screw junk box for short machine screws and found a ready replacement, which I drove home - nice 'n tight. Done!
After putting all the stuff away, it occurred to me that "What if the screw I picked, coming from God knows what, happens to be the Cadmium plated one". So, after review of a web site showing the colors of different platings for screws, back out it came...
Dumped the whole drawer into my sorting tray and found one suitable replacement in brass. That's now in the machine. Maybe better than the quite visibly rusty one, second candidate.
You have to be careful to find even a suitable screw, for certain applications, when doing home repairs.
- Home
- Member Areas
- The Lounge
- What did you last repair?