
A few pics would be great renron, and a source for the parts you need eg, where would you buy the carbon fibre sheet and what type would you need. Are they available at an online seller that will ship international? What kind of glue to use to hold it on, ordinary contact cement?
I am interested because it would be very easy for me to make a chassis from say plywood and coat the outside in CF to make a very good looking component but really quickly and easily.
Would be a great bonus.
Fran
I am interested because it would be very easy for me to make a chassis from say plywood and coat the outside in CF to make a very good looking component but really quickly and easily.
Would be a great bonus.
Fran
Very timely thread for me, I've also been struggling with getting my Aikido working, although I'm using Russian 6N23P tubes on a 24V Aikido PCB with 10M45S in the solid state headphone output section with a B+ of 150V.
I had tried using Broskies PS-1 power supply board but I somehow missed that it could only pass 50mA on the High voltage side, when I needed close to 200mA. So I built my own B+ supply based on the CLC schematic in the Aikido user guide.
I'm using an isolation xformer for the supply, and ended up with 180v. So I ordered a 10 ohm resistor to add in between the rectifier bridge and the first C to drop some voltage and get me closer to my intended 150V, and also ordered a new choke since the one I'm using now is borrowed from my box of parts for my as yet unbuilt SimpleSE amp project.
Getting to the point, I tested everything out as it is right now and I was hearing the same kind of distortion problems as the OP and was feeling at my wits end because of all the other obstacles I've ran into trying to build this thing.
The ground lift resistor though gives me another ray of hope that I can try, because I currently have the PS gnd connected to the Aikido PCB gnd as the OP did. I also still need to reference my regulated DC heater supply to B+, so that could be an issue also, I was just trying to test things out with the parts I had on hand last weekend. Good stuff in here though, I like this thread!
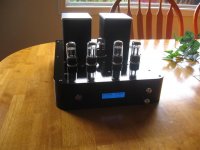
Nice! Domed Knobs and carbon fiber! Is the power button a Bulgin? I am looking for a non-momentary switch with blue ring illumination and have yet to find one, as the Bulgin switches are only available in momentary in the 19mm size.
Can you provide more details on the diodes and cap that you used in the ground lift? (I just read your post in another Aikido thread)
Can you provide more details on the diodes and cap that you used in the ground lift? (I just read your post in another Aikido thread)
BW,
We seem to be shadowing each other in various threads.....
Thanks for your help and input with my Aikido.
You are both Right and Wrong at the same time...
Yes, it is a bulgin switch and it is also a latching switch with a blue glow ring. Mouser Electronics P/N 117-Mp0045/1E2BL012
$13.90. It is a little on the small side of life but it fits my application perfectly. I have pretty big hands and if I don't push hard enough with my finger it is only a momentary switch, push a little harder and its a latching switch. A couple of quick notes about this switch; it's built for military standards which makes it work of art, beautiful switch. It can be configured as a Normaly Open or Normaly Closed switch, It has both the hot side and neutral contacts for safety if you so choose. I did. This means that you switch on (and off, that's important) both the hot and neutral sides of the power. Make sure that both inputs and outputs are twisted to avoid EM radiation. The connector is SMALL and soldering must be covered with shrink tube afterwards. (Very close terminals)
Bulgin lists the Switch as LED 12V, but it's not....kinda.
It's rated a 3A 250V and 12V LED. If you connect a 12V source to LED it's gonna burn out. It needs a resistor to drop it's voltage to between 3V - 4.5V, depending on how bright you want it and how long it has to last. It cannot be replaced inside the Bulgin switch. I powered my off of 5V with a 120R, I like the luminosity that produced. Don't fry the LED or you'll buy another switch.
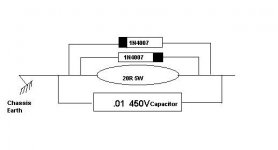
The ground lift is a 20R 5W (5W is overkill, but it's what I had) with 2 1N4007 diodes each facing opposite directions, with a bypass cap of .01 450V film. Diodes were robbed from donor motherboards in my parts bucket. Some are from Computers others from DVD players, others from Satelite receivers (Dish Network converter box). I keep lots of old junker boards around to scrounge from. Recycling at it's finest! Here's a drawing of the lift.
Ron
We seem to be shadowing each other in various threads.....
Thanks for your help and input with my Aikido.
You are both Right and Wrong at the same time...
Yes, it is a bulgin switch and it is also a latching switch with a blue glow ring. Mouser Electronics P/N 117-Mp0045/1E2BL012
$13.90. It is a little on the small side of life but it fits my application perfectly. I have pretty big hands and if I don't push hard enough with my finger it is only a momentary switch, push a little harder and its a latching switch. A couple of quick notes about this switch; it's built for military standards which makes it work of art, beautiful switch. It can be configured as a Normaly Open or Normaly Closed switch, It has both the hot side and neutral contacts for safety if you so choose. I did. This means that you switch on (and off, that's important) both the hot and neutral sides of the power. Make sure that both inputs and outputs are twisted to avoid EM radiation. The connector is SMALL and soldering must be covered with shrink tube afterwards. (Very close terminals)
Bulgin lists the Switch as LED 12V, but it's not....kinda.
It's rated a 3A 250V and 12V LED. If you connect a 12V source to LED it's gonna burn out. It needs a resistor to drop it's voltage to between 3V - 4.5V, depending on how bright you want it and how long it has to last. It cannot be replaced inside the Bulgin switch. I powered my off of 5V with a 120R, I like the luminosity that produced. Don't fry the LED or you'll buy another switch.
The ground lift is a 20R 5W (5W is overkill, but it's what I had) with 2 1N4007 diodes each facing opposite directions, with a bypass cap of .01 450V film. Diodes were robbed from donor motherboards in my parts bucket. Some are from Computers others from DVD players, others from Satelite receivers (Dish Network converter box). I keep lots of old junker boards around to scrounge from. Recycling at it's finest!
Here's a drawing of the lift.Ron
Attachments
CoreyK78,
Do you have a different amplifier you could try? I used 2 different ones, one was bad without me knowing it. It took me down an incorrect diagnostic path. I ended up testing my Aikido Pre with my garage receiver and crappy garage speakers. I used the CD RCA input jacks and adjusted the volume with both the Aikido attenuator and the volume knob on the receiver. Try it on a secondary system and not your premier stereo setup.
Again, my problem was with the negative rail from the B+ supply tied to the ground on the Aikido board.
BW,
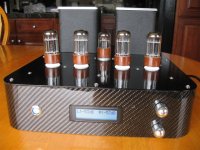
Thanks for the compliments, the Domed knobs were hard to find without being textured / knurled.
Ron
Do you have a different amplifier you could try? I used 2 different ones, one was bad without me knowing it. It took me down an incorrect diagnostic path. I ended up testing my Aikido Pre with my garage receiver and crappy garage speakers. I used the CD RCA input jacks and adjusted the volume with both the Aikido attenuator and the volume knob on the receiver. Try it on a secondary system and not your premier stereo setup.
Again, my problem was with the negative rail from the B+ supply tied to the ground on the Aikido board.
BW,
Thanks for the compliments, the Domed knobs were hard to find without being textured / knurled.
Ron
Great! Thanks for the Diagram, I'll modify my Aikido to your config and see if I can reduce hum further. Presently it's barely audible with my ear right in front of the speakers.
I have a few of the 19mm Bulgins, and they are the cat's pajamas except that they only come in momentary config. I already popped a blue LED in one when testing it on the bench, a $23 mistake. IIRC, I'm using a 480 ohm R (with 12VDC) in one on my stereo PC to give a subtle blue glow.
I have a few of the 19mm Bulgins, and they are the cat's pajamas except that they only come in momentary config. I already popped a blue LED in one when testing it on the bench, a $23 mistake. IIRC, I'm using a 480 ohm R (with 12VDC) in one on my stereo PC to give a subtle blue glow.
Woodturner Fran,
Rather than starting a new thread on building with Carbon Fiber I'll just put it in this one. After all it IS my thread, and I'll Hi-Jack it if I want! LOL.
The Carbon Fiber that I used is a Twill, not the standard weave.
I bought it from Dragon Carbon Fiber
It is .018" thick and comes in various sizes. It can be rolled as small as 1" tube, and comes either with adheasive backing or plain. I used the adheasive backed stuff. This is not structural CF, but only a veneer and as such has to have a solid substructure for support. It is as glassy as it looks on thier website. Not cheap, but excellent quality! You could also take your chances on Ebay....
I wanted a curved front on my Preamp because it is different than the standard miter cornered rectangular box most build. They look great too, but I wanted something different. My Diy speakers are also curved and not square boxes.
I used prebuilt laminated wood corners that were designed for round corner baseboard mouldings. Bought from LOWES. They were 6" tall before I cut them to 3" tall. I then glued both the corners to a 1x4 ripped to the correct width. Next, I cut plexiglas on the tablesaw to the same 3" width about 14" long. I cut it later to the correct length.
Using a dremmel I cut a centered window in the Plexiglas to fit the display. Next, I determined how wide I wanted my Preamp to be and cut the plexiglas to length plus the round corners. Next, I set the table saw blade heigth to the same thickness as the Plexiglas and notched the exterior fronts of the curved peices to inset the Plexiglas flush with the wooden round corners. For stability and aluminum top plate support I ripped a 3/4 x 3/4 hardwood for the top back of the plexiglas. I glued all these components together, then quick sanded the exterior wood/Plexiglas flush to promote adheasion of the Carbon Fiber sheet. I drilled all holes in the Plexiglas prior to appling the Carbon Fiber Veneer. Once the Veneer is applied the holes are cut from front (carefully ) drilling holes with a sharp drill bit then enlarging them with a pointed stone bit in the dremmel. Carbon fiber grinds better than it cuts. It can also be, and should be, filed afterwards to remove all extranious fibers. The protective plastic was left on until completely finished. It was hard not to peak at the Carbon Fiber finish.
If you wanted a longer rounded corner than could be provided by the 6" baseboard a closet rod dowel could be rebbited or notched on both sides. Alternatively, a sheet of ABS heated and wrapped arond a pipe to cool could be used, or a PVC pipe could be ripped. Many ways to skin a cat here.
Once I had the front attached to the sides, I cut a strip of aluminum for the support of the back of the sides. Then I flipped it upside down on a sheet of aluminum and scribed the top. Cut it + 1/16 on the table saw and used a dremmel with a cutfoff wheel to make the round front corners. File and test fit. Used a punch to make the valve holes and then Powder coated the top and back panels. I layed out the components inside to keep the signal wires on one side and the power / TX / Heater wires on the other.
That ought to cover it.
Ron
Rather than starting a new thread on building with Carbon Fiber I'll just put it in this one. After all it IS my thread, and I'll Hi-Jack it if I want! LOL.
The Carbon Fiber that I used is a Twill, not the standard weave.
I bought it from Dragon Carbon Fiber
It is .018" thick and comes in various sizes. It can be rolled as small as 1" tube, and comes either with adheasive backing or plain. I used the adheasive backed stuff. This is not structural CF, but only a veneer and as such has to have a solid substructure for support. It is as glassy as it looks on thier website. Not cheap, but excellent quality! You could also take your chances on Ebay....
I wanted a curved front on my Preamp because it is different than the standard miter cornered rectangular box most build. They look great too, but I wanted something different. My Diy speakers are also curved and not square boxes.
I used prebuilt laminated wood corners that were designed for round corner baseboard mouldings. Bought from LOWES. They were 6" tall before I cut them to 3" tall. I then glued both the corners to a 1x4 ripped to the correct width. Next, I cut plexiglas on the tablesaw to the same 3" width about 14" long. I cut it later to the correct length.
Using a dremmel I cut a centered window in the Plexiglas to fit the display. Next, I determined how wide I wanted my Preamp to be and cut the plexiglas to length plus the round corners. Next, I set the table saw blade heigth to the same thickness as the Plexiglas and notched the exterior fronts of the curved peices to inset the Plexiglas flush with the wooden round corners. For stability and aluminum top plate support I ripped a 3/4 x 3/4 hardwood for the top back of the plexiglas. I glued all these components together, then quick sanded the exterior wood/Plexiglas flush to promote adheasion of the Carbon Fiber sheet. I drilled all holes in the Plexiglas prior to appling the Carbon Fiber Veneer. Once the Veneer is applied the holes are cut from front (carefully
) drilling holes with a sharp drill bit then enlarging them with a pointed stone bit in the dremmel. Carbon fiber grinds better than it cuts. It can also be, and should be, filed afterwards to remove all extranious fibers. The protective plastic was left on until completely finished. It was hard not to peak at the Carbon Fiber finish. If you wanted a longer rounded corner than could be provided by the 6" baseboard a closet rod dowel could be rebbited or notched on both sides. Alternatively, a sheet of ABS heated and wrapped arond a pipe to cool could be used, or a PVC pipe could be ripped. Many ways to skin a cat here.
Once I had the front attached to the sides, I cut a strip of aluminum for the support of the back of the sides. Then I flipped it upside down on a sheet of aluminum and scribed the top. Cut it + 1/16 on the table saw and used a dremmel with a cutfoff wheel to make the round front corners. File and test fit. Used a punch to make the valve holes and then Powder coated the top and back panels. I layed out the components inside to keep the signal wires on one side and the power / TX / Heater wires on the other.
That ought to cover it.
Ron
boywonder said:Great! Thanks for the Diagram, I'll modify my Aikido to your config and see if I can reduce hum further. Presently it's barely audible with my ear right in front of the speakers.
I have a few of the 19mm Bulgins, and they are the cat's pajamas except that they only come in momentary config. I already popped a blue LED in one when testing it on the bench, a $23 mistake. IIRC, I'm using a 480 ohm R (with 12VDC) in one on my stereo PC to give a subtle blue glow.
BW,
The Mouser Electronics P/N 117-Mp0045/1E2BL012 is the latching model. It's the 1E designation, the 1D is the momentary unit.
Look at the bottom of the "Data Sheet" page.
Mouser Bulgin Switches
They are listed as 18mm switches, maybe that's the difference?
And there only $13.90
Kinda confusing the way they are sized.....
18mm Bezel (locking nut on outside)
16mm switch (hole size for switch) These are the same switch!
Ron
Glad to hear you got everything working as expected Renron !
Do invest into an oscilloscope nevertheless if you intend to fiddle with electronics in the future. They start at way under $100 on ePray, 500-1000 dollars should net you a brand new DSO (one of those chinese brands but useful regardless - it appears that they're making products for Agilent and other big name brands as well and sell their clones of these under their own brand name).
Do invest into an oscilloscope nevertheless if you intend to fiddle with electronics in the future. They start at way under $100 on ePray, 500-1000 dollars should net you a brand new DSO (one of those chinese brands but useful regardless - it appears that they're making products for Agilent and other big name brands as well and sell their clones of these under their own brand name).
tektronix 465 or 465b was a rec that I got here. If you can get one that ges to 100MHz I'm told thats useful too. Take your time in geting one. Talk to your local surplus, colleges etc and see if they have one they're getting rid of.
I have one here but wouldn't be 100% sure of exactly how to go about using it to diagnose a problem...
Fran
I have one here but wouldn't be 100% sure of exactly how to go about using it to diagnose a problem...
Fran
Renron, now that it is working and that suspicious foam I complained about is gone I have to complement you on a very nice overall build.
Now you should tackle a nice big tube amplifier to go with your masterpiece.
Oh, and get a scope and learn to use it, decent used Tektronix scopes are a dime a dozen on ePay.. You'll never regret having it once you know how to use it. A basic function or sinewave generator to start would also be helpful.
Kevin,
Thanks for the kind words. The foam stunk to high-hlll when burnt, so out it went! One never expects to see our work go up in flames....but I guess it happens.
Thanks for the Tektronics tips, being an out of work carpenter / general contractor is going to slow down my building projects for a while. Suppose I'll just have to enjoy my preamp and music instead just a little bit longer.
I'll keep my eye out for a good deal on a 465 though.
Ron
Thanks for the kind words. The foam stunk to high-hlll when burnt, so out it went! One never expects to see our work go up in flames....but I guess it happens.
Thanks for the Tektronics tips, being an out of work carpenter / general contractor is going to slow down my building projects for a while. Suppose I'll just have to enjoy my preamp and music instead just a little bit longer.
I'll keep my eye out for a good deal on a 465 though.
Ron- Status
- This old topic is closed. If you want to reopen this topic, contact a moderator using the "Report Post" button.
- Home
- Amplifiers
- Tubes / Valves
- Weird fuzz from Aikido Pre, HELP!