My resistance calculations were off. I just etched a conductor and measured the resistance. I got about 1.6 ohms.
Using the following parameters I get a predicted resistance of 1.4 ohms:
Aluminum resistivity: 2.6 x 10^-8 ohm meters
Conductor length: 1.373 meters
Conductor thickness: 13 x 10^-6 meters
Conductor width: 2 x 10^-3 meters
Resistance is resistivity times length divided by (thickness times width). My measured resistance is probably slightly high because of a combination of probe contact resistance and slightly undersized conductor width (assuming some under-cutting in the etching process). I think I have the foil thickness correct because I measured it two ways and they agreed (I weighed a known area on an analytical balance and also measured the thickness of many stacked layers of foil and divided by the number of layers).
I still ran into some gluing problems but it was much better so I think I'm on the right track.
So now the question is whether to continue with the silk screen and etch approach or follow the Scandinavians' lead and use a Silhouette cutter. I'll be out of town for four days so I can either ponder the options while traveling or order a cutter today so it's waiting for me when I return! Tough call...
Questions for the Silhouette users (in case I pull the trigger):
• Solhaga: Do the knives you linked to previously---the ones sold on Ebay---work with the Silhouette Portrait? If so, which angle is best for aluminum foil and foil on paper?
• I've seen some say the Cricut mats are better, and perhaps cheaper, than those from Silhouette. Any experiences? I'd like to get one 24" long so I can make longer conductors and fewer drivers per line array. I haven't seen Cricut mats specified with a less sticky surface, though. They seem to have regular and extra-sticky. It's hard to know whether their regular is similar to Silhouette's light adhesive. I imagine too much stickiness is going to cause big problems.
===============
By the way, I already got a preliminary response regarding the NeXolve Essar Stretch 255 material. They're just asking for more information so far but I was pleased to receive a reply. I hope the answers I gave them are enough to keep the ball rolling.
Few
I don't know about the knives and the Silhouette Portrait, perhaps you could mail the eBay seller or check with the PCB forum.
I think that the original knives (I think that those are 45°) tends to produce jagged edges.
In fact, I just placed an order for the holder plus 5 pieces of 30° and 5 pieces of 60° blades so I'd guess that I know the answer in a couple of weeks at least for the Silhouette Cameo compliance and the jaggedness other knife angles produce.
I don't know about the stickieness of any other mat than the original which I by the way don't use; even that is too sticky!
I spray adhesive on plain print paper and apply the aluminium on paper foil.
Sorry for so many posts today... I'm heading out of town tomorrow so after this I'll give everyone a break for a few days.
Thanks, Solhaga, for the information. Before I saw your post I came up with another possibility for holding the foil flat while cutting it with a Silhouette machine. For those of us who have a hard time finding the paper/foil laminate this might be an option but I've only done preliminary testing.
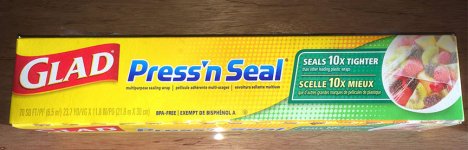
Press'n Seal, made by the Glad company (see attached photo), is available in US grocery stores. It has a lightly tacky adhesive designed to stick to itself but it seems also to stick just the right amount for holding thin foil so that it can be cut but also removed safely.
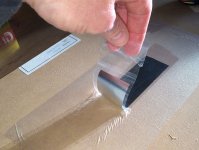
As a test I sprayed 3M 77 on a smooth surface and stuck the less sticky side of a piece of Press'n Seal onto the adhesive. I used a rubber roller to smooth the Press'n Seal and ensure that it was well stuck. I then put a piece of 13 micron thick Al foil onto the Press'n Seal, rolled it flat, and verified that it sticks very well. I don't think a cutter would dislodge the Al from the Press'n Seal. But, I was still able to remove the Al foil from the Press'n Seal without damage by laying adhesive tape on top of the foil and peeling the foil off the Press'n Seal (I'm really tired of typing that silly name; it's PnS from now on).
I was thinking I could put the PnS onto the cutter mat, put the foil onto the PnS, do the cuts, and then remove the cut out conductor by overlaying it with the diaphragm material coated with adhesive.
If I can find paper-backed foil this might all be less necessary but for now it seems like a promising approach given the materials I can find. I have photos of the process but I think it's premature to go into too much detail because the whole idea might be doomed. I've attached just one process photo showing tape being used to peel the 13 micron foil cleanly from the PnS.
I finally broke down and ordered a Silhouette Portrait so I'll be able to test things next week.
Few
Thanks, Solhaga, for the information. Before I saw your post I came up with another possibility for holding the foil flat while cutting it with a Silhouette machine. For those of us who have a hard time finding the paper/foil laminate this might be an option but I've only done preliminary testing.
Press'n Seal, made by the Glad company (see attached photo), is available in US grocery stores. It has a lightly tacky adhesive designed to stick to itself but it seems also to stick just the right amount for holding thin foil so that it can be cut but also removed safely.
As a test I sprayed 3M 77 on a smooth surface and stuck the less sticky side of a piece of Press'n Seal onto the adhesive. I used a rubber roller to smooth the Press'n Seal and ensure that it was well stuck. I then put a piece of 13 micron thick Al foil onto the Press'n Seal, rolled it flat, and verified that it sticks very well. I don't think a cutter would dislodge the Al from the Press'n Seal. But, I was still able to remove the Al foil from the Press'n Seal without damage by laying adhesive tape on top of the foil and peeling the foil off the Press'n Seal (I'm really tired of typing that silly name; it's PnS from now on).
I was thinking I could put the PnS onto the cutter mat, put the foil onto the PnS, do the cuts, and then remove the cut out conductor by overlaying it with the diaphragm material coated with adhesive.
If I can find paper-backed foil this might all be less necessary but for now it seems like a promising approach given the materials I can find. I have photos of the process but I think it's premature to go into too much detail because the whole idea might be doomed. I've attached just one process photo showing tape being used to peel the 13 micron foil cleanly from the PnS.
I finally broke down and ordered a Silhouette Portrait so I'll be able to test things next week.
Few
Attachments
About the tackieness, there is also a light version of the cutting mat.
Good to hear, one can do other things with it as well - perhaps cut out a logo for your loudspeakers?I finally broke down and ordered a Silhouette Portrait so I'll be able to test things next week
Bernt: I'm still away from home so I can't provide a thickness measurement of the PnS sheets. I will be happy to take look when I return and also happy to send a roll your way. It's not super thin so I'm guessing 1 mil or so. Just a guess, though.
Solhaga: "glad" to hear you found sme PnS. Glad has the same "happy" meaning in English---I wonder where the word started.
Solhaga: "glad" to hear you found sme PnS. Glad has the same "happy" meaning in English---I wonder where the word started.
Bernt: 16 layers of PnS is about 0.57 mm thick which means 36 microns per layer or 1.5 mils. There's a big error bar on that because of the way the adhesive is applied makes the layers a bit "squishy" (easy to compress).
Each roll is 30 cm x 21.6 m. Could you send me a PM with your mailing address so I can send you some PnS? I received the package you sent me (thanks again!) and your address is on it, but I want to be sure I spell everything correctly and don't want to rely on my interpretation of your handwriting.
-----------
My Silhouette Portrait has arrived and I'm in the process of installing the software. I purchased the somewhat overpriced Silhouette Connect software so that I can design and cut directly with Adobe Illustrator. We'll see how that works out.
Any suggestions for knife settings and cutting speeds?
Few
I got the "Glad" film and tested it acording to my Amt project,and it is not sticky enough.
It is useful for other purposes though.
The 3m tape is cut to the width you wish.
Solhaga got 160mm.My NeXT will be 100mm.It is app 12my mylar and 8 my adhesive.
In Denmark:Specialtape & klæbestoffer
Bernt
It is useful for other purposes though.
The 3m tape is cut to the width you wish.
Solhaga got 160mm.My NeXT will be 100mm.It is app 12my mylar and 8 my adhesive.
In Denmark:Specialtape & klæbestoffer
Bernt
Life has been providing few opportunities to work on this project lately. I did find a bit of time today, though. Here's the latest, in case anyone's still following this.
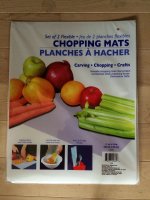
The Silhouette Portrait is a nice little machine---quite good for the cost. The adhesive cutting mats seem way overpriced, though, and I found myself experimenting less because I was preoccupied with using up my mat. A little searching and subsequent modification yielded a promising alternative. Plastic cutting mats of the type used to chop vegetables in the kitchen work well. (See photo below.) Plus, I can buy two for $1 US. Not bad. They're 11" x 14" so I cut its width down a bit with scissors.
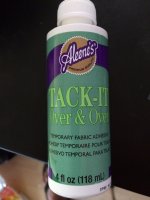
They're just missing the adhesive surface. The Press'n Seal I used on the Silhouette mat doesn't stick to the cheap chopping mats. Fortunately, I found that Aleene's "Tack-It Over & Over" adhesive creates a nice reusable tacky surface (again, photo below). It's a white glue that dries clear and remains sticky. I diluted it with water about 50/50 and got a useable level of stickiness. It's easy to apply by wiping it on, and you can adjust the stickiness to match different materials. 3M spray would likely work as well but that stuff gets everywhere so I'd rather not use it to make mats.
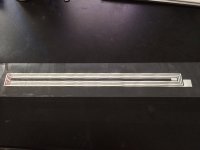
I've been having trouble cutting some 0.0005" thick recycled aluminum foil I found at Amazon. It seems to tear very easily, and it sounds very crinkly. I don't think it's been annealed. When I use my Ebay roll of 0.0005" aluminum, which I think was intended for capacitors or something, the results are much better. The third photo below shows a conductor made using the latter foil. Too bad the roll of foil that works well is only 1.5" wide. The "diaphragm" is just packing tape. I wanted to be sure I could remove the foil from my DIY cutting board without ripping everything up.
Conductivity: 2.9 ohms.
Bandsei very generously sent me rolls of his famous foil on paper. My original diy sticky surface doesn't adhere well to the paper so I'll have to make the mat stickier or use the official Silhouette mat to try that material.
Few
The Silhouette Portrait is a nice little machine---quite good for the cost. The adhesive cutting mats seem way overpriced, though, and I found myself experimenting less because I was preoccupied with using up my mat. A little searching and subsequent modification yielded a promising alternative. Plastic cutting mats of the type used to chop vegetables in the kitchen work well. (See photo below.) Plus, I can buy two for $1 US. Not bad. They're 11" x 14" so I cut its width down a bit with scissors.
They're just missing the adhesive surface. The Press'n Seal I used on the Silhouette mat doesn't stick to the cheap chopping mats. Fortunately, I found that Aleene's "Tack-It Over & Over" adhesive creates a nice reusable tacky surface (again, photo below). It's a white glue that dries clear and remains sticky. I diluted it with water about 50/50 and got a useable level of stickiness. It's easy to apply by wiping it on, and you can adjust the stickiness to match different materials. 3M spray would likely work as well but that stuff gets everywhere so I'd rather not use it to make mats.
I've been having trouble cutting some 0.0005" thick recycled aluminum foil I found at Amazon. It seems to tear very easily, and it sounds very crinkly. I don't think it's been annealed. When I use my Ebay roll of 0.0005" aluminum, which I think was intended for capacitors or something, the results are much better. The third photo below shows a conductor made using the latter foil. Too bad the roll of foil that works well is only 1.5" wide. The "diaphragm" is just packing tape. I wanted to be sure I could remove the foil from my DIY cutting board without ripping everything up.
Conductivity: 2.9 ohms.
Bandsei very generously sent me rolls of his famous foil on paper. My original diy sticky surface doesn't adhere well to the paper so I'll have to make the mat stickier or use the official Silhouette mat to try that material.
Few
Attachments
In my continuing search for very thin, non-crinkly, adhesive tape that is available wide enough to make my diaphragms I found this. It's polyimide (Kapton) tape with silicone adhesive. Thickness 12 microns. There are a few problems, though. First, 36 yards of 6" wide tape costs about $100 US so it's not cheap. Also, Kapton is more crinkly than I'd really like. I'd prefer something with a feel like stretch wrap (LLDPE). I don't know if that material would hold up to the heat and mechanical stresses, though. It's also hard to find in ultrathin form (less than 10 microns).
By the way, I received a sample of the NeXolve Essar Stretch material from the manufacturer (see earlier post in this thread). Looks very interesting but in spite of what their web site says they don't have any thin material available. They sent me a piece of the thinnest stuff they have on hand: 45 microns.
Few
Last edited:
Thanks jer. The conductor came out looking pretty clean, I have to admit. Now the question is whether I can cut them three at a time reproducibly.
I agree thinner Kapton will be hard to find. Since I'm aiming for a line array, I don't think I'll be driving the drivers very hard (thermally) so I'm hoping I can use something other than crinkly Kapton. Even mylar can be a bit crinkly, but it may be the best option. At least it's available very thin. I've also modified the conductor pattern to minimize the amount of diaphragm not covered by aluminum. That's partly to maximize sensitivity, but also an attempt use the conductor/adhesive/diaphragm sandwich as a damping mechanism. I envision the bare diaphragm material as being prone to flapping in the breeze.
Few
When I made my very first sample using etched copper tape I used .25mil Mylar, copper tape and a very very thin layer of Elmer's rubber cement and let it cure and then slapped on another top layer of .25 Mylar.
The result was very nice and didn't make any crinkly noises.
I still had that sample as I had mentioned before, for would be now 20 years ago, but I can't seem to find it anywhere now!!!
I had it still back in 2010,But I don't know where it went!!
I started a new larger sample back back in about 2004/5 using some pure copper leaf I got from Micheal's but I didn't have a chance to finish that one either, before someone threw it out on me too!!!
I still have everything to make another one except that I need to get another jar of rubber cement.
And some Magnets.
If you are going to drive them hard and heat becomes an issue then Kapton is the only way to go.
Testing will tell.
But I think it will take a lot of current before heat becomes an issue due to the large cooling surface area from what I have read on this subject sometime ago.
jer
This is exactly sommething i wanted to try for ages !!! Very nice post and awesome results
I tried etching with stuff to unclogg drain pipes, but either the glue or the masking paint give way after seeing this I might give it a second shot with normal etching stuff for copper clad it is less aggressive I gues. What bothers me most I can't seem to find laminated Mylar with al foil. It's possible to obtain for cable shielding. It in quantity of half a ton . Bit to much for me
I tried etching with stuff to unclogg drain pipes, but either the glue or the masking paint give way
after seeing this I might give it a second shot with normal etching stuff for copper clad it is less aggressive I gues. What bothers me most I can't seem to find laminated Mylar with al foil. It's possible to obtain for cable shielding. It in quantity of half a ton . Bit to much for me- Status
- This old topic is closed. If you want to reopen this topic, contact a moderator using the "Report Post" button.
- Home
- Loudspeakers
- Planars & Exotics
- Viability test: DIY screen printing for planar magnetics