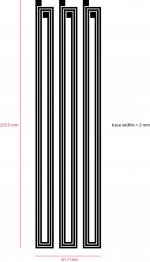
The foil is placed on a "cutting mat" 0.5mm thick plastic sprayed with 3M remount glue.
The ruler on the Picture shows centimeters.
Gap is app. 1mm.
The cutter has a program to trace the lines ,so a good Picture in JPEG is enough.Sketchup Picture better.
Bernt
Ok, so after you cut using the 3M remount glue, then what?
How do you transfer the foil from the cutting mat to the mylar/kapton and remove the traces of the "remount glue"??
_-_-
You can se it here:http://www.diyaudio.com/forums/planars-exotics/218549-diy-amt-42.html
I have made a program with the silhouette to make a 4 meter long diaphragm.It is possibly to make the program.
Bernt
I have made a program with the silhouette to make a 4 meter long diaphragm.It is possibly to make the program.
Bernt
The weekend festivities are done here so I'm posting the conductor files Bernt requested. I'm trying to attach the file in two formats but I'm not sure they're both going through. I only see the jpeg version in the preview. The png file keeps getting lost for some reason.
Both files have overall height and width of the pattern. Please let me know if you need more dimensioning information.
Few
Both files have overall height and width of the pattern. Please let me know if you need more dimensioning information.
Few
Attachments
You can se it here:http://www.diyaudio.com/forums/planars-exotics/218549-diy-amt-42.html
I have made a program with the silhouette to make a 4 meter long diaphragm.It is possibly to make the program.
Bernt
I am sorry, I am not able to understand the specific details of the process I inquired about.
I see the machine cutting the foil.
I see the mat + foil.
I see the foil somehow being rolled after cutting??
At this point, I have no clue how you keep the foil from sticking to itself while being rolled, how you get it to roll up, how you then - or before this point adhere it to the final diaphragm material, and what you use for this adhesion??
Perhaps I have missed this in a quick read?
![URL]](/community/proxy.php?image=http%3A%2F%2F%5BURL%3Dhttps%3A%2F%2Fimageshack.com%2Fi%2Fn88wh4j%5D%5BIMGDEAD%5Dhttp%3A%2F%2Fimagizer.imageshack.us%2Fv2%2F1024x768q90%2F836%2F8wh4.jpg%5B%2FIMGDEAD%5D%5B%2FURL%5D&hash=8d29e68715c75860abac067a6e39ed5c)
Looks great! If you accidentally cut 20 copies of the pattern and glue them to 4 micron thick mylar diaphragms, feel free to send them my way!
More seriously, how does your cutter operate? Does it rotate the cutter's orientation as it cuts in different directions? I've not seen a good video of how it does its thing.
Bear: I shouldn't butt in but if you're thinking of the same rolled up diaphragm picture as I am, I think it was rolled up so it could be weighed. That said, I share your confusion about how the rest of the process works. (If I'm thinking of the wrong picture then I apologize for butting in.)
Few
Yes, it rotates the cutter's orientation as it cuts in different directions.More seriously, how does your cutter operate? Does it rotate the cutter's orientation as it cuts in different directions? I've not seen a good video of how it does its thing.
As this machine is also used by DIY circuit boards designers in order to cut SMD solder templates, there are better third party knives to be bought with different angles.
Does this stuff fit the bill of what you're looking for? They also have pretty thin Copper clad laminates.
Essar? Stretch 255
Essar? Stretch 255
Interesting read over on the circuit board forum. There is quite a community of users over there. I've not messed around with surface mount board construction. Looks like a nice way to do it. For your AMT conductor cutting did you have to use the Python-based approach discussed on that forum or can you use the software that comes with the machine?
I had not seen the Essar stretch material. Looks interesting. I need aluminum clad, rather than copper, but the high temperature stability, 0.25 mil thickness, and elasticity look great. I could just glue aluminum foil to it. Any ideas for how to purchase non-industrial quantities?
I had not seen the Essar stretch material. Looks interesting. I need aluminum clad, rather than copper, but the high temperature stability, 0.25 mil thickness, and elasticity look great. I could just glue aluminum foil to it. Any ideas for how to purchase non-industrial quantities?
I used the software that came with the machine but I updated it to the Designer Edition.
Etch update: Good news/bad news. (Ugh...)
My latest screen printing screen worked very nicely. The transfer of the resist layer (paint) went smoothly and the results looked quite clean.
The etching step went less well. As the etching step proceeded I thought it looked quite promising. The paint remain intact and the aluminum seemed to be coming off at a suitable rate---not so fast that the mylar was damaged, not so slow that it took all day. Unfortunately, the trouble was occurring on the side of the diaphragm I couldn't see while I was etching. The photo below shows what happened. The photo is a view through the mylar: the mylar is closest to the camera, then the aluminum, then the white paint is farthest away. Apparently the etchant (ferric chloride) got under the paint and etched the aluminum traces. This is not something I had seen before so it must result from some change I made. I see two possibilities:
1) I glued the shiny side of the foil to the mylar instead of the matte side. In the past I glued the matte side to the mylar.
2) I made a simple box to contain the 3M 77 spray adhesive when I apply it to the mylar before placing the aluminum foil on it. It's just a cardboard box with a rectangular hole in the bottom that matches the size of the area I want to apply adhesive to.
I have a hard time believing that gluing the shiny side of the foil to the mylar is a problem. I did it because I thought I'd make double-sure there were no microchannels between the aluminum and mylar for the etchant to seep into. Maybe the shiny side is less glue-able?
The paint seems to have maintained its integrity; it didn't just peel off the aluminum or flake away. I don't think paint adhesion is the problem.
So, I think I simply didn't do a good job of applying a complete layer of adhesive to the mylar. With my new spray box I think I was able to keep the can of adhesive farther from the surface while spraying, hoping to get a smoother layer. As a result, I may have simply applied too little glue.
I just screen printed another pattern onto foil to make another run. This time I used Weldbond contact cement as the adhesive. It's brushed on so I think there's less risk of leaving isolated islands of adhesive separated by channels the etchant can seep into. It'll make a heavier layer, at least that's my guess, but I'll worry about that later once I figure out if the bond was the problem with my most recent etch.
As soon as one step of the process starts to feel refined, problems show up somewhere else!
P.S. Thanks for the clarification on the cutter software. I'll take a look at that link.
Attachments
hi
did you clean the surface with (mild) alcohol before attaching the glue?
be careful when doing this, the glue will probably stick much stronger. try it out on a small testing piece.
how was the environment like before? temperature and humidity.
PS: very good details on the lanes.
did you clean the surface with (mild) alcohol before attaching the glue?
be careful when doing this, the glue will probably stick much stronger. try it out on a small testing piece.
how was the environment like before? temperature and humidity.
PS: very good details on the lanes.
![URL]](/community/proxy.php?image=http%3A%2F%2F%5BURL%3Dhttps%3A%2F%2Fimageshack.com%2Fi%2Fnb3ms9j%5D%5BIMGDEAD%5Dhttp%3A%2F%2Fimagizer.imageshack.us%2Fv2%2F1024x768q90%2F839%2F3ms9.jpg%5B%2FIMGDEAD%5D%5B%2FURL%5D&hash=e4a638bb1aa11dfe9955be01ab2fdc63)
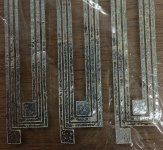
I cut a pattern,adn remowed the leftover's.
![URL]](/community/proxy.php?image=http%3A%2F%2F%5BURL%3Dhttps%3A%2F%2Fimageshack.com%2Fi%2Fnhk2n6rj%5D%5BIMGDEAD%5Dhttp%3A%2F%2Fimagizer.imageshack.us%2Fv2%2F1024x768q90%2F845%2Fk2n6r.jpg%5B%2FIMGDEAD%5D%5B%2FURL%5D&hash=20095ec1322e5a9a973e18735cab36d4)
Aplied adhesive mylar tape. 50mm wide 12my thick.
![URL]](/community/proxy.php?image=http%3A%2F%2F%5BURL%3Dhttps%3A%2F%2Fimageshack.com%2Fi%2Fnbggnbj%5D%5BIMGDEAD%5Dhttp%3A%2F%2Fimagizer.imageshack.us%2Fv2%2F1024x768q90%2F839%2Fggnb.jpg%5B%2FIMGDEAD%5D%5B%2FURL%5D&hash=8da526dbd73754e37ccd510c9f7d9601)
Peels tape and pattern of.
![URL]](/community/proxy.php?image=http%3A%2F%2F%5BURL%3Dhttps%3A%2F%2Fimageshack.com%2Fi%2Fnd89swxj%5D%5BIMGDEAD%5Dhttp%3A%2F%2Fimagizer.imageshack.us%2Fv2%2F1024x768q90%2F841%2F89swx.jpg%5B%2FIMGDEAD%5D%5B%2FURL%5D&hash=b33a62ea0d0974f2a73383a7443dfdc9)
Remowes paper with warm water.
![URL]](/community/proxy.php?image=http%3A%2F%2F%5BURL%3Dhttps%3A%2F%2Fimageshack.com%2Fi%2Fnfthnnxj%5D%5BIMGDEAD%5Dhttp%3A%2F%2Fimagizer.imageshack.us%2Fv2%2F1024x768q90%2F843%2Fthnnx.jpg%5B%2FIMGDEAD%5D%5B%2FURL%5D&hash=42d0c0e7c0dd606e6e8fc27972565ef3)
Removes adhesive glue with heptane.
![URL]](/community/proxy.php?image=http%3A%2F%2F%5BURL%3Dhttps%3A%2F%2Fimageshack.com%2Fi%2Fndhf6q0j%5D%5BIMGDEAD%5Dhttp%3A%2F%2Fimagizer.imageshack.us%2Fv2%2F1024x768q90%2F841%2Fhf6q0.jpg%5B%2FIMGDEAD%5D%5B%2FURL%5D&hash=bf8d1748e9aae42cd804161b1d6b0246)
Done.The yellow stripe is two layer tape.
Resistance is 2,8 ohm with 10my alu.Will be 4,0 ohm with 7 my alu.
Bernt
 !
!Looks beautiful Bernt! Just 19 more to go!
Are you using the Designer Edition software as well?
I don't have easy access to the paper/foil laminate you're using, unfortunately. I'm not sure why it's been hard to find in the US. I may just be looking in the wrong places. You've concluded the cutter is less well suited to cutting foil without the paper attached, do I have that right?
I'd really like to go with a plastic film that is more like 6 microns but it's not easy to find tape that thickness. It would have to be quite wide, too. I guess I'll stick with glue and plastic film for now.
By the way, your resistance measurements are for one conductor, not all three in parallel, right?
Thanks for making the test cut for me. Much appreciated!
Few
Thanks for the response. If you're confident about your foil thicknesses then I need to figure out what's wrong with my resistance calculations. I expected higher resistances than what you're finding.
I'm using 13 micron aluminum foil without paper backing so far. Do you think the Silhouette method might work with that material or is the paper necessary no matter how thick the aluminum is?
In the meantime:
1) I located a source of confectioner's foil which is supposed to be 0.00045" thick. I haven't had it in my hands yet but I believe it's paper laminated to foil. No information on the thicknesses of those two materials independently, though.
2) I contacted the Nexolve company to ask about the Essar Stretch 255 material. I hope they bother to email me back even though I told them I'm not looking for industrial quantities.
- Status
- This old topic is closed. If you want to reopen this topic, contact a moderator using the "Report Post" button.
- Home
- Loudspeakers
- Planars & Exotics
- Viability test: DIY screen printing for planar magnetics