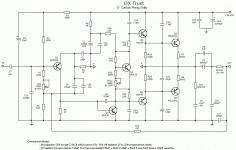
Supply voltage to the Trust amplifier is 36 volts
So, no condenser or capacitor will need more insulating voltage than 35 Volts.... if you want some more insulating voltage you can use of course...but really not needed.
I told that bootstrap electrolitic and zobel needed higher insulating voltage but was my mistake.
Nothing there needs more than 35 volts.
regards,
Carlos
An externally hosted image should be here but it was not working when we last tested it.


taj said:Note to self (me not Doug): Never send Carlos preliminary schematics, because he posts them with problems and that causes endless confusion. I will put big "DRAFT ONLY - DO NOT POST" markings on it. Making them too big is a good idea, but it doesn't stop him.
The final one is not ready yet, but it will be uploaded here when the QC department has approved it.
..Todd
ha ha
Note 2: There is no QC department.
ha ha
See you april.
regards
no problem Carlos!Please, do not even try to discuss theories not to atract boring theorists to come here...
The link was just for your circuit collection. I know you are an addict
One of the related designers, Mr. Haas, has written books and articles about audio electronics and runs a small audio-kit selling company.
regards
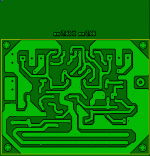
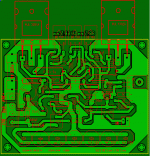
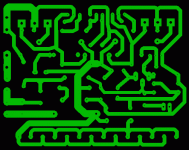
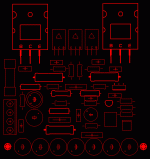
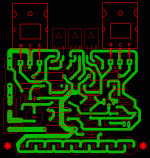
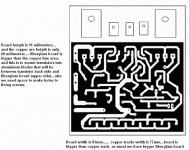
I found that copper lines has different dimensions compared to the whole board
So i had to measure once again and prepare those informs to you.
This image shows the copper lines only..but board is bigger..we need room to parts that are fat (electrolitic condensers goes out from the board if it is small).... also trimpots.... also transistors need space (power units)...also we need room for holes to attach board to the chassis or heatsink using screws.
regards,
Carlos
Attachments
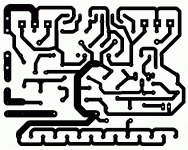
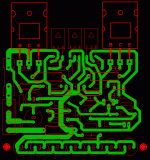
Into this image i am explaining the details
Because there are two main dimensions...the copper tracks area and the fiberglass board area..... so...there are two dimensions..one to cut your board..and other to order printer to prepare your transparence or lazer printer copy to hot iron transference.
regards,
Carlos
Because there are two main dimensions...the copper tracks area and the fiberglass board area..... so...there are two dimensions..one to cut your board..and other to order printer to prepare your transparence or lazer printer copy to hot iron transference.
regards,
Carlos
Attachments
Hi Carlos,
Not trying to be a "theorist" here. Just curious.
Why all the 7.5pf caps on the output transistors?
I guess they have something to do with stability, to prevent oscillation.
Or maybe to allow various transistor types to be substituted.
Or maybe they roll off some higher harmonics to give warm lush tone...
Regards,
Mike
The two extra capacitors we have included into the official schematic published by
dear Todd are usefull but you can survive without them if you need.
Also you can install them under the board as they are small ceramic 104 capacitors.
The trimpot can be substituted by two resistances in series if needed.
So, do not worry about board... the one made by Alex mm is good enougth to be used... this is a DIY circuit... also a DIY board.... not a challenge to perfection....so.... some small capacitors under the board can be used.
Also paralell resistances if needed can be used too... the musical and sonic "spirit" will not disappear without a perfect construction...do not worry with those small things.... better to worry about speakers as they are a hell bad things we have.
Ancient air pumps that distorts a lot!
regards,
Carlos
- Status
- This old topic is closed. If you want to reopen this topic, contact a moderator using the "Report Post" button.
- Home
- Amplifiers
- Solid State
- Trust, the most delicious Dx Amplifier