SY said:Steve, some feedback from the field. When I pulled up a picture of your transformer box from your website, my wife blurted out, "Six Feet Under!"
Hahahahaha!
Hey, perhaps I can take the guts out, line it with silk and market it to bereived, upscale hamster owners! Or former owners as the case may be.
")
"Wouldn't you want Fluffy to be put to rest in the best?"
Tell the wife thanks for the inspiration! If it takes off, I'll give her a cut.
se
Peter Daniel said:Here's the look of a rear panel. It is attached to the back edge of side panels. Additionaly, the 5/8" bar is added in a center to make connection to the top and bottom covers. Six screws, size 4, are used altogether. Both rear and front panels are anodized and I'm using here some surplus, in good shape, material.
Nice job, Peter! And very interesting topic
How did you cut a nice rectangle on the back pannel, for your mains plug+switch ?
I drilled four holes in a corners and used scroll saw. You can also use a jigsaw. Then use file to smooth out the edges.
The other tools usefull for that type of job are definitely band saw (anyone is good) and a belt sander (2" preffered, although hard to find at regular stores like HD). Those were my first major machines for metal work and I paid $200CAD for both. Now I have a better band saw, but the belt sander is still good.
You also may find a drill press useful, especially when you can buy one for $60. And that's about all the tools you really need. Some other helpful additions might be a machinist square, cordless screwdriver, some kind of a scriber (I use small blade) and a nice deburiing tools.
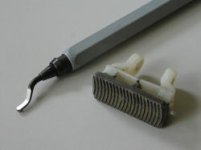
I present here my two favourite deburring tools. One on the left is pretty easy obtainable from Home Depot and I use it on larger holes. The one on the right is made out of a Vixen file. I cut a piece from a file and glued a handle. This is the best tool for deburring. You can use it on holes in aluminum, after drilling PCBs, on sheet metal edges etc. I've been using it for last 10 years.
I also provide a link to a best supplier of aircraft sheetmetal tools (both new and used). They have monthly catalog with good specials: http://www.yardstore.com
The other tools usefull for that type of job are definitely band saw (anyone is good) and a belt sander (2" preffered, although hard to find at regular stores like HD). Those were my first major machines for metal work and I paid $200CAD for both. Now I have a better band saw, but the belt sander is still good.
You also may find a drill press useful, especially when you can buy one for $60. And that's about all the tools you really need. Some other helpful additions might be a machinist square, cordless screwdriver, some kind of a scriber (I use small blade) and a nice deburiing tools.
I present here my two favourite deburring tools. One on the left is pretty easy obtainable from Home Depot and I use it on larger holes. The one on the right is made out of a Vixen file. I cut a piece from a file and glued a handle. This is the best tool for deburring. You can use it on holes in aluminum, after drilling PCBs, on sheet metal edges etc. I've been using it for last 10 years.
I also provide a link to a best supplier of aircraft sheetmetal tools (both new and used). They have monthly catalog with good specials: http://www.yardstore.com
Attachments
Peter,
Could you tell us a little about how you do the layout on the metal before cutting?
I’ve read your other thread on tools and such and it’s been very helpful. This might seem too obvious, but how do you make the cut lines, pencil? That’s easy to clean off but tough to see and easy to smudge while working.
I’ve taped paper on the panel for layout, or even directly attached a laser printed design, bit this always seems to tear and slip. Contact paper works a little better, buy catches fillings and helps scratch in spite of it self.
Miter box, Panel saw, miter guides, the belt sander and lots of patience must account for why your cuts are always perfectly square. (talent and practice fit in there too I suppose)
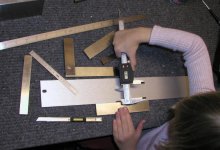
Your gear looks real good in the photo layout with the Nagra stuff.
-Dave
Could you tell us a little about how you do the layout on the metal before cutting?
I’ve read your other thread on tools and such and it’s been very helpful. This might seem too obvious, but how do you make the cut lines, pencil? That’s easy to clean off but tough to see and easy to smudge while working.
I’ve taped paper on the panel for layout, or even directly attached a laser printed design, bit this always seems to tear and slip. Contact paper works a little better, buy catches fillings and helps scratch in spite of it self.
Miter box, Panel saw, miter guides, the belt sander and lots of patience must account for why your cuts are always perfectly square. (talent and practice fit in there too I suppose)
Your gear looks real good in the photo layout with the Nagra stuff.
-Dave
Those are about all the tools you'll ever need to do proper layout. I use a ruler and calipers and the lines are marked with that small knife, directly on pieces I'm working on. I found a pencil or a marker not accurate enough. When using calipers a metal slab is useful, because you can draw a perfect line with a caliper directly. Those stainles slabs of different sizes are really helpful when working on layout and doing anything else with metal. I'm not using any mitre boxes or guides, just a steady hand and sharp eye.
Another suggestion, it's good to put a piece of carpet on your bench when working with metal. You won't scratch your work this way.
Another suggestion, it's good to put a piece of carpet on your bench when working with metal. You won't scratch your work this way.
Attachments
Ive got two micrometer calipers, The elder is a Fowler with a venire scale that was making me blind fast. The second has an LCD scale I just bought from Harbor Freight for $20. Seems reasonably accurate and not to shabby for a throw away price. It also kept me from having to explain the cost of a Starret to my wife. I gave one to my Dad, a recently retired machinist, for his birthday and he seems to like it, at least that’s what he tells me. Is that a Mitutoyo in the picture?
Thanks for the tips on the knife and layout blocks, that should help a lot. Do you set hole locations with a punch?
Thanks for the tips on the knife and layout blocks, that should help a lot. Do you set hole locations with a punch?
I think it is Mitutoyo, although it doesn't say the name on it. Digital calipers is the must, when working frequently with metals.
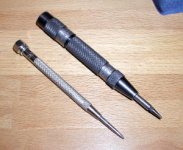
For marking holes I use those two punches. I use the skinny one first,if the placement has to be very accurate and then center punch it with the other one. This makes the mark big enough to guide the drill bit. When I drill the holes I never clamp the piece, but hold it lightly, so it always centers properly.
For marking holes I use those two punches. I use the skinny one first,if the placement has to be very accurate and then center punch it with the other one. This makes the mark big enough to guide the drill bit. When I drill the holes I never clamp the piece, but hold it lightly, so it always centers properly.
Attachments
I think I have the same punch that you do. Seems that I have a lot of nice tools, just not the time to practice or the talent to use them well.
A cautionary tale about not clamping your work, I have a cool scar on the inside of my left finger from a piece that got away from me. 10 stitches and had to drive myself to the hospital. Of course I was drilling steal, but the thought of having my hand on a piece of work that’s under a machine still makes me squeamish.
I like the idea of setting the make by hand before using the spring punch, I'll definitely be doing that from now on.
- Dave
When I drill the holes I never clamp the piece, but hold it lightly, so it always centers properly.
Uhhh, better be careful, there
Real easy to lose fingers or even more important parts of your anatomy
if the part you are workin' on slips
Be careful

slowmotion said:
Uhhh, better be careful, there
Real easy to lose fingers or even more important parts of your anatomy
if the part you are workin' on slips
Be careful
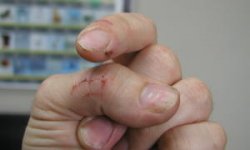
You are right about it and this is how my left hand fingers look now after I drilled all the holes in some acrylic blocks I used for feet in my Aleph amps.
It is true that one has to be carefull, especially with small parts made of steel and plastics when drilling. In this case I also recommend a vise or clamps. Yet with large aluminum panels and mostly anything aluminum, there is not much danger of the piece being spun by the drill. Use lubricant when drilling deep and use caution, sooner or later you'll get the feel and it's easy to predict when it becomes dangerous.
And I've been to hospital on more than one occasion as well.
Attachments
tiroth said:Peter,
Could you give some tips on finishing raw bar/plate/channel stock? You've presented some really elegant ways of using off-the-shelf extrusions, but how do you get a nice looking finish?
Thanks very much for all of your insights.
One way is to use pre finished and anodised extrusions from Home Depot. They are limited though in size and variety. When I use extrusions from metal stores, I finish them on 3" belt sander with 120 grid paper. I use Varsol as a lubricant. This is pretty good and efficient method. After that the final finish can be improved with some fine Scotch Brite. If not anodizing, one can protect aluminum from elements by using alodine. There are at least two threads dealing with that chemical.
If you dont have a belt sander you can polish your extrusions by hand, wrapping a sheet of sand paper over the wooden block and using another straight piece of wood as a guide so your lines are uniform. Some people use some sorts of laquers on aluminum, but I never tried it. I prefer natural look and even unprotected aluminum lasts a long time if proper care is taken.
Thanks Peter. Home Depots here don't carry anything useful in terms of extrusions , but I can get raw channel/bar stock so I'll give it a go and not worry for the moment about anodizing.
I had seen the threads about alodine, but after seeing your work my next couple of projects at least will focus on natural aluminum. Thanks again for the inspiration!
, but I can get raw channel/bar stock so I'll give it a go and not worry for the moment about anodizing.I had seen the threads about alodine, but after seeing your work my next couple of projects at least will focus on natural aluminum. Thanks again for the inspiration!
I got some difficulties to find this topic, since I searched for "the way to build a chassis" and not with peter's "built" and "chassiss"
Peter: my aluminium plates aren't flat :/ they are a little curved
since it's 6mm thick, I see no easy way to correct this.
Do you have an idea to fix this?
I can post pictures if you want
Peter: my aluminium plates aren't flat :/ they are a little curved
since it's 6mm thick, I see no easy way to correct this.
Do you have an idea to fix this?
I can post pictures if you want
- Status
- This old topic is closed. If you want to reopen this topic, contact a moderator using the "Report Post" button.
- Home
- General Interest
- Everything Else
- The way to build a chassis