The way to built a chassiss
Let's get physical and start building something.")
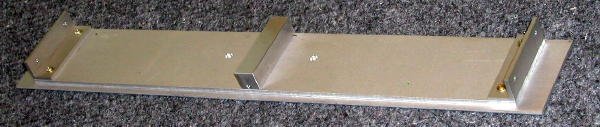
This is the way I like to built my chassiss. I usually don't buy materials for that from metal suppliers, but like to look at surplus stores for loose panels taken from some other electrical equipment. Anything that is 1/8 or prefferably thicker can be put into a good use when building a chassiss. Those panels are usually nicely painted and the finish is industrial strong.
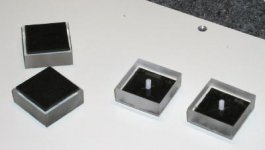
I start a chassiss from choosing feet, since this is the most important thing here. After seeing Boulder equipment, I'm not using round feet anymore, and acrylic makes a nice material choice not only from a soundwise POV, but it's also easy to cut, looks nice when sanded and is cheap. I add damping sheets at the bottom and place the feet at the very corners.
Let's get physical and start building something.
This is the way I like to built my chassiss. I usually don't buy materials for that from metal suppliers, but like to look at surplus stores for loose panels taken from some other electrical equipment. Anything that is 1/8 or prefferably thicker can be put into a good use when building a chassiss. Those panels are usually nicely painted and the finish is industrial strong.
I start a chassiss from choosing feet, since this is the most important thing here. After seeing Boulder equipment, I'm not using round feet anymore, and acrylic makes a nice material choice not only from a soundwise POV, but it's also easy to cut, looks nice when sanded and is cheap. I add damping sheets at the bottom and place the feet at the very corners.
Attachments
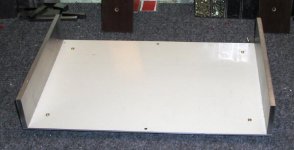
We got the 3/16" bottom panel cut to the size, so the next step is adding the sides. I like to use flatbars 3/8 or 1/2" thick and usually 2.5 or 3" wide. One reason for that is that I don'thave to use any additional rods or angles to attach all the other panels; I simply drill and tap the holes in the side panels. Since the bottom is pretty thick, I use Allen type screws and bore the holes so the heads are recessed and don't stick out so much. Size #6 or #8 is a good choice here.
Attachments
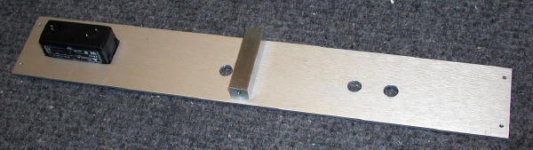
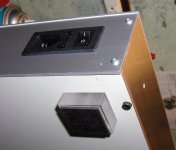
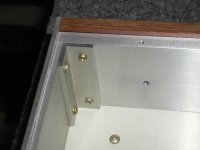
Here's the look of a rear panel. It is attached to the back edge of side panels. Additionaly, the 5/8" bar is added in a center to make connection to the top and bottom covers. Six screws, size 4, are used altogether. Both rear and front panels are anodized and I'm using here some surplus, in good shape, material.
Attachments
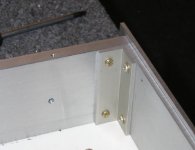
The front panel is pretty tricky to make, especially when no pots and swithes are used. I build it from two pieces. One is the outside, visible panel, the other is a subplate which is used to mount it to the rest of a chassiss as well as support top from bending. You probably noticed that top panel will go really on top and it rests on side panels, rear panel and front subplate. I think it is a better way to do it and it provides support in case you want to place something on top of your unit (Shakti stones maybe or some weights?).
I'm using angles to attach the front assembly to the sides, with a screws which mount from the inside. I glue both panels with 5min epoxy and this gives me the final one piece panel. This particular one has two LEDs in front and I used those holes for easy aignment. In case you are using pots and swithches no glue is required and you can use the hardware to keep both parts together.
).I'm using angles to attach the front assembly to the sides, with a screws which mount from the inside. I glue both panels with 5min epoxy and this gives me the final one piece panel. This particular one has two LEDs in front and I used those holes for easy aignment. In case you are using pots and swithches no glue is required and you can use the hardware to keep both parts together.
Attachments
This could actually make the chassiss complete, yet for me it seems a bit unfinished like that, too much cold looking without definition. What I'm doing to improve on that is adding additional side panels. I have found this really nice surplus place and for last 10 years they had those cut off pieces of some fiber materal. It looks better than wood and is much stronger and doesn't require finishing after cutting. This is what I'm using here. I think it looks better that way
Attachments
This is again front corner detail after adding side panels.
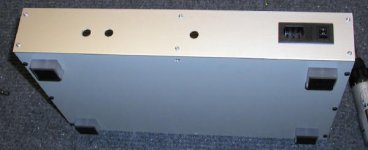
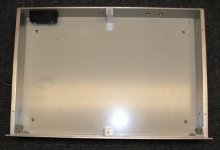
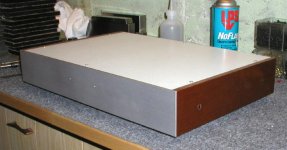
And this is complete chassiss, this one is for a DAC and took me 3 evenings to make. What I liked about it, is that I was using prefinished panels and except for 3/8" aluminum sides, didn't have to finish anything.
And this is complete chassiss, this one is for a DAC and took me 3 evenings to make. What I liked about it, is that I was using prefinished panels and except for 3/8" aluminum sides, didn't have to finish anything.
Attachments
This one is actually not mine, but through some trade, will possibly make one Skandinavian guy happy. Broadhurst DAC goes there. One reason I posted that here, is because Brian e-mailed me recently asking for some pointers on chassiss building and I thought it may be a good opportunity to show a proven way of the chssiss building.
I hope I didn't post too many pics.
I hope I didn't post too many pics.
Peter Daniel said:It looks better than wood and is much stronger and doesn't require finishing after cutting. This is what I'm using here. I think it looks better that way
Looks better than wood? *sigh* Heathens.
Will it take a thread? The only "improvement" to the chassis would suggest would be to ultimately eliminate the exposed screws on the top and sides. Confine 'em to the back and bottom where they won't normally be seen. With a bottoming tap, you can get a blind thread with enough of a bite in 1/8" material.
se
That's the approach I sometimes don't understand. Some people are obsessed with hiding screws so everything looks dull and boring. I believe that proper screws are a part of so called industrial (or functional) look and I really don't care much about hiding them. When chosen properly they can actually make the unit to look better. Of course I am not a fan of an early Cello look when the screws were too much in abundance.
Peter Daniel said:That's the approach I sometimes don't understand. Some people are obsessed with hiding screws so everything looks dull and boring. I believe that proper screws are a part of so called industrial (or functional) look and I really don't care much about hiding them. When chosen properly they can actually make the unit to look better. Of course I am not a fan of an early Cello look when the screws were too much in abundance.
Well, one person's "dull and boring" is another person's "sleek and elegant."
I know what you mean though and I agree. However you can get a "screwless" result while avoiding the "dull and boring." Though the techniques don't lend themselves too well to simple slab construction and would require thicker materials and more sophisticated machine work rather than simple straight cuts.
Just brought it up as an option for those who see "dull and boring" as "sleek and elegant."
By the way, good work (as usual)! Friend of mine was complimenting your work earlier today. So you're getting something of a reputation.
se
Steve Eddy said:
Friend of mine was complimenting your work earlier today. So you're getting something of a reputation.
se
Was he at the Montreal Show?
I could build it without visible fasteners, yet somehow in here, this was not a look I was after. I could imagine that for "slick and elegant" I would also have to go with custom polishing and anodizing all panels and this would be a totally different approach. My gainclone amp is a good example of that technique.
http://www.shows.soundstagelive.com/shows/avtour2003/mtl_showstop3.shtml
Don't blame me for 9mm claim though, I don't know where it came from
Peter Daniel said:Was he at the Montreal Show?
No, I turned him on to this place a while back so he knows your work from your posts here.
I could build it without visible fasteners, yet somehow in here, this was not a look I was after. I could imagine that for "slick and elegant" I would also have to go with custom polishing and anodizing all panels and this would be a totally different approach. My gainclone amp is a good example of that technique.
Yes. And that space between the two extrusions gives the chassis some character and keeps it from looking like a "dull and boring" slab of metal. Rather the same as the three big holes in the Evett & Shaw Flatte amp.
By the way, the blue sandwich between the acrylic slabs is a nice touch. You've got a good eye for design.
Don't blame me for 9mm claim though, I don't know where it came from
Hehehe. Perhaps they meant feedback path? That's the same figure claimed for the feedback path in the Gaincard.
se
Peter Daniel said:Evett & Shaw have some really nice designs. I remember their first line of speakers. For some reason however, they don't seem to have much appearance in magazines and among reviewers.
Well, they're no longer in business, so...
My friend designed their little Elan loudspeaker.
An externally hosted image should be here but it was not working when we last tested it.
se
Peter, very educational and entertaining, in an area whereI badly need some education. Care to give a brief rundown on what tools you used in each step?
Steve, some feedback from the field. When I pulled up a picture of your transformer box from your website, my wife blurted out, "Six Feet Under!"
Steve, some feedback from the field. When I pulled up a picture of your transformer box from your website, my wife blurted out, "Six Feet Under!"
- Status
- This old topic is closed. If you want to reopen this topic, contact a moderator using the "Report Post" button.
- Home
- General Interest
- Everything Else
- The way to build a chassis