The type C will still be on my agenda. Somehow I have the feeling I will need some more power in the future...

and thank you 🙂
and thank you 🙂
The inrush circuit Wesayso has ordered , has an NTC in series as inrush protection, but also a relay that bypass it after a delay. If you just have the NTC in series, you always have a resistance in series with the transformers and the Goldmund has a rather low idle current, so the NTC has a relatively high resistance under normal listening. This could degrade the dynamic capability. In a class A amplifier, a NTC in series can be a good solution IMHO
If this is connected to a GFI breaker, a very small ground leakage current will trip the breaker. Same goes for "rewired" homes that do not have balanced circuits, like when a line/neutral wire has been accidentally shared between two circuits.
Indeed, from all we could find, it's the inrush that is the problem. Once the amp is on it has never been a problem. Once every few times the amp is turned on it will trip the breaker. It happened once on the day we were testing amps and two times after that.
I ran measurements in between and a couple of listening sessions etc.
It's a problem at turn on only.
I ran measurements in between and a couple of listening sessions etc.
It's a problem at turn on only.
...It's a problem at turn on only.
With a little help it adjusts in length like the new kitten 😛 what's not to like with dual 300watts that weights a ton and smelled like a serious system sound improvement.
I've been listening way less that I would want to, I'm still waiting for my purchased soft start relay to arrive. Ordering from China does have it's drawbacks.
Today I've done a long listening session but I realise I need to redo a lot to get the best out of it all. Basically everything has changed when I put this amp in it's place without the pré-amplifier. As said, measurements confirmed the differences I heard.
It does sound quite good though, right now, but I do believe I can do better. I've enjoyed the listening a lot, wish I could have gone on and on...
In the mean time I've been working hard to add some bling to the new amp, hope to show something soon. For no other reason than that it could be done. Not nearly finished yet, I just want to make the new amp look a little more integrated with the total concept.
After the soft start arrives I'll start new measurements and a couple of different ways to process that. I can hardly wait, but I'll have to...
Soft start relays came in this week. Today I've put it into place in the amplifier. Done about 7 starts, all went well. You can hear the relays click in one after another.
On to the next job, some exterior modifications. And when I have time again, new measurements.
On to the next job, some exterior modifications. And when I have time again, new measurements.
Restyle of the amplifier is finished. After consulting with koldby, asking him if I could "rebrand" it to my pseudo brand name Vandermill Audio and got permission for that I went on with that job.
If you folks remember, it originally looked like this:
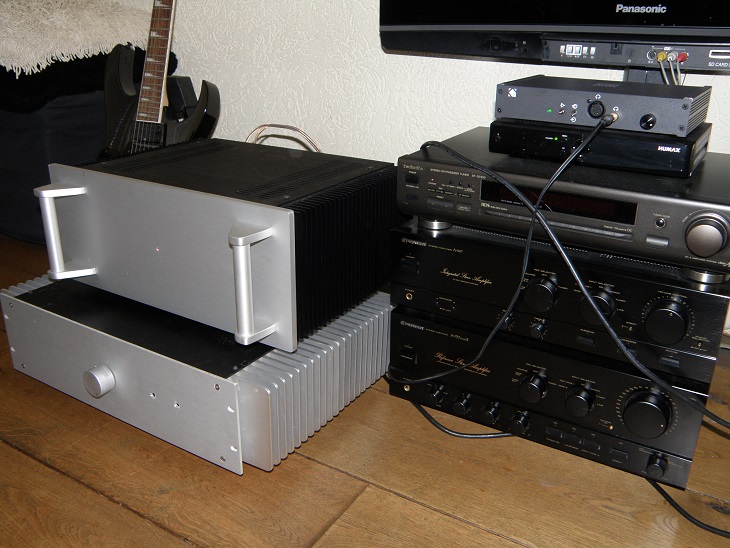
(top of the left stack)
That style with the grey front didn't do particularly good with the missus.
So I figured if I would do my best to match it to the line array theme it might be a little more acceptable to her and fit in a little better overall.
Here's what it looks like after the make-over session:

Zooming in:

Another one:

The logo by itself before assembly:

Slippery to photograph...
Overall I'm quite pleased with this make-over. I guess I have a "thing" for the black/chrome style.
Now on to one small line-array tweak, that one isn't quite finished yet...
One more...

If you folks remember, it originally looked like this:
(top of the left stack)
That style with the grey front didn't do particularly good with the missus.
So I figured if I would do my best to match it to the line array theme it might be a little more acceptable to her and fit in a little better overall.
Here's what it looks like after the make-over session:
Zooming in:
Another one:
The logo by itself before assembly:
Slippery to photograph...
Overall I'm quite pleased with this make-over. I guess I have a "thing" for the black/chrome style.
Now on to one small line-array tweak, that one isn't quite finished yet...
One more...
Last edited:
Thanks 😉...
Not sure about this tweak though:

I think it's a bit too large to go there. Don't worry, they're very light plastic 3D prints and stuck on with butyl rope, they come off easy 😀.
I wanted a small logo on the amplifier tag plate and came up with this:

I'll probably remove them again from the arrays. I also have a (black) metal set of the same size. Just trying out the commercial materials on Shapeways online 3D printing service. That amplifier tag is 3D printed as well, full metal print(*) with rhodium plating, usually used to create jewellery. It's not cheap but it was worth it to me.
(*) = the print is actually a wax print, captured in plaster, wax is molten and poured out again and the metal is casted into the plaster mould. Next it will be polished and plated, first a tin-rhodium coating and next the final rhodium plating.
Not sure about this tweak though:
I think it's a bit too large to go there. Don't worry, they're very light plastic 3D prints and stuck on with butyl rope, they come off easy 😀.
I wanted a small logo on the amplifier tag plate and came up with this:
I'll probably remove them again from the arrays. I also have a (black) metal set of the same size. Just trying out the commercial materials on Shapeways online 3D printing service. That amplifier tag is 3D printed as well, full metal print(*) with rhodium plating, usually used to create jewellery. It's not cheap but it was worth it to me.
(*) = the print is actually a wax print, captured in plaster, wax is molten and poured out again and the metal is casted into the plaster mould. Next it will be polished and plated, first a tin-rhodium coating and next the final rhodium plating.
Amp styling looks really beautiful 🙂 about the speaker styling say maybe you right overall its a bit too large, in my eyes and taste it looks could be saved if sprayed matte dark brown, same brown color as for milled coffee beans and the matte look is also important.
As its removable, and not that expensive I 'might' print it in my original planned size.
I had a discussion about the logo size and let that influence me. I should have followed my gut instinct and should have gone with the smaller size.
The metal version I have is a matt black/grey and would also work better I think. That one needed to be bigger though due to printing restrictions.
For now I'll let it rest... I'm quite pleased with how the amp turned out.
The amp looks absolutely stunning. I envy you your talent of taking the right decisions to make amp design just right and look like a million. Nice work!
(*) = the print is actually a wax print, captured in plaster, wax is molten and poured out again and the metal is casted into the plaster mould.
So, it's actually a lost-wax-cast, the same process Rolls Royces Flying Emilies are made. Perfectly fitting

The amp looks absolutely stunning. I envy you your talent of taking the right decisions to make amp design just right and look like a million. Nice work!
Thanks koldby,
I wanted to make it look like what's inside 🙂.
Nice work with the amp wesayso. 🙂
What did you use to get the aluminum black?
Rattle can automotive spray paint, 3 thin coats of satin black. As it had a nice brushed finish which was anodised, I wanted to keep that look.
From a thread about Fuchs wheels finishes I remembered reading the advice from Harvey Weidman, a wheel refinish specialist, about anodised finishes and spray paint. Only light (wet) sanding as preparation in the same direction as the brushed finish.
The harder part was sanding back the anodised layer from the handle bars leaving deep scratches.
A lot of sanding needed with finer grit each step to get it ready again for polishing. An electric drill helped to speed it up though.
So, it's actually a lost-wax-cast, the same process Rolls Royces Flying Emilies are made. Perfectly fitting
🙂
- Home
- Loudspeakers
- Full Range
- The making of: The Two Towers (a 25 driver Full Range line array)