I think the expanding foam would substantially damp the sheet metal resonance, no?
You're making some from sheetmetal? Or you mean for an original Altec horn?
I would think it would damp it, though how well is hard to guess.
You could go to a big box store and get a few small pieces of ~16 or 18g mild steel, and a few different types of the foam products. Cut the steel into a few pieces, make a little jig and fill a few pairs of sheet metal pieces with the different types of foam. Then, punch them with your fist and see which one rings...
")
or, tap it with something that's not attached to your person....
Cheers,
Gable
Wow, you have big doors in Scotland!
I wonder just how much bandwidth a multi-cell can cover? The cells on the Altec 300Hz horns are 8x8". Don't think you'd want to go much larger per cell. And how deep would you go? 6 feet, 2 meters, more?
FWIW there is a pair of 24 cell horns on eBay right now. The cells there are 6" on a side, and they look conical to me.
vintage Western Electric 24 cell Tar Filled horn for westrex-altec-rca very rare | eBay
I do wonder about the bandwidth myself - make em big, no harm in trying, eh? As for number of cells ........ if I was covering a 6.5” driver .......... could be quite a lot. Could be a circular, square, oval or panoramic array, but I would make em deep. Gotta get it through a doorway and to the flatbed of my pickup truck. Might as well make it all up as I go along. Don’t even know the specs on the Paradigm driver, although Hornresp is my best friend.
Had a look at those horns on eBay - a lot of money for some tarry wood (I jest) but the pictures are invaluable. The throats on the cells are very small, and the cell walls from the back look exponential, not conical to me. Looks like the back end acts as a compression chamber - I thought it would be so in theory, and maybe I’m right.
Yep, I’m getting more and more sold on building a multicellular horn, as the whole idea is really quite outrageous when you think about it. They are supposed to be difficult to build ...... nah, I reckon no more difficult than anything else. Yeh, I know they are supposed to be for even dispersion of higher frequencies, but I’m fixated on making a full range single point stereo multicellular entity
ToS
Paper, plywood or Masonite would certainly have an advantage over metal there.
I'm hoping the plywood works well, with the cld material, so I don't have to fill the voids with anything.
We'll see!
I am wondering about using expanding foam and hoping to reap the damping benefits without the weight.
What do you guys think?
If it were me, I would use brown rice - light weight, pours well, absorbs sound.
But then again, I do wonder if the damping of say tar, is really all that necessary in a small room listening environment. It must be possible to build a multicellular horn without it ringing.
Advice from someone who knows jack squat!
I too have experience working with papier mache...in elementary school
Some ideas: yes, if you use starch or other food ingredient, vermin bugs and miscellaneous biting things are a risk.
You don't want to wake up one morning and find roaches munching on the remnants of the horn you spent dozens of hours working on, for crissake
Rather than use something toxic to begin with (wallpaper paste), could you not spray the finished (dried) parts with insecticide?
Finally, I've found that applying a popular solvent to myself improves my attitude during construction, but not necessarily the quality of the finished good.
Do you seal the finished papier mache item? Epifanes marine varnish or similar?
I too have experience working with papier mache...in elementary school
Some ideas: yes, if you use starch or other food ingredient, vermin bugs and miscellaneous biting things are a risk.
You don't want to wake up one morning and find roaches munching on the remnants of the horn you spent dozens of hours working on, for crissake
Rather than use something toxic to begin with (wallpaper paste), could you not spray the finished (dried) parts with insecticide?
Finally, I've found that applying a popular solvent to myself
improves my attitude during construction, but not necessarily the quality of the finished good.Do you seal the finished papier mache item? Epifanes marine varnish or similar?
Last edited:
Some ideas: yes, if you use starch or other food ingredient, vermin bugs and miscellaneous biting things are a risk.
You don't want to wake up one morning and find roaches munching on the remnants of the horn you spent dozens of hours working on, for crissake
Rather than use something toxic to begin with (wallpaper paste), could you not spray the finished (dried) parts with insecticide?
There is no need to ever use either fungicides or insecticides when working with starch based glues and paper mâché for speaker building.
My own paper mâché horn speaker is set up problem free in a barn hayloft infested with mice, woodworm, mould and damp.
When a paper mâché construction project is complete, you can then use boiled linseed oil and beeswax to seal it. The procedures involved, although simple enough, do take time and have to be done properly in order to work. And work, they certainly do.
Mind you, yesterday I stood the speaker upright pointing at the roof and wrapped it in a tarpaulin along with a 500gm bag of silica gel suspended inside the mouth. The winter damp and humidity here becomes so great, that the structure begins to swell and there is a real danger of the beastie sagging under its own weight.
By spring, everything dries and shrinks back to normal, but for now, it’s headphones
ToS
Ah, there's a smell from my childhood. My father used it to finish the wood carvings he did in the 50s-60s. Still looking great. Had not thought of using that on papier mâché... you can then use boiled linseed oil and beeswax to seal it.

Yep, when it comes to paper mâché construction, boiled linseed oil (BLO) is the ‘special magic sauce’.
Note well:- it has to be organic in origin. Non organic BLO has toxic catalytic accelerants that are not good for humans. Also, and take heed of this, BLO does not dry as such, what it does in fact is it oxidises on contact with the air.
This means two things:-
(1) Rags soaked in BLO need either to be pegged out outside to dry off in the open air - before - disposal. Or to burn the rags immediately after use. This is because the oxidation of BLO in a bunch of screwed up rags in a confined space generates a lot of heat, and is a fire risk. If handled properly BLO is safe as mothers milk.
(2) BLO as a wood/paper mâché finish has very specific properties that need to understood in order to be effective ...... Ask and you all will receive
ToS
I'm keen to try. I do know about the rags and have the same cautions using rags with varnish and turps. I hang them out to dry before disposal.
Curious about the organic BLO. I know that "boiled" oil has heavy metal driers in it, so that one would want to use gloves. Is there another version that dries without the metals?
I do know about the rags and have the same cautions using rags with varnish and turps. I hang them out to dry before disposal.Curious about the organic BLO. I know that "boiled" oil has heavy metal driers in it, so that one would want to use gloves. Is there another version that dries without the metals?
I'm keen to try.
Curious about the organic BLO. I know that "boiled" oil has heavy metal driers in it, so that one would want to use gloves. Is there another version that dries without the metals?
Yes, the ‘organic’ version, which is top quality linseed oil that has been boiled, then graded. It oxidises slightly slower than the non-organic version, but being ‘organic’ will cost a bit more - otherwise as a finish it is cheap as chips.
Also, and take note here:- when diluting organic boiled linseed oil (O-BLO) use organic oil of turpentine (OOT). Do not use what is known as ‘mineral spirit’ or ‘white spirit’ or ‘turps substitute’ - they are all one and the same thing, so let’s call it ‘mineral spirit’. OOT is what oil painters use, and is a lot less heavy on the lungs than mineral spirit, and it smells a lot nicer too. OOT is a heavier distillate than mineral spirit, and takes longer to evaporate or wick off. This, when working with O-BLO and building paper mâché horn speakers is a very desirable property.
More about this later.
ToS
Yes, O-BLO and beeswax are soluble in OOT ....... it depends on how you want to apply it to a surface as either an all in one finish (thick) or in multiple coats (thin) ...... and as you can imagine, there are many different formulas out there catering for as many different applications. It all depends upon what you want to do.
Remember O-BLO does not dry, it oxidises and forms a hard skin. So when O-BLO is wiped on and left to soak in for awhile, the excess is wiped off - otherwise it never quite dries properly and leaves a sticky mess.
When O-BLO is diluted with OOT it will, depending on the wooden surface material, penetrate deeper. Now, with most woods about 0.25mm is about as deep as it goes. But with paper mâché construction, which is porous, the penetration can be as much as 2mm. The more dilute the O-BLO, the deeper it penetrates, and after it dries out through wicking off of the OOT, it actually becomes structural in nature. After wiping off the surface excess, place the workpiece in a room corner and put an oscillating fan on it so that the air penetrates the surface.
The secret is to make 5 coats, starting with 3:1 OOT to O-BLO then 2:1 then 1:1 then 1:2 with a final coat of pure O-BLO with between 3 to 7 days drying time between each coat. Yes, it takes time, but the O-BLO has a dramatically positive affect on the acoustic properties of the paper mâché, and also strengthens and waterproofs the structure. There is a lot of close up and personal elbow grease when using O-BLO, but the results (and the beautiful finish) are well worth it.
Two top coats of organic beeswax dissolved in OOT and you will never get problems with bugs or mould, and if the structure gets scuffed, a quick wipe of wax and it all blends in without trace.
This is why starch based glues are best. Unlike plastic glues, they are permeable to O-BLO, OOT and beeswax, and most importantly, they are flexible and do not crack or delaminate.
Good luck ToS
ToS
Remember O-BLO does not dry, it oxidises and forms a hard skin. So when O-BLO is wiped on and left to soak in for awhile, the excess is wiped off - otherwise it never quite dries properly and leaves a sticky mess.
When O-BLO is diluted with OOT it will, depending on the wooden surface material, penetrate deeper. Now, with most woods about 0.25mm is about as deep as it goes. But with paper mâché construction, which is porous, the penetration can be as much as 2mm. The more dilute the O-BLO, the deeper it penetrates, and after it dries out through wicking off of the OOT, it actually becomes structural in nature. After wiping off the surface excess, place the workpiece in a room corner and put an oscillating fan on it so that the air penetrates the surface.
The secret is to make 5 coats, starting with 3:1 OOT to O-BLO then 2:1 then 1:1 then 1:2 with a final coat of pure O-BLO with between 3 to 7 days drying time between each coat. Yes, it takes time, but the O-BLO has a dramatically positive affect on the acoustic properties of the paper mâché, and also strengthens and waterproofs the structure. There is a lot of close up and personal elbow grease when using O-BLO, but the results (and the beautiful finish) are well worth it.
Two top coats of organic beeswax dissolved in OOT and you will never get problems with bugs or mould, and if the structure gets scuffed, a quick wipe of wax and it all blends in without trace.
This is why starch based glues are best. Unlike plastic glues, they are permeable to O-BLO, OOT and beeswax, and most importantly, they are flexible and do not crack or delaminate.
Good luck
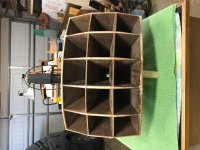
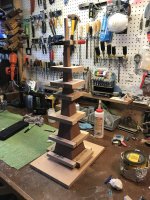
ToSAround November of 2018 I started construction of a set of multi cell horns based in Peter Persson’s original post. I had an aluminum pattern CNC cut, based on Peter’s spread sheet. Due to cost and availability of high quality 3mm ply in my area, I used 4’ x 8” sheets of Masonite to construct the horns
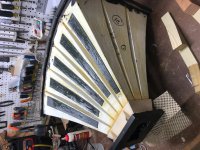
The Masonite purchased is a little thicker than 3mm, so I adjusted the size of the aluminum pattern to keep the assembled ID of the horns as the spread sheet suggested. All pieces were cut out on a band saw, then cut with a 45-degree router bit mated to the pattern. The cell ends were cut to length “batch style” with a chop saw. This took me around 4 months on and off to complete.
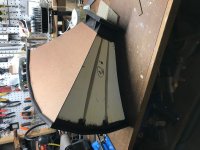
I assembled each horn as seen the original pictures - documentation, with wooded squares, sliding over the jigged cell walls compressing the sides to make each horn. With each cell made I decided to apply paper mache to each horn over the lengths, leaving the very ends un-papered. My reasoning is the same as discussed in previous posts, damping the horns and to make the 45-degree horn sides stronger. I applied Roughly 6 layers of 24 lb/ream paper to each horn cell.
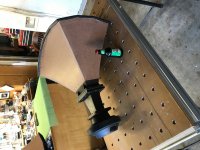
Cells were assembled as suggested, then the cell large ends were filled in with hard wood, each had to be hand shaped and fitted, as they do not flange up as you would think. I started thinking of additional vibration dampening and decided to enclose the horns with Masonite and fill the internals with a sand and granular rubber I used from other speaker projects.
I made the horn Driver adapter in the same manner as the horn cells and fill the inside of the adapter with Durhams Wood Putty – Worked great, as per Peters instructions.
I am driving the horns with a set of used JBL 2446H drivers, I have measured and listened to these horns cobbled to my home set up and have been blown away. The original Maxell tape “blown away” has nothing on the speakers. The dynamics are fantastic, and the sound is LIVE. I am extremely impressed with the sound, coming from conventional cone-based line array systems. I am still early with integration as I only have had the horn up and running for a month or so, so very early in my journey…….
The one issue I am having now are the JBL drivers, my ear thinks they sound great, but I am seeing measurement issues. I post some information a week ago concerning possible diaphragm ringing, and a +5 dB frequency rise at 1300Hz on the multi way forum at:
JBL 2446H Measurement interp
I anyone has input to my questions Please respond. Most likely I will purchase a new set of diaphragms and remeasure the drivers alone and with the horn attached
Tom in Lafayette
The Masonite purchased is a little thicker than 3mm, so I adjusted the size of the aluminum pattern to keep the assembled ID of the horns as the spread sheet suggested. All pieces were cut out on a band saw, then cut with a 45-degree router bit mated to the pattern. The cell ends were cut to length “batch style” with a chop saw. This took me around 4 months on and off to complete.
I assembled each horn as seen the original pictures - documentation, with wooded squares, sliding over the jigged cell walls compressing the sides to make each horn. With each cell made I decided to apply paper mache to each horn over the lengths, leaving the very ends un-papered. My reasoning is the same as discussed in previous posts, damping the horns and to make the 45-degree horn sides stronger. I applied Roughly 6 layers of 24 lb/ream paper to each horn cell.
Cells were assembled as suggested, then the cell large ends were filled in with hard wood, each had to be hand shaped and fitted, as they do not flange up as you would think. I started thinking of additional vibration dampening and decided to enclose the horns with Masonite and fill the internals with a sand and granular rubber I used from other speaker projects.
I made the horn Driver adapter in the same manner as the horn cells and fill the inside of the adapter with Durhams Wood Putty – Worked great, as per Peters instructions.
I am driving the horns with a set of used JBL 2446H drivers, I have measured and listened to these horns cobbled to my home set up and have been blown away. The original Maxell tape “blown away” has nothing on the speakers. The dynamics are fantastic, and the sound is LIVE. I am extremely impressed with the sound, coming from conventional cone-based line array systems. I am still early with integration as I only have had the horn up and running for a month or so, so very early in my journey…….
The one issue I am having now are the JBL drivers, my ear thinks they sound great, but I am seeing measurement issues. I post some information a week ago concerning possible diaphragm ringing, and a +5 dB frequency rise at 1300Hz on the multi way forum at:
JBL 2446H Measurement interp
I anyone has input to my questions Please respond. Most likely I will purchase a new set of diaphragms and remeasure the drivers alone and with the horn attached
Tom in Lafayette
Attachments
Awesome work Tom, I'm building some in the exact same manner. I'm using ~3mm plywood instead of hardboard/masonite. I've thought about applying some paper mache, maybe with heavy parchment.
I like your idea of the 'skin' of masonite, then filling the space with some damping material. I'm planning to try some CLD material, the stuff that's used on car doors, etc. I've used it with great success on speaker boxes. I suspect it should work well, but won't look so great if I don't cover it with something. The approach you took with the skin would be a great way to cover it, one could even veneer the skin with fancy veneers, if so inclined.
I like your idea of the 'skin' of masonite, then filling the space with some damping material. I'm planning to try some CLD material, the stuff that's used on car doors, etc. I've used it with great success on speaker boxes. I suspect it should work well, but won't look so great if I don't cover it with something. The approach you took with the skin would be a great way to cover it, one could even veneer the skin with fancy veneers, if so inclined.
Awesome build Tom! However I see nothing that would upset me in your measurements. What do you see that disturbs you? Most of the graphs show a long window, we see the DUT (device under test) plus whatever happens after that (in a room or wherever the measurement was made). Even for such a long time window it does look pretty good.
Even the IR looks normal to me (though it is inversed) and I don't think the FR curve looks bad either. What makes you think something is off?
Even the IR looks normal to me (though it is inversed) and I don't think the FR curve looks bad either. What makes you think something is off?
Last edited:
- Home
- Loudspeakers
- Multi-Way
- The construction of a multicell horn