Petter, I hope your still reading this, would it be alright to upload the original spread sheet to this thread? That way everyone interested could just download it.
Perhaps Pano could attach it to the first post?
I still hope more people come forward with their own results... maybe one day I'll find the time to do my own version of it. However I'm in no hurry and have way too much fun with my own speakers.
Perhaps Pano could attach it to the first post?
I still hope more people come forward with their own results... maybe one day I'll find the time to do my own version of it. However I'm in no hurry and have way too much fun with my own speakers.
Thanks ")
Sure, that would be great. I think I have sent it like 50-100 times but nobody did the actual build to my knowledge. Life the got in the way.
The horn itself is a simple exponential horn only divided into sections. However, it has a very uncolored sound if used properly. I crossed mina at 500-550 and 3000 Hz. Above, fingring (cell beaming) will occur. The horn is likeky good down to 300-350 Hz if used with a true midrange driver. Since I only used passive filters, it was was easier to match the natural midbass roll off with the multicell filter than to make a 24 dB midbass filter lower in frequency.

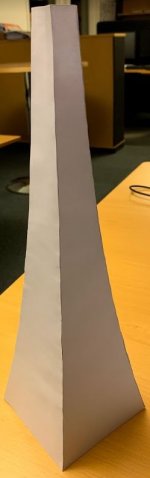
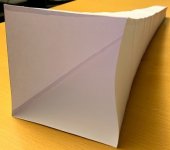
Since there is so much polyester inside, I wonder if a multicell horn like this could be made from hard paper and some paper tape. In my youth, I made quite a few paper models and I think as a base it could work. I would glue the cells with paper tape, then spray with transparent lacquer (or paint by expoxy paint) to get some strenght and make the adapter with a 3D printer. The paper is thin so it might be necessary to laminate the front part. I will try to make two smaller cells as a proof of concept. It that will work, I will share the results and maybe make it into a full horn. These just look awesome and hopefully will sound awesome as well with my JBL2445 drivers.
So I think paper could work for the construction. The pictures show 35 cm long cell made out of standard office paper with glue stick. It is far from perfect, but it lead me to an idea. For a 50 cm horn, a 3D printed inside mold could be done in 3 pieces (or maybe in 2 on a larger printer). The sides would be cut out of thicker paper, taped to the top and bottom of the mold - and then glued together from outside with paper tape or maybe by strips of paper with PVA glue. After the glue dries, still on the mold, the paper would be painted or sprayed with lacquer to gain some strength. Then it could be taken off the mold, add another layer of lacquer, it should not warp anymore. The rest would be the same as with the plywood.
By the way, I used hornresp export defining the throat and mouth area of a single cell with the selected cut off frequency and it did work quite well.
So now I will try to design the mold with proper dimensions (for a 183 Hz flare / 500 Hz crossover), since I have JBL2445 drivers to use. The driver attachment would be also 3D printed.
Attachments
Last edited:
I do not think I could fit my fingers inside, but laminating on the outside sounds good, that I will also try. If I succeed with creating the mold, the rest should be pretty straightforward.
Yes, a mold is a good way of doing it. For the work I do I use long handled brushes. You can feed pieces of paper inside a former and stretch them along the sides using the brushes to push wetted paper into the corners. Takes a bit of dexterity, but practice makes perfect. As the paper dries, it shrinks to a snug fit - very satisfying.
While creating the mold - I wonder if it made sense to 3D print the whole thing - cell by cell, each in two parts. With some 3D modelling skills I do not have, a thin wall LEGO-like construction could be made, which would be filled by polyester resin (or maybe polyurethane foam?) after glued together. It would contain all the extra parts to insert between the cells in the front and maybe also some construction between the cells
While creating the mold - I wonder if it made sense to 3D print the whole thing - cell by cell, each in two parts. With some 3D modelling skills I do not have, a thin wall LEGO-like construction could be made, which would be filled by polyester resin (or maybe polyurethane foam?) after glued together. It would contain all the extra parts to insert between the cells in the front and maybe also some construction between the cells
That sounds like quite a lot of work, and might be a bit difficult injecting resins or foams into the cell walls. But I can see why you are keen to try it.
Thinking about it, you could make a cell mold from plywood, sand smooth to shape, and then coat it in epoxy resin. This could then be sanded and polished to a very high finish. Vaseline could then be used on the surface as a mold releasing agent. You could use something like brown paper gummed tape, and wrap the mold from throat to mouth using small pieces in an overlapping spiral - a bit like an Egyptian mummy. When dry, the Vaseline would help the paper cell pop off the mold without too much bother. Maybe use sawdust to fill the gaps between cells - effective and cheap.
John Inlow goes into this technique in great detail on his website.
Making paper cell horns seems like a good idea - I've been thinking about it for a couple of years. You could call it the Vespa.
I've made single cell horns from extra heavy Arches watercolor paper and was quite happy with them. With this technique the small end of each cell could be "as thin as paper." It might take some experimenting to figure out what stiffener or filler to use. Wax with sand maybe, if if didn't crush the cells.
I've made single cell horns from extra heavy Arches watercolor paper and was quite happy with them. With this technique the small end of each cell could be "as thin as paper." It might take some experimenting to figure out what stiffener or filler to use. Wax with sand maybe, if if didn't crush the cells.
I've always thought that laying up papier-mâché with Japanese washi would make for a very cool horn. Good looking but also very strong with all those long fibers.
John Inlow has been at it with paper mache for years now. How to on his website.
John Inlow has been at it with paper mache for years now. How to on his website.
I've always thought that laying up papier-mâché with Japanese washi would make for a very cool horn. Good looking but also very strong with all those long fibers.
John Inlow has been at it with paper mache for years now. How to on his website.
Yes, the long fibres really makes washi ideal. Applied as a cross ply you have as you say, tremendous strength plus dimensional stability. My experience has previously shown me that this technique although slow, is completely viable as Pano has stated.
I am right in the middle of a huge, but completely unrelated paper construction project, and when finished I intend to build a new improved hornspeaker out of paper. Yep, paper plywood really rocks.
ToS
When I was a kid, we did some "paper mache" on baloons - with torn newspaper and corn starch. When it dried, it was pretty strong. I guess with some layers of paint, it could be made resistant to humidity as well.
Also, I used to make boat models from polystyrene molds covered with brown paper gummed tape - cut in pieces, let it soak water and place with the glue side up. Some 3 layers were enough. Then, the mold was melted by a solvent. Again, just a few layers of lacquer/paint and the boat was happily floating on water and was literarily indestructible (at least by firecracker torpedoes that was )
In the attachment, there is a two part model of a single cell mold based on post 231 - it requires printing height of 199 mm. It was not printed yet, so no warranty it will work as I imagined
It will be used to hold the thick card sides, that will be glued together by some tape. Maybe the paper tape technique would work also, because the shape looks suitable for that - when I start from the top. Also, it should not stick to the plastic too much even without greasing. The surface of the mold can be filled and sanded if necessary.
On the fully 3D printed idea - I am consulting it with my 3D printer guy - if the "lego" could be printed for a sensible price, it would be only the inner thin walls with some reinforcement ribs on the outer side of the cells. Glued together, they would form the horn - and polyester resing would be filled inbetween the cells - like tar was used for the multicell horns in the past. It would actually not be difficult at all, Peter is using the same with the plywood cells - the plywood would be replaced by PLA or maybe another more suitable 3D printing material.
Also, I used to make boat models from polystyrene molds covered with brown paper gummed tape - cut in pieces, let it soak water and place with the glue side up. Some 3 layers were enough. Then, the mold was melted by a solvent. Again, just a few layers of lacquer/paint and the boat was happily floating on water and was literarily indestructible (at least by firecracker torpedoes that was
)In the attachment, there is a two part model of a single cell mold based on post 231 - it requires printing height of 199 mm. It was not printed yet, so no warranty it will work as I imagined
It will be used to hold the thick card sides, that will be glued together by some tape. Maybe the paper tape technique would work also, because the shape looks suitable for that - when I start from the top. Also, it should not stick to the plastic too much even without greasing. The surface of the mold can be filled and sanded if necessary.
On the fully 3D printed idea - I am consulting it with my 3D printer guy - if the "lego" could be printed for a sensible price, it would be only the inner thin walls with some reinforcement ribs on the outer side of the cells. Glued together, they would form the horn - and polyester resing would be filled inbetween the cells - like tar was used for the multicell horns in the past. It would actually not be difficult at all, Peter is using the same with the plywood cells - the plywood would be replaced by PLA or maybe another more suitable 3D printing material.
Attachments
Funny, I am thinking of making new horns for my Altec 604´s and then I have been thinking about different materials such as wood, plastic, fiberglass but realized that it would be easier with paper especially when I live in an apartment. I have done a bit with papier- macier before so it will be no problem but I follow the thread for more inspiration.
A few years ago, I built a stitch and glue wooden kayak from a kit using okoume mahogany laminated ply, fibreglass cloth, and epoxy resin.
Never again - I spent months wearing a full face respirator, nitrile gloves, eye goggles, dressed in a tyvek bunny suit, and it was just horrible. But I learned a great deal about fabrication techniques, and I was easily able to translate them into working with card, paper and starch glue - non of which are toxic.
If you are savvy and patient with yourself, it is possible by using simple hand tools alone to build really fantastic hornspeakers out of paper that will sound good and easily last for hundreds of years.
I heartily recommend some elementary readings on bookbinding, dressmaking and boatbuilding as a spur to invention.
ToS
Yes, papier-maché can be quite strong with just a few layers. I went overboard and used a 300 lb cotton bond paper with stiffener. Difficult to work with but very strong.
ARCHES(R) Aquarelle / ARCHES(R) Watercolour
Thanks for the idea of the washi paper, the long fibers would be nice.
Of course it we wanted small, very strong strips of paper we could use bank notes. Adjust the cost of your build by choosing different denominations.
Difficult to work with but very strong.ARCHES(R) Aquarelle / ARCHES(R) Watercolour
Thanks for the idea of the washi paper, the long fibers would be nice.
Of course it we wanted small, very strong strips of paper we could use bank notes.
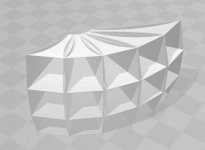
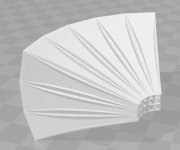
Adjust the cost of your build by choosing different denominations.Dark and cold evenings in Denmark bring crazy ideas I started exploring the thought of 3D printed multicell horn. I made a model in Fusion 360, since the guy with the 3D printer confirmed that 1 mm wall with this shape and size should not be a problem (material/work price is a different thing...).
However, even when building with paper mache, there are some construction issues I will need to fight. I expect some difficulties while designing the throat flange. The difference due to the curvature is around 20 mm if I measured correctly on the model. That can be reduced to about 7 mm by cutting the outter walls of the outter cells. The number of lego pieces is growing
I started exploring the thought of 3D printed multicell horn. I made a model in Fusion 360, since the guy with the 3D printer confirmed that 1 mm wall with this shape and size should not be a problem (material/work price is a different thing...).However, even when building with paper mache, there are some construction issues I will need to fight. I expect some difficulties while designing the throat flange. The difference due to the curvature is around 20 mm if I measured correctly on the model. That can be reduced to about 7 mm by cutting the outter walls of the outter cells. The number of lego pieces is growing
Attachments
Here is something of interest to those who wish to work with paper:-
Paper Horn | Rob Ives
What really inspires me is the technique of interlocking tabs that hold the paper structure together. A lot of mileage there.
ToS
Paper Horn | Rob Ives
What really inspires me is the technique of interlocking tabs that hold the paper structure together. A lot of mileage there.
ToS
- Home
- Loudspeakers
- Multi-Way
- The construction of a multicell horn