What I have traditionally done for the gasket seal on the drivers, which has worked amazingly well for me, is to take a bead of hot glue around the backside of the driver frame and let it dry for a day. Then when you mount the driver it makes a rubber "gasket like" seal that is airtight and also makes the driver easily removable. However, I did buy some of the adhesive backed foam, and I may just go that route.
I just took the spec sheet for the driver, which has a series of measurements on it, and drew a template out on paper and transfered it to the panel. I can "digitize" it later tonight.
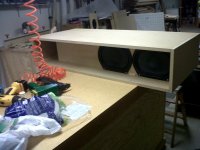
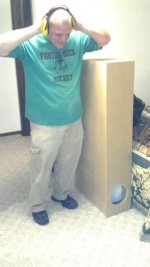
I am planning on getting everything installed tonight except for the two removable panels.
I just took the spec sheet for the driver, which has a series of measurements on it, and drew a template out on paper and transfered it to the panel. I can "digitize" it later tonight.
I am planning on getting everything installed tonight except for the two removable panels.
Hi permo,
I like the hot glue trick, will have to try that. 1 1/2" x 8 5/8" does make for one stout board, doesn't it?
Regards,
It is amazingly stout and I am so glad we went that route with it. I found out last night that the hydro press was set at 6000 PSI to sandwhich the boards together. We actually cut them big, sandwhiched them together and then cut them to length and width so they are perfect. It acts as one large thick board. Actually, after seeing how robust and tight the entire build is, I am thinking that there won't be need for much bracing. Near the drivers and I will put some reflectors in...that might be it.
We are also planning on finishing this with a red oak veneer. the final product should be beautiful! I am contemplating grill options for the port opening. I have two little girls and I can see them putting crayons etc..etc.. in there!
The luxury I have is that my theater room is months away from being completed so I can take my time on this project and make it perfect.
Last edited:
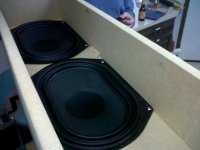
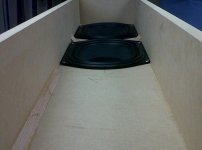
Looking good!! Used dremel circle attachment to cut exact hole for S4, we measured and we are off of perfect square by 1/64 of 1 inch. I would say it is perfection. We have the front and rear panels temporarily in place, deciding what medium to use to seal them and yet make them removable.
Attachments
")
Hi permo,
Looks like you're making good progress.
Regards,
It's all thanks to you and Bjorno. I can say for sure, that I have never been involved in a project that has been so well planned and executed. Do you have any reccomendations for covering the circle opening?
I am just trying to understand more of the functional principle of what I just built!
So the rear wave of the speakers travels back until it hits the S1 area and then is "re-routed" back through the horn until it realigns with the front sound wave and exits at the S4 opening? Tapped horns don't have a blocked path, so to speak, so I am wondering what the difference in design theory is.
I have no doubt the speaker will work great, as I trust the design. I just want to understand why!
Hi permo,
I see the T-TQWT as a member of the family of tapped horns/pipes/tubes/ transmission lines that has been made accessible through the work of Joerg Panzer (AkAbak), David McBean (Hornresp) and Martin L. King (MathCad acoustical spreadsheets). The basic TQWT seems to go back to the Voight pipes (with a more normal horn taper). The initial idea of recirculating the sound from the rear of the diaphragm to the front by means of a tube seems to go back to the Jensen Transflex. Without simulation software the whole thing is almost impossible (I can attest to that from trying to recirculate transmission lines in the mid 1970s.); at the very least you end up with a lot of fire wood.
I find the descriptions in Danley's white paper (and his patents) on tapped horn and synergy horn technologies is a good starting point.
Hopefully bjorno can add some theory and experience here.
Regards,
Hi permo,
The finish depends so much on where and what.... I've used just about everything from latex and acrylic paint to 1/4" plywood (ash looks-and finishes-nice) with edge trim to burlap. You can always round the corners, and paint it black.
Maybe a grill for the opening:
http://www.parts-express.com/pe/showdetl.cfm?Partnumber=260-424
and, some vinyl speaker covering:
Vinyl Speaker Cabinet Covering Black Bronco Yard 54" Wide 260-760
Regards,
i am just updating the folks who helped me so much with this. I have ordered a grill, 1 50 foot rool of the speaker sealing foam (1/8th X 3/8th) and also the primer, paint and poly sealent to finish the project. I should be done in a month...but I will post pics at every step.
The next step is going to be to pre drill, sand and do a dry run of the removable front and rear panels before we shoot it with primer. We are going to prime, wet sand, prime, wet sand, until we are satisfied...then shoot the hammer finish black and finish it with satin varithane poly. It's nice to have a painting/staining room at your disposal!
The next step is going to be to pre drill, sand and do a dry run of the removable front and rear panels before we shoot it with primer. We are going to prime, wet sand, prime, wet sand, until we are satisfied...then shoot the hammer finish black and finish it with satin varithane poly. It's nice to have a painting/staining room at your disposal!
Last edited:
The enclosure was fitted with the removable lids yesterday. Also yesterday we applied the woodfiller, chamfered all of the edges to soften them and sanded the entire enclosure so it will take the primer better.
Tomorow we will move it to the paint room for the first coating of primer.
Tomorow we will move it to the paint room for the first coating of primer.
Hi permo,
Have you run a sound test yet?
Regards,
Yes sir, some very light testing and the sound was good, so I am moving forward with finishing.
Hi permo,
Great. Will you be able to perform some measurements?
Regards,
I did just procure an 11 function audio system test generator, but I have no O-scope, so I am working on that piece of the puzzle.
Hi permo,
Take a look at the Linkwitz Lab site:
System Test
Linkwitz sells some test CDs, and has some good information on building an inexpensive but good recording microphone. You should also have a simple hand-held SPL meter, they are just handy. Lots of information on that subject on the web.
Regards,
Take a look at the Linkwitz Lab site:
System Test
Linkwitz sells some test CDs, and has some good information on building an inexpensive but good recording microphone. You should also have a simple hand-held SPL meter, they are just handy. Lots of information on that subject on the web.
Regards,
- Status
- This old topic is closed. If you want to reopen this topic, contact a moderator using the "Report Post" button.
- Home
- Loudspeakers
- Subwoofers
- Tang Band Tang Band W8Q-1071F 8 X 12 box reccomendation