Any input on the color or lining the cabinets? Thanks!
Scott
Re color - are you planning on grilles at all? If so then the bright copper driver cones will be hidden, and any of the paint colors will work. A lightly napped velour roller ( and some practice on scraps) should give you a nice stippled texture. It probably wouldn't hurt to sand the MDF with 150-200G first for better adhesion.
If not, the contrast of dark grey cabinets and the cones will only highlight them - particularly if / when the center channel enclosure is included.
Re lining the Pensil cabinets with Ultra-touch, that's something I've considered, but haven't gotten around to yet on my own. If nothing else, it should provide some surface friction to reduce changes of loose fill to slip/settle on wider CSA enclosures such as for the 12s.
Chris,
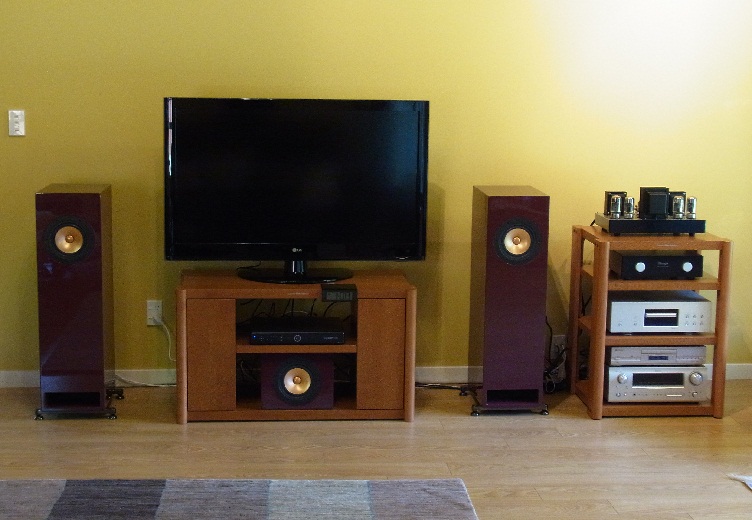
I'm not planning on grills for now and really like a contrasting driver/cabinet combination which is part of why I chose the gold coned 12's
") I may build a grill for the center when I build that (hopefully this weekend!) but we'll have to see. I've never done a grill before.
I may build a grill for the center when I build that (hopefully this weekend!) but we'll have to see. I've never done a grill before. I already have the cabinets done with 220 grit sandpaper and they're ready for prime/painting. Just getting the removable backs perfect and getting the hardware so they can be 100% before painting. I'm using T-Nuts and machined socket head screws for easy on/off and a more professional fit. Don't want to worry about the MDF wearing out from taking these on and off
So you haven't tried the lining either? Maybe I'll just go without it for now and see how I like them with the bracing in and poly evenly distributed. I actually stapled it in place last time to prevent any movement and it worked really well.
Scott
Colour
Interesting you're thinking about grey in combination with the Alpair gold. After much indecision I went for RAL 7035 "lichtgrau" a very light grey quite similar to the background of the forum. I thought about darker greys before, but really liked the contrast light grey/black surround/gold cone, with a darker colour this isn't as pronounced. Unfortunately it's dark here so I can't take any pictures but might get around to it Sunday. just my 2ct
Interesting you're thinking about grey in combination with the Alpair gold. After much indecision I went for RAL 7035 "lichtgrau" a very light grey quite similar to the background of the forum. I thought about darker greys before, but really liked the contrast light grey/black surround/gold cone, with a darker colour this isn't as pronounced. Unfortunately it's dark here so I can't take any pictures but might get around to it Sunday. just my 2ct
Interesting you're thinking about grey in combination with the Alpair gold. After much indecision I went for RAL 7035 "lichtgrau" a very light grey quite similar to the background of the forum. I thought about darker greys before, but really liked the contrast light grey/black surround/gold cone, with a darker colour this isn't as pronounced. Unfortunately it's dark here so I can't take any pictures but might get around to it Sunday. just my 2ct
Yeah we were looking at some of the lighter grays also. I actually found a cool semi-metallic one from Martha Stewart paint (can't remember the color name) and it was very cool. I think the more subdued contrast was what we liked for our situation. I can see how the light gray would look cool too though. If you get a chance I'd love to see a pic!!
Scott
I'm thinking that a rich maroon/burgundy colour would be good. Like a deep red wine.
Like Grahams?
I like those but we'd like to stay with a shade of gray.
Scott
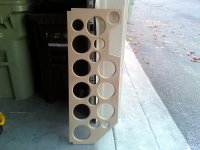
Got the main holy bracing cut and one of them is in and gluing (didn't have enough long clamps to do them both at the same time). They turned out pretty good although I think I may have done too many holes. Oh well
as long as the brace doesn't break before fully installed, I'd say better a "few too many"? holes than not enough
as long as the brace doesn't break before fully installed, I'd say better a "few too many"? holes than not enough
Well they're in and glued and didn't break so I guess we're good
Thanks Chris!Scott
Good work Scott, getting these braces done is quite a task
Thanks Zia! I have the smaller side braces all cut to size, holes cut/rounded and glued in place. They're currently clamped and drying. The bracing really was a lot more work than I thought it was going to be. It wouldn't have been nearly as difficult if I still had a table saw. Oh well; I should be able to start painting this week, finally! LOL!
Scott
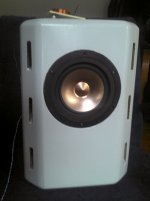
Finally managed to take pictures, sadly it was quite dark outside again so the quality isn't all too good, also due to the fact that these are made with a phone. Hope you get the idea of the colour.
Also these aren't finished yet, only primer and first layer of colour, the final colour will probably be a little darker - I made the mistake of mounting the drivers too early - don't do that.
The coil on top is part of a small bsc circuit, without the gen1 Alpair 10's where a little too edgy in the treble.
Attachments
Finally managed to take pictures, sadly it was quite dark outside again so the quality isn't all too good, also due to the fact that these are made with a phone. Hope you get the idea of the colour.
Also these aren't finished yet, only primer and first layer of colour, the final colour will probably be a little darker - I made the mistake of mounting the drivers too early - don't do that.
The coil on top is part of a small bsc circuit, without the gen1 Alpair 10's where a little too edgy in the treble.
Nice! The finish looks very smooth ... Are you shooting with a gun or with rattle can spray paint?
Zottinger,
Like the white - I am thinking white for my Lotus^2... but still not confident of pulling it off for such a big surface...
Agreed and after seeing that I'm tempted to do my Pensils in white too! LOL! I really like a nice white but I don't have the means to shoot it properly so I have to roll it making the finish much less appealing ... HMM
Actually it's rolled and then slightly sanded with 400 grit. As I said only primer and first layer of finish, should be much better once I convince myself to do the whole painting/sanding/....
The camera is good at hiding imperfections.
It's not really white but a very light grey, got the idea after mounting the drivers in the primed cabinets (white primer). But I didn't want to do these in pure white cause that seemed to close to Apple designs to me. Besides that I'm sure white works well in combination with the gold/copper drivers.
Agreed and after seeing that I'm tempted to do my Pensils in white too! LOL! I really like a nice white but I don't have the means to shoot it properly so I have to roll it making the finish much less appealing ... HMM
Actually rolling works too, you just have to be really patient and sand a lot. Another trick I picked up on a German forum is using a water-based paint and spray the surface with a little water from a water spray bottle for plants. You really have to try this on scraps first to get the distance and amount of water right, but it really helps with a smooth finish.
I know, I thought about it, but since the whole thing is built using hand tools only, I'm afraid I wouldn't be able to get the bevels evenly rounded. I made the bevels using a plane and some guide I cobbled together from scrap wood. The round edges are from sanding the surface even, even with a really sharp plane I wasn't able to avoid some dents when I was too impatient and set the plane to deep.If you're in the white zone, a nice cream/ivory colour would work well.
Also, just thinking, your bevels are a little rounded, why not go all the way and really round them? Could look cool.
That's so off topic - maybe I should start a new thread about this built - something I wanted to do after I finished.
Actually rolling works too, you just have to be really patient and sand a lot. Another trick I picked up on a German forum is using a water-based paint and spray the surface with a little water from a water spray bottle for plants. You really have to try this on scraps first to get the distance and amount of water right, but it really helps with a smooth finish.
Interesting, I may have to try that sometime

- Status
- This old topic is closed. If you want to reopen this topic, contact a moderator using the "Report Post" button.
- Home
- Loudspeakers
- Full Range
- Skeeter's SuperPensil12 Build