so .1uf for interstage texas telfon, less important - 0.015, 0.047 -was going to use MKP1837
For the 47n I can agree with the MKP but for the 15n (governing highs) I would choose SMicas or teflon.
These two 15n and 47n are critical... not less important as you say.
Hi folks-
Still gathering parts for my build. I'll be using either PRP or NOS mil-spec RN65 for most of the resistors except for the RIAA network and the Rload.
I assume RIAA precision is critical. So I tried to source 0.1% resistors. No luck for the values stated in the schematic (R14-43K & 2.7K series; and R3 1M & R4 6.8K in parallel).
So I've come up with other series/parallel combos and was wondering if the arrangements and values are good enough....
For R14- Target resistance= 45.7K
Option 1-
40K Vishay S102 0.01% (I have quantity of these)
in series with-
5K Vishay S102 0.01% (I have quantity of these)
in series with-
(2) 1.4K 0.1% Welwyn RC55Y-1K4BI (in parallel).
Option 2-
26.7K 0.1% IRC RC55LF-D-26K7-B-B
in series with-
19K 0.1% Vishay RN65E1902BB14
Option 3-
18.7K 0.1% IRC RC55LF-D-18K7-B-B
in series with-
27K 0.1% Vishay CMF5527K000BEBF
For R3 & R4, things get a bit more tricky. I came up with some other resistor combinations, below. They are not exactly at the target resistance, but within a few ohms.
R3, R4 target resistance- 6754.07 ohms (6K8 & 1M in parallel).
Option 1-
13.3K 0.1% IRC RC55LF-D-13K3-B-B
in parallel with-
13.7K 0.1% IRC RC55-D-13K7-B-B
Total Resistance- 6748.5 ohms.
Option 2-
562 ohms 0.1% IRC RC55LF-D-562R-B-B
on series with-
6190 ohms 0.1% IRC RC55LF-D-6K19-B-B
Total Resistance- 6752 ohms.
I would appreciate any feedback, even if I'm being too anal about this!
Thank you- Kent
You are not beeing too anal at all.
I would go for 6752 r
if you select resistors for the RIAA to 0.1% then to get the full benefit of this accuracy you also need 0.1% capacitors.
If you can get 1% capacitors then to me it seems a waste to look for resistor any better than 0.5%.
Now back to your 45k7.
you have 40k and 5k to 0.01%.
You need a further 700r to give your target value.
Add in a 680r 1% resistor than has a worst case range of 673r2 to 686r8
You now have 45k6732 as your worst case value. How close to target is that?
~99.94% to ~99.97% You are less than 0.06% low. However you still need to add the 0.01% tolerance of the 45k, giving a worst case of -<0.07%. Where is the problem.? Is your capacitor that gives the turn over frequency going to be that close to target?
Last edited:
For the 47n I can agree with the MKP but for the 15n (governing highs) I would choose SMicas or teflon.
These two 15n and 47n are critical... not less important as you say.
I dont think I like the sound of silver micas, but something to consider.
You are not beeing too anal at all.
I would go for 6752 r
Kent, I would get a qoute from Texas Components on getting the exact resistance you need. They will custom make it for you. They make the S102's I think for Vishay.
There is a TX2352, less costly, and higher resistances, The TX2575, less resistance and higher price.
They leave no sonic signature as afiak.
I have a qoute out for several resistors right now.
if you select resistors for the RIAA to 0.1% then to get the full benefit of this accuracy you also need 0.1% capacitors.
If you can get 1% capacitors then to me it seems a waste to look for resistor any better than 0.5%...................Is your capacitor that gives the turn over frequency going to be that close to target?
Hi Andrew-
I look at it more as looking at eliminating variables.
Thanks for the reality check, though. As you pointed out , using a 680r 1% for my R14 option 1 combo would still add up to a very low tolerance.
The best I can measure for caps at present is 1%. I'm hoping to better that in the future.
Hi Teabag-
Thanks for the resistor tips. I shutter to think what Texas Components charge for that, though! I will look into it.
Cheers- Kent
Hi Andrew-
Hi Teabag-
Thanks for the resistor tips. I shutter to think what Texas Components charge for that, though! I will look into it.
Cheers- Kent
Kent, here is the R14 I will order. It's insane for sure, but the right value
")
TX2575 0.1%
2pcs-46K300 $11.28ea
TX2352 0.1%
2pcs-46K300 $8.60ea
I dont think I like the sound of silver micas, but something to consider.
15nF consider also polysterenes, I prefer over micas for RIAA.
Thinkin' about layout
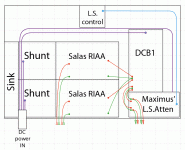
As I've been gathering parts, I thought I should start to do a block layout of the whole RIAA system so I can find a chassis.
Seeing Tea-Bag posting here got me thinking...
To cap-couple to my Lightspeed attenuator (Maximus implementation), I'm going to need some pretty large caps. 2x 5.7uF worth Obbligato's run ~ $60 (1+4.7uF)... getting pricey and will be a major influence in sound.
Well... I do have these DCB1 Hypnotize boards.....!
I could use them in place of the buffers on the Salas, correct?
Attached is a basic block layout. As the DCB1 and LS attenuator were not designed in unison, the signal connections (red and green) look long & a bit messy and could invite ground loops.
I could use the Hypnotize board just as a power supply, and put the DCB1 buffer on the RIAA boards, correct? How do I implement this, just transfer the DCBI buffer circuit to the RIAA?
All AC components will be in a remote chassis. With the RIAA 40v, the LS attenuator 15V and Hypnotize +-10V, thats three supplies I have to remotely route.. Getting a wee bit complex.
Anyway, it's just an idea at this point. Thought I'd post it. I'd love to hear back your comments.
Best- Kent
Attachments
Last edited:
Hi,
connect the returns on the input together using an external two channel interconnect.
Do the same on the output. Connect both returns together externally with an interconnect.
Now examine only the ground lines. Remove the chassis and PCB outlines and remove all the signals.
How many ground loops are now in your grounding scheme?
Now apply a 50Hz hum field to those loops. It will generate a hum current in the loops.
Does that hum current affect the voltages on any of the audio circuits?
Last edited:
Hi,
connect the returns on the input together using an external two channel interconnect.
Do the same on the output. Connect both returns together externally with an interconnect.
Now examine only the ground lines. Remove the chassis and PCB outlines and remove all the signals.
How many ground loops are now in your grounding scheme?
Now apply a 50Hz hum field to those loops. It will generate a hum current in the loops.
Does that hum current affect the voltages on any of the audio circuits?
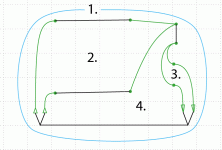
I count 4, correct? See attached. Yes, it would effect the audio circuits. I could eliminate 2 be removing the DCB1, as it's grounds are tied together. Or use 2 bipolar shunts so the grounds are separated.
I can't see how to eliminate the other two...
Nice description on how to visualize ground loops, thanks!
-Kent
Attachments
Last edited:
star grounding gets part way there.
But the separated screens/returns of the interconnects must be very close coupled.
Pity they don't sell figure of 8 screened pairs. The screens in electrical contact from plugs to plugs.
I asked a few weeks ago if stripping the insulation off the screens and coupling the screened cables together would help in overcoming this problem.
No reply.
I guess all Members who saw my request thought I was off my head.
I was serious. It is not sold as far as I know.
Last edited:
Maybe that is a good idea.... A special interconnect with both screens interleaved so we can avoid GND loops outside the cases.
I always found strange why we connect both output GND inside the source and than redo that connection inside the receiving preamp. I always keep the interconnects close to each other to avoid loop areas....
But on the inputs, I do not know why you suggest connecting both GND because the MC carts have independent windings.
I am using now my simplistic RIAA for about one year with very big pleasure.
60dB version, driven by a Denon DL103R, mounted on a Thorens TD160/TP16.
The shunt regulated psu is still not ready and actually very little soldering action from my side (much more MCITP studies...).
But: this weekend, I made a very good trade in.
A Thorens TD126MKII with an SME3009 II S2, detachable headshell. Newly rebuilt from new spare parts.
And a Benz Micro ACE SL, new.
All this in trade for two revised Quad II Monoblocks!
I think, the 60dB version of the phono pre will fit perfectly, isn't it?
Franz
That one is a cart I have experienced with this phono. Goes well for 58dB gain. Should be OK with 60 too. Takes 120-150R to load. If for any reason the output would be much in your system's gain or the tone will thicken perceptibly by 2ndH we can always save off 2dB. Let us know if content when it will be hooked up. Some times they output more than nominal.
Let us know if content when it will be hooked up. Some times they output more than nominal.
O.K. thanks!
I will have the chance to compare both turntables and therefore have some reference.
Greetings to Greece
Franz

I am looking forward for your comparative comments (DL103R <> benz ACE L)
I am sorry, but the comparision will not allow to separate the DL103R and the ACE SL, because they will be mounted on different tonearms and different turntables.
But I will write about my impressions.
Franz
I am using my "new" turntable the first time.
First impression: superb!
Very good bass, perfect presence and detailled. The higher output voltage than the 103R is very welcome with my 60dB version, followed by an F5.
And, surprize for me as a conical needle fan: absolutely no tracking noise, regardless of the Gyger S-shape of the diamond
No direct comparison done yet.
Franz
/Edit
Yes, I have to build a dustcover. And I will use a serious hinge...
First impression: superb!
Very good bass, perfect presence and detailled. The higher output voltage than the 103R is very welcome with my 60dB version, followed by an F5.
And, surprize for me as a conical needle fan: absolutely no tracking noise, regardless of the Gyger S-shape of the diamond
An externally hosted image should be here but it was not working when we last tested it.
No direct comparison done yet.
Franz
/Edit
Yes, I have to build a dustcover. And I will use a serious hinge...
Last edited:
There was the previous non S Ace Red version and then the S version on a friend's turntable and there was a reduction of vinyl surface noise. Seems consistent that they got their needle technology better lately. Its Swiss made, isn't it? Do they OEM the needles? If you feel it did not push the phono for perceivable THD rise, let the 60dB be, its good for driving a low system gain.
- Home
- Source & Line
- Analogue Source
- Simplistic NJFET RIAA